A TECHNIQUE DRIVEN Blog dedicated to mastery of surface design techniques. First we dye, overdye, paint, stitch, resist, tie, fold, silk screen, stamp, thermofax, batik, bejewel, stretch, shrink, sprinkle, Smooch, fuse, slice, dice, AND then we set it on fire using a variety of heat tools.

Friday, February 27, 2015

Painting technique - the finale

Here are some pieces using multiple techniques


Printing using a fish with paint on it


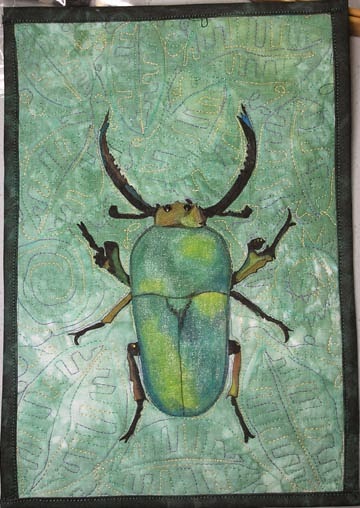
Paint with salt, stamps, stencils, thermofax and painted fusible web.


Painting directly on the cloth


Hand painted cloth


Paint with salt stamps, tape resist


Printing using real leaves as stamps


Stamping - feather and crow


painted fabric, rug pad roller stamp and sponge


Salt on paint, stamps. thermofax, stencil.


Paint, sponge, stamps


Stamps and stencil


Round pouncer, stamps, paint and thermofax, stencil (leaf)


Crumpled paint, drizzled paint, tape resist, stamps


Thursday, February 26, 2015

Painting technique day 17

Crumpling and Sunprinting

This is another oldie but goodie but makes a great first layer. Basically this is just a piece of heavily misted cloth with some paint on it - pretty diluted. I crumpled it into a ball and set it out to dry.


This is a previously crumpled piece.


This is sun printing and the only thing I am going to say about this is that Lynda covered this technique pretty thoroughly on the fire blog during June 2014.


Wednesday, February 25, 2015

Painting techniques day 16

Plastic Wrap and salt

I have used this technique only with paper in the past so this was a real experiment.


I covered it with plastic wrap.


Salt
This technique is nothing new but must be included none the less. This is a piece of heavily misted cloth with brown and black paint. I sprinkled salt on it and let it dry.


 The salt particles attracted the paint leaving small dots.


This is something I usually do for a first layer when making some art cloth.


Tuesday, February 24, 2015

Painting techniques day 15

Thermofax screens

Again I have two tutorial on thermofax screens. One is about what they are and how to use and care for them. The other is how to prepare photos for making a screens.

This is a screen about 10" tall that Lyric made for me from a photo I had taken, thresholded, and sent to her. I LOVE this image. There is nothing like a thermofax to give you fine details.


The screen with the "up" arrow so I don't accidentally print it upside down.


This is a Bondo blade which can be purchased in three sizes from the auto supply store for about $6.00


Make sure you have enough paint to cover the width and distance in ONE pull. Multiple pulls make blurry and thick images.


Wonderful detail.


Refer to the tutorial about the importance of keeping the pores in your screen open by washing thoroghly or soaking in water immediately. Don't forget to heat set.

Monday, February 23, 2015

Painting techniques day 14

Stencils

There are all sorts of stencils: metal, plastic, freezer paper, plain paper, tape and many more. This is a simple stencil that I have been making since this product, Avery Note Tabs, was first introduced. As a matter of fact I have a step by step tutorial on making them here.

I can only find one of the many I made because the bookcase they were adhered to collapsed under the weight of all my books (smile). I know I put them somewhere...

I made another spiral which is one of my favorites.


This is my round pouncer. I have these in three sizes. I bought them at WalMart and I am still using the same few after all these years. 


They leave a nice clear edge and even after washing MANY times, the sticky back keeps sticking.


Don't forget to heat set.

Friday, February 20, 2015

Painting techniques day13

Painting multiples
I actually have no idea what this technique is called but I have seen Sherrill Kahn do it many times. This is Sherrill's latest book and she is in my mind the queen of painting techniques.


I started with 4 pieces of fabric the same size stacked one on top of the other. I painted some stripes in ProFab paint thickly. Then I misted and misted until the entire stack was soaked and covered it with poly film. I pressed with my fingers (maybe not hard enough) and left it covered over night to migrate through all the layers.


Next day I separated the pieces of fabric and laid them out to dry on a sheet of poly film on the floor. The original sheet of poly had lots of paint on it so I took a monoprint.


Monoprint


Second monoprint misted to pick up all the paint (hopefully) - below


Four sheets of fabric starting with the top sheet below


Second


Third


Fourth


Thursday, February 19, 2015

Painting techniques day 12

Painted fusible webbing

This is a really interesting technique which I have used many times. Instead of me showing a step-by-step, I will upload this YouTube Video.


Remember that after you have applied the painted fusible web, you MUST use release paper to iron your piece forever. A hot iron used directly on the painted fusible will melt and smear it.