A TECHNIQUE DRIVEN Blog dedicated to mastery of surface design techniques. First we dye, overdye, paint, stitch, resist, tie, fold, silk screen, stamp, thermofax, batik, bejewel, stretch, shrink, sprinkle, Smooch, fuse, slice, dice, AND then we set it on fire using a variety of heat tools.

Wednesday, August 31, 2016

Background Check - Bonus Post 2 - ?????????????

A few years ago, Wil and I were at an art show in the art district of Minneapolis. While there we saw some amazing art on paper. We talked to the artist and on the way home were wondering…

“What would happen if …. We did that same technique on fabric?????”

Well, there was nothing to do but try it out. And we LOVED the results! We have been working on this technique for a couple of years...testing, tweaking, learning. And now we are ready to share it with you guys! It is a fun and exciting surface design we have not really seen done on fabric before.

In the months of January and February of 2017, Wil and I will be tag team presenting several posts on complex surface designs. During that time, we will be revealing this technique. I’m SOOOO hoping you will be joining us for those two months. There will be some mysteries each week, some prizes and, of course, the presentation of this new technique.

Are you looking forward to it yet??????

Just to give you another boost…here is a piece I did with the background using this technique. If you guess what it is….shhhhhhhhhhhhh. Don’t spoil the surprise for others, OK?


SANDS  OF  TIME
Kelly L Hendrickson

Thanks for joining me in this journey through the varied world of backgrounds! 

SEE  YOU  IN  JANUARY/FEBRUARY!!!

Monday, August 29, 2016

Background Check - Bonus Post 1 - PARTING THOUGHTS

Our time is now almost over.

I hope you have been inspired, excited or just entertained!

Just a couple of other thoughts and examples of some backgrounds that didn't make a whole post.

1) Use untraditional fabric

Here is a small piece I did that has a background of purple velvet. (Good thing I didn't paint on it! YIKES!!)

Deep Purple Sea
Different untraditional background fabrics can give a new interest, texture and depth to a piece. I have often wondered about using burlap sometime.  Hmmmmmmmmm

2) Use parts of fabrics to create parts of a background.

In this piece I was using all batiks. One batik in my stash had an overall pine twig print. Needing pine trees for this background, I took just one twig, cut it out (an art quilt form of fussy cutting?) and the twig became a whole tree.

Sky Gazer
Sky Gazer - detail

A lot of batiks and perhaps other commercial fabrics have bits that can be used for other purposes than their original intention! 

Only one more post and it is one you won't want to miss!!! So be sure to be back here on Wednesday to see the finale and to get a taste of something to come in Jan/Feb on FIRE!!!

Kelly L Hendrickson


Background Check - Week 4 - PHOTO

It seems to me that so many art quilters I meet also love photography. Personally I have a HUGE collection of random photos of all kinds of things. I use them for inspiration mostly. But I wanted to integrate a photo even more into my art as an experiment.

A couple of years ago I was creating pieces in the theme of Earth. I chose to depict 4 amazing natural wonders. One of those was the Giant Sequoias in California. We had taken some trips while in California and I LOVE the way the trees look in a morning mist. THAT is want I wanted to show. The tall giants peacefully standing in the forest, the trees in the distance fading into a mere shadow. In the distance they turn into a more gray scale background. But how to do that was the question...to make them distant and fading yet discernable.

I had previously printed a photo onto silk organza and loved the ethereal effect. If I printed the trees in black and white on the silk organza it just might work!

It took a couple of prints to cover the space I needed. Here is how it turned out. In the close-up you can see the photo on silk organza.


And here is the final piece.

GIANTS  IN  THE  MIST

Because of the misty look I wanted, I printed the photo in black and white. But depending on the photo and what you want to do with it....color could work just as well! Take a stroll through your own photos and you just might see something that will inspire a new piece of art!

Now yes, I know it has been four weeks. BUT...I'm lucky enough to have a long month!!! Be SURE to come back on Monday. There will be a surprise and an announcement!  Then on Wednesday I'll just close off the month with a few miscellaneous thoughts on backgrounds.

Kelly L Hendrickson

Wednesday, August 24, 2016

Background Check - Week 4 - PEEK-A-BOO

This one is a bit different but I like the way it turned out. I have only done these two pieces with this kind of background technique but I hope to do more!

PEEK-A-BOO BACKGROUND

In this technique, the background peeking through can be either the star or just in a supporting role.
The concept is to have a background fabric and put the main pieces on it where only part of it shows through. So it's not really pieced or appliqued....it is just...well...peeking through!

Here is an example of the peek-a-boo being a very supporting character. After a long road trip I had gathered a LOT of various kinds of maps (one of the many things I collect!) and wanted to make a piece about road trips, maps, etc. I used the maps with a wonderunder transfer thingie. (Sorry for the technical language there. LOL)  The maps became a single piece of fabric.


I cut the "map fabric" up and added appropriate fabric for farms, rivers. fields, woods, etc.  I then laid the pieces out like a map on top of a background piece of black Kona. The Kona peeking through becomes the roadways. Not the prettiest part of a road trip but necessary to be able to enjoy the beauty of everything else.

TAKE  THE  BACKROADS


Take the Backroads - detail


Here is another example of a peek-a-boo background that actually becomes the star of the show. I had a favorite monoprint piece of fabric that I wanted to use but just never found the right vehicle. Then I was working with 3-D techniques and found a way to use it!  

Here is that GORGEOUS piece of fabric.


Here is the technique in a nutshell. Put metal in the area that will be the 3-D part, back it, cut it, put it over the background fabric.


BREAKTHROUGH


The concept of this piece is a brick wall of a creative block and the creativity that finally breaks through.

So when you are feeling a bit shy about your backgrounds...just let them peek through a bit! The results can be fun and a bit different.

That's it until Friday!

Kelly L Hendrickson


Monday, August 22, 2016

Background Check - Week 4 - PAINTED

Now this topic can go on forever! So many options and painting techniques. Too many really to cover in one little post. So I'm just going to mention it because painted fabric can be an amazing part of a background OR even as a whole cloth background just painted as is!

Again...no step 1 and step 2. But then your imaginations can go crazy!!!

PAINTED  BACKGROUND

In the "wholecloth" painted background it can either blend in as part of your whole piece or simply provide the appropriate feeling to the real stars of the piece.

Here is an example of a painted wholecloth background that is meant to blend in as a supporting actor in this piece. It started a one of my photographs and it needed a definite all over background.

photo

 Here is how I made the background


RUSTY  LEAVES
See how the painted background gives the depth and sets the stage for the main character?

Here's one where I just needed a bit of definition on a light blue hand-dyed fabric to give depth and clouds to the sky background. I used a Lumiere pearlized white paint.


RIDING  HIGH

This one is an example of a painted wholecloth that is not really but kinda both a background and part of the piece itself (a wall actually - but not only) I chose this painted complex cloth because it was really scattered and random and chaotic feeling...which fit well with the theme of this piece.


LIFE  UPSIDE DOWN
(and slightly off kilter)

One last example. This painted technique is Pounded Fabric. (If you want to learn about this technique of painting fabric, you'll want to tune in for Jan/Feb 2017 at FIRE!!!)

The pounded fabric (painted black Kona) becomes the depth of outer space with painted cheesecloth nebula.

DEEP  SPACE


I hope these examples (with NO STEPS AT ALL!) have inspired perhaps a way you have not considered as a background before!

See you on Wednesday!

Kelly L Hendrickson


Friday, August 19, 2016

Background Check - Week 3 - SERENDIPITY

You all know when it happens....

You dig through a pile of fabric and see the exact piece you need

You iron out a piece of hand dyed fabric and see the inspiration for a new piece

You do a particular technique and it doesn't work out...but it goes a whole new direction

SERENDIPITY

The dictionary defines Serendipity like this:  

luck that takes the form of finding valuable or pleasant things that are not looked for

When it happens it can make your whole day!!

There are, of course, no step 1 and step 2 to this one...just a reminder to keep your eyes and creativity open to seeing these jewels when they breeze by.

Example:
I was entering a competition that required a book or reading theme. I love to read so I had several concepts in mind.  Then....one dyeing day....it happened.  I rinsed, dried and ironed a piece and it had a big white streak in it.  Oh bummer!! Then it hits. Serendipity. And thus "A Dark and Stormy Night" was born.

I used the big white streak in the background sky as a bright lightening ground strike! Additional lightening bolts were added with specialty yarn and stitching with metallic thread. But the whole idea came from a "messed up" dyed fabric!

The beginning

"A Dark and Stormy Night"

Another example

A friend used some freezer paper to mask a circle which she was going to paint. However, with moisture of the paint seeped under the freezer paper mask.  Again....oh bummer!  But from that, "Blue Moon" was born!  The circle looked just like a moon with a cloud beginning to pass over it. A little quilting and the sky and the sea came into being.

Thanks Wil!
"Blue Moon"
Wil Opio Oguta


And another week comes to an end. Have an amazing weekend! Keep open to serendipity in all areas of your life!

Kelly L Hendrickson


Wednesday, August 17, 2016

Background Check - Week 3 - STRIPPING

NO!!!!!!! Not THAT kind......

STRIPPING  BACKGROUND

This background is built out of strips sewn together. These strips can be pieced or raw edge appliqued.

Step 1
Pick out your Fabric Strips!
Or...make them! I've done both

Step 2
Stitch them together
Difficult instructions...I know. This is where you decide what kind of stitching you want to do...

Background is ready!!

Smaller Strips
Here is a piece I did with a stripped background. The topic piece is a gel medium transfer from the original entertainment section in a 1946 New York paper advertising war time movies. The strips are both commercial red and cammo fabrics and my own hand dyed fabrics. This one I piece strips together and then cut them up to use as the background. I also "wrote" with my sewing machine the names of people I know who served and are serving in the military.


IN  HONOR

In Honor - detail

Larger Strips
Sometimes a very simple background is best. But you still want a sense of depth, transition and texture. This time I used a set of hand-dyed blue gradation fabrics, Riiiippped up larger strips (oh the fun of it all!) and placed them diagonally on the batting. Then stitched them down with raw-edge applique. I felt the blues brought just the right amount of "icy cold" to a piece about snowflakes.
The color difference is due to the fact that the final piece is a professional photograph.


NO  TWO  ALIKE
Big strips...little strips...they can all make a very interesting background for your creativity!!

See you Friday!!

Kelly L Hendrickson 


Monday, August 15, 2016

Background Check - Week 3 - ZAPPED

OK....I KNOW there is a more professional name for it perhaps but this is what I call it in MY studio!

ZAPPED  BACKGROUND

Using a commercial synthetic organza to create an interesting background.....AFTER it is zapped with my trusty heat gun!  Not QUITE setting it on FIRE...at least that is not the plan! Although I have
create a few hot messes with it in the early days!

Step 1
Choose the Organza
This bit is for a background in which I need a part of the ocean just before it breaks on the beach. Just as it is slightly kissing the tops of the reef just out from the surf. I also wanted it to have a shimmer to it because it is a bright sunny day at the beach and I wanted the sun sparkle to be there as well as the whitish bits of the beginning surf. So I also chose another synthetic organza of a shimmery blue. For the background of this bit, I picked out a hand dyed very pale bluish-green. So the whitecaps are not stark white.

For zapping you must have a synthetic fabric (in this case organza).Otherwise it won't melt.

"Ocean" organza

The pale green is the backing, then the blue dotted organza in the middle, topped with the "ocean" organza


Step 2
Stitch the Fabrics Together
(this could be an optional step depending on the look you want)

I like to stitch it first as this can help to create the spaces of little or no melting. On this piece I just stitched around the organic shapes in the fabric.

Unfortunately, I was having so much fun, I forgot to take a photo of this stitching step. However, I think from the following photos you can see how I stitched it together.

Step 3
Let the ZAPPING begin!!
NOTE: You really need to do this on a heat resistant surface. Heat guns can get really hot and despite the name of this group...we don't ALWAYS want to set stuff on fire! For this short session and since I had a backing fabric, I just did it on my ironing board.

I start with my heat gun about 8" away from my fabric and slowly bring it closer until it begins to melt. Then I move it over the fabric, closer and farther away as I go, until I get just the right melting
for the effect I'm looking for.

Here is the zapped organza for this piece.


zapped detail


Now you have a very interesting piece with texture and depth. You can use this for a whole background or, like I'm doing with this particular piece, for part of a larger background.

Here is this part of the developing background as it stands today.


So hope your Monday is off to an inspired start! I'll see you here on Wednesday!

Kelly L Hendrickson


Friday, August 12, 2016

Background Check - Week 2 - DROPCLOTH

Hey, it's a summer Friday. Thought we would take and easy background today and then head out to the beach, cabin, road trip, etc.

DROPCLOTH  BACKGROUND

Don't know about you guys but I have many dropcloths...all at different stages of "creation"

Also there are a couple of them which have been retired, having reached their ultimate "look". These have been years and years in the making. Many dye sessions, painting, stamping, just to mention how a few of the many many layers were developed. Difficult to describe just when that is done...you will just know it when you see it. I knew I wanted to save them because they would have a home in an art piece someday!

Recently, an online group I belong to was invited to participate in a show in Taiwan. The theme of the show had to do with some aspects of recycling.  As a hoarder...I mean COLLECTOR!!...I have lots and lots of bits and pieces of all kinds of things safely tucked away until the creative moment arrives and they are called on to lend their unique qualities to a piece of art.  So...recycling??? No problem.

The one thing I KNEW I wanted to do was use one of my treasured dropcloths for the background.
That dropcloth inspired the color choices and sometimes the placement of a lot of my "used" objects.
I didn't want to go too literal and decided on a more abstract piece for this show.

Using a dropcloth background seemed fitting for the theme. And every piece added to the background, from fabric saved from past projects to a thrift store belt, puzzles, washers, plastic grid.....are all used and found and repurposed.

Here is the result...

WASTE  NOT, WANT  NOT

So NEVER throw those dropcloths away! They have an amazing future somewhere down the road!

You guys have an amazing weekend! See you here on Monday!

Kelly L Hendrickson

Wednesday, August 10, 2016

Background Check - Week 2 - RIPPED UP

OK....confession time.....(quilt police - cover your ears!!!) I LOVE RIPPING FABRIC!!

These days I often only use my rotary cutter to cut the batting, facing and sleeve!

As one who prefers free-wheeling, fly by the seat of your pants, moment of inspiration kind of stuff, ripping fabric was a total liberation to me. I love the texture and whimsy it gives to many of my backgrounds.

So put your rulers and rotary cutter aside for just a bit and play with me!!!

RIPPED FABRIC BACKGROUND

Step 1
Gather your fabrics
For example, I have a container of a ton of all shades of blue which I went through to pick out just the right ones. But sometimes I rip a smaller bit off a huge piece at just the right spot for the look I want. No fabric beyond a 6"X6" square is safe in my studio!

Step 2
Rip Away!
Rip off the size of fabric pieces you need to cover the portion of the background you are working on. Squares and rectangles, smaller to larger.

Step 3
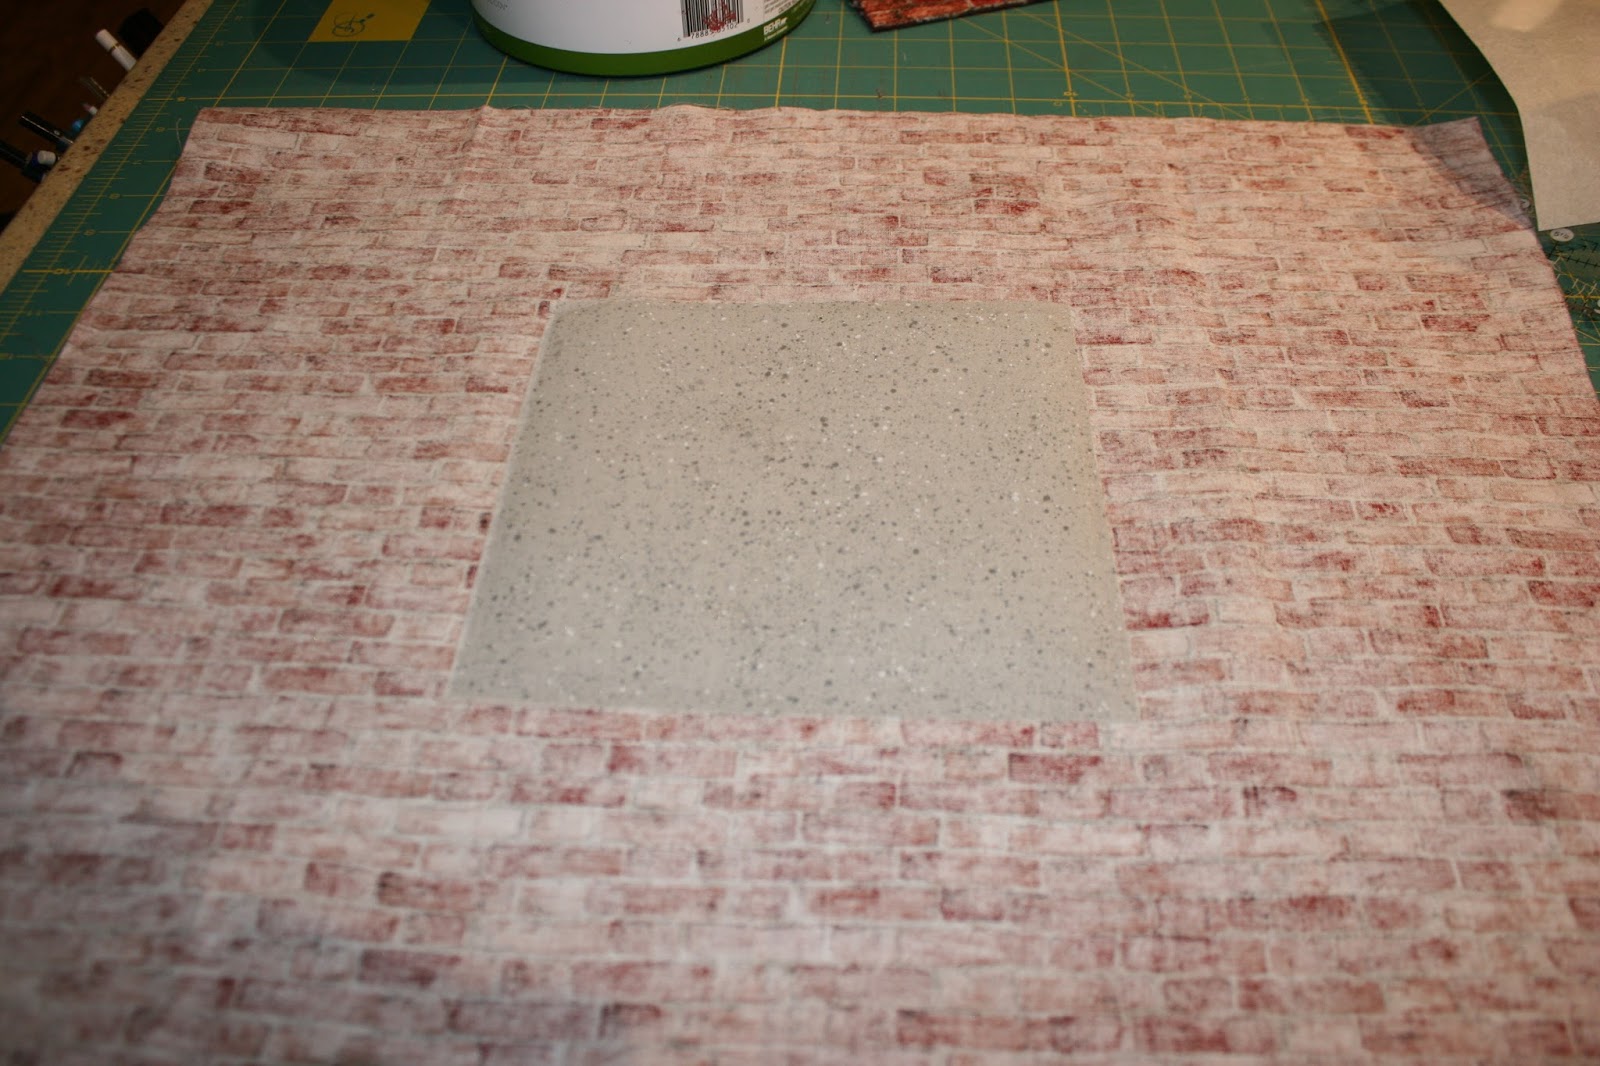
Arrange on the batting
Place the bits of fabric to create the look you want. Be sure to overlap them enough so that when they are sewn down, the batting won't be visible. I like to work directly on the batting (with the backing under it). When I first did this technique I arranged it on a piece of muslin but it just added another layer of fabric and made some parts 4 layers thick! UGH! I audition many pieces in all different places until I find just the look and balance I want.

This is a piece my granddaughter is working on at this time. She chose to use more rectangular strips than I usually use but hey...it's HER quilt! Still, you can get the idea.


Step 4
Make it Stay
I usually work directly onto fusible batting which helps a lot but since they are overlapped more in some places that others, I also use a glue stick when I need to be sure a corner or edge stays in place.
I sometimes pin as well but find that a bit cumbersome. Can't tell you how often I have actually quilted a pin into the quilt itself.  Ouch!!

Step 5
Stitch it down
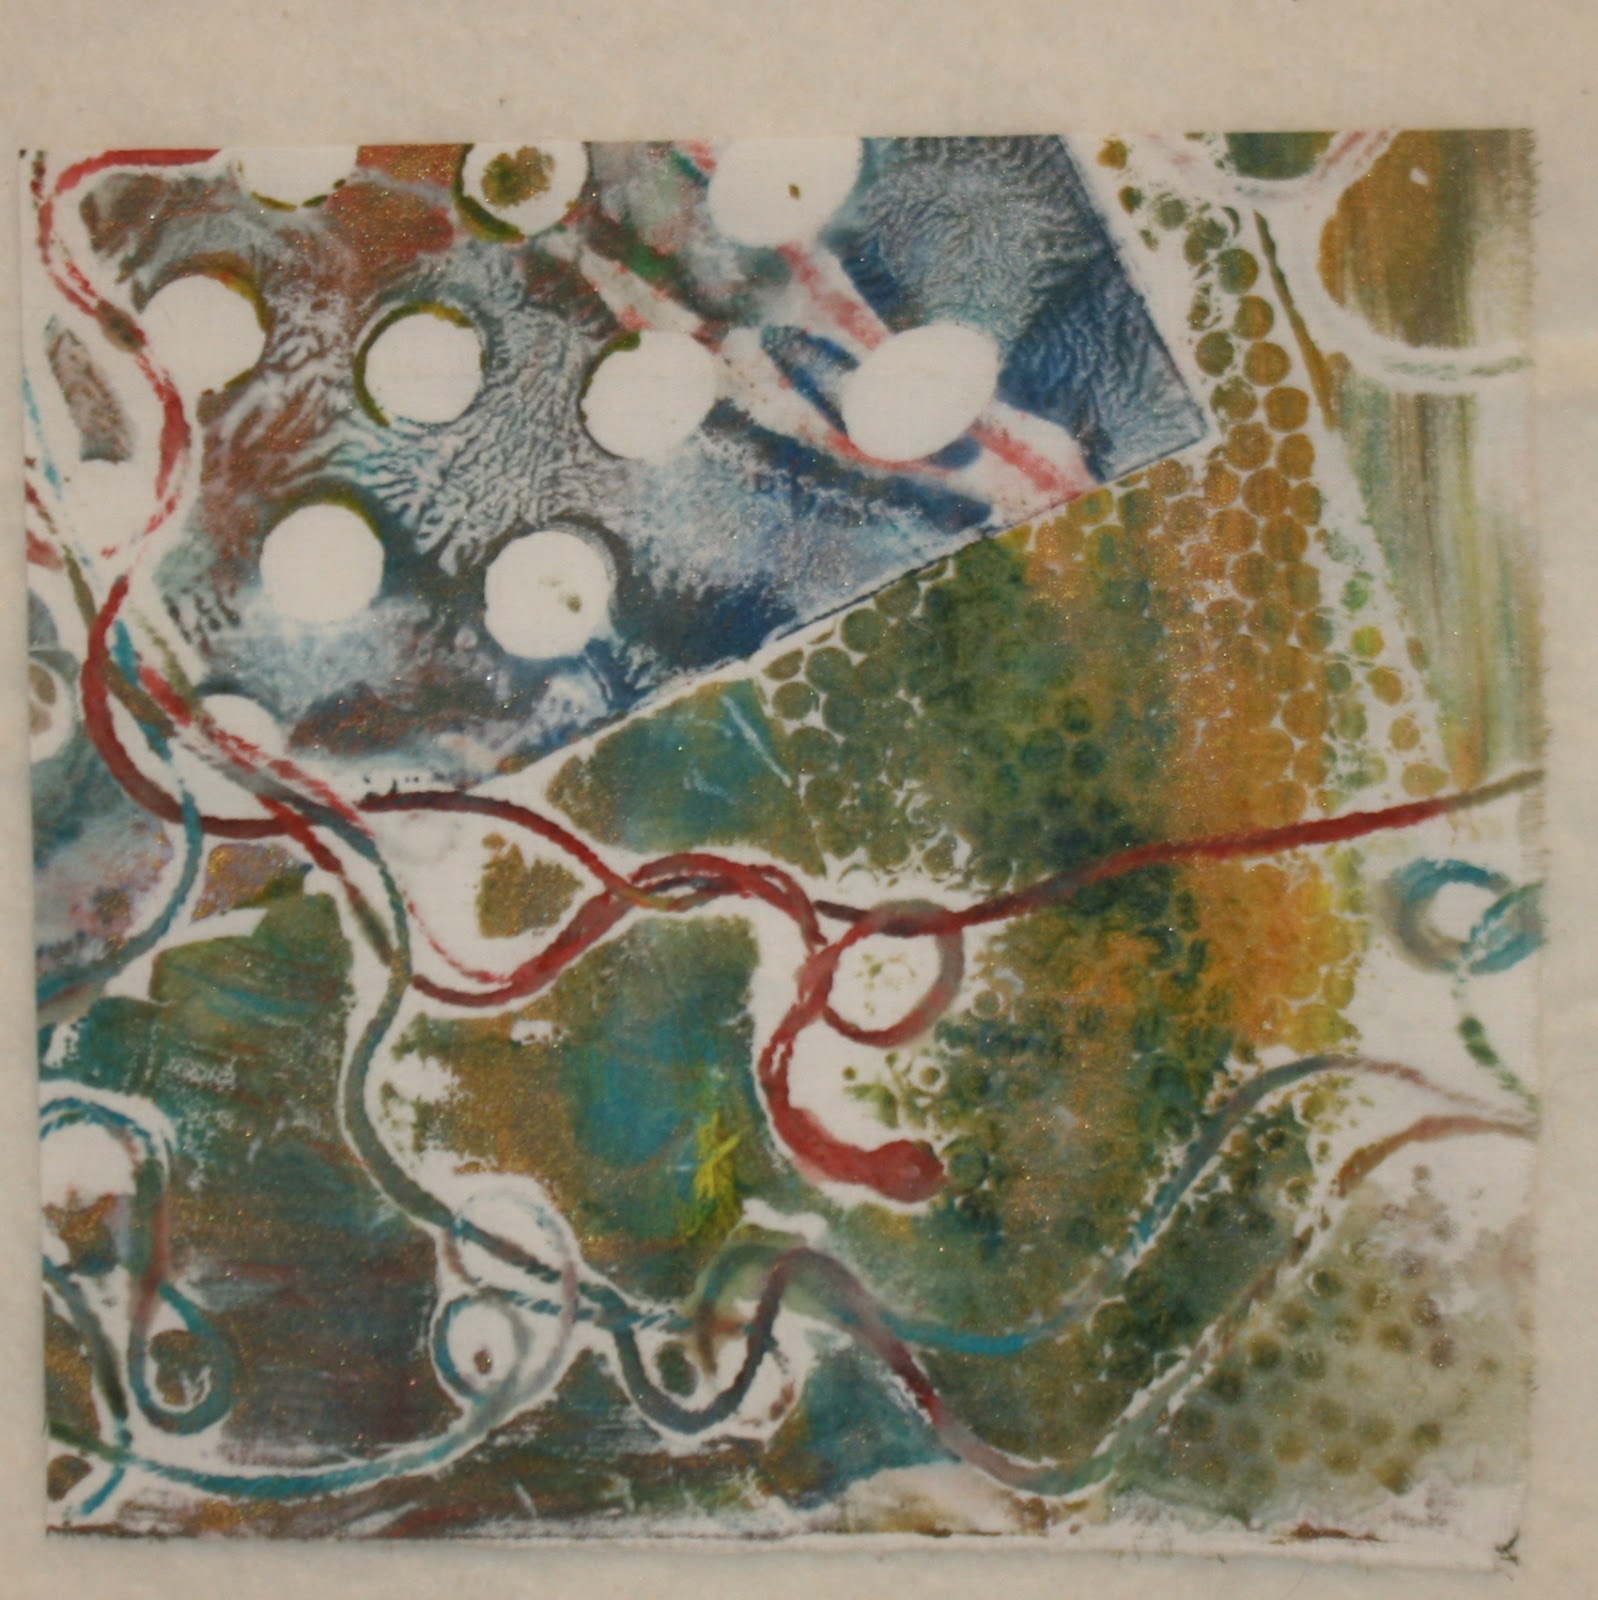
Often I just stitch around the edges of the bits and since they are not usually that large, it is just enough to be exactly what I need.  But in the pieces I just completed recently, I did some different quilting stitching because straight lines up and across just wouldn't do. Here are some examples.

You can see in the examples below, that for each piece I chose a few fabrics that tied in with the main color of the main concept of each quilt. So you can also use this technique to highlight the main color theme of the piece.

Quilting - Horizontal Wavy Lines

Quilting - Diagonal Wavy Lines

Quilting - Horizontal and Vertical Wavy Lines

Quilting - Intersecting Arching Wavy Lines

Bonus!! You can see fish and a seahorse and seaweed fabrics in these pieces as well...further enhancing the theme but still a background piece.

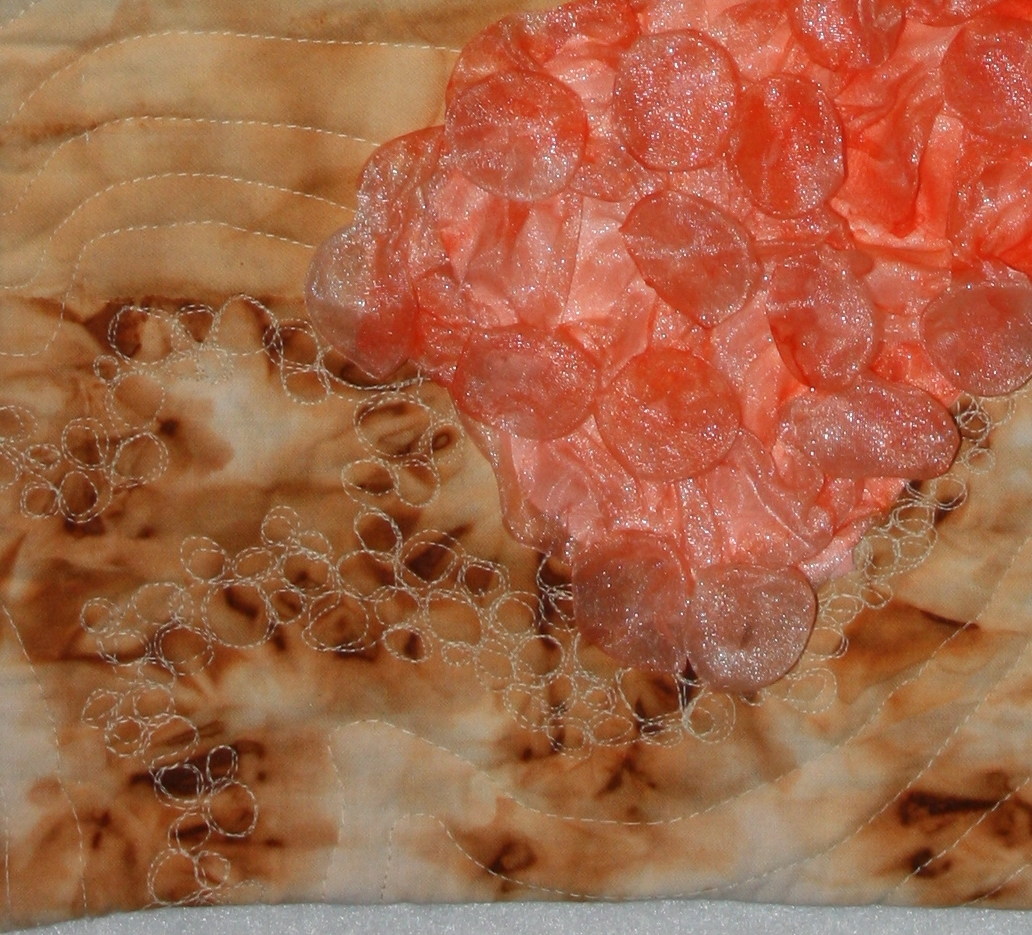
Here is another completed piece where I used this technique in shades of green for the shore/grass.

LIMBO

So ignore the quilt police sometimes and just rip away!!!

See you here again on Friday!

Kelly L Hendrickson

Monday, August 8, 2016

Background Check - Week 2 - RUSTED

A while ago (well since the first time I tried out this technique) I fell in love with rusting! The side of my house before we moved looked like some rusty junk yard! My favorite piece was a baby mattress with all the material ripped off and just the springs left. They rusted so nicely and made such a great pattern.

RUSTED  BACKGROUNDS

I'm not going into detail on the process of rusting because so many of you probably know it. But for those of you who have never heard of this process or how to do it...

Here are the basics

Step 1
Select some fabric
A solid works best (I have always used 100% cotton). But why not try out some commercial fabrics!

Step 2
Select some rusted metal bits
If you don't have any, you can make them yourself in a few days.
Just put the metal bits you choose in a container and cover with vinegar. Trust me...you will WANT
to do this process outside. It does get a little funky smelling and looking by the end of the process.
HINT: Be sure the metal you choose is rustable. Galvanized for example won't work. Also, coated metals don't work unless you use an acid bath on them first from what I understand. After a couple of days check a piece or two to see if it has reach the level of rusting you desire. Rinse all the bits and you are ready to go. It is best also to let them air dry after rinsing.

Step 3
Soak your fabric in vinegar and put it in contact with the rusted bits
I've wrapped folded fabric around a rusty pipe, pushed it down into my baby mattress coils, layered it between rusted grids, wadded it up in the bottom of a rusted can, placed it in a rusted cast iron skillet....you get the idea.

Step 4
Cover it lightly with plastic wrap
Enough so it can get some air (which causes the oxidation) but also so it will help keep the fabric damp. You can also spray it with vinegar if it starts to get dry.

Step 5
Rinse, let air dry and enjoy the results!
When you have the color you want, take the fabric away from the rusted bits and rinse it well in salt water. Let it air dry and you are ready to find a million ways to use it!

Here are a couple of pieces I had on hand from previous rusting sessions.

Baby Mattress Springs


 L- Crumpled in Rusty Skillet, R- no clue!


Any way, hopefully that will inspire you to either get back to rusting or to give it your first try! The results can be amazing!...and very useful in backgrounds.

I also noticed there are a couple of "rusty" posts coming up in the next months! Keep an eye out for those!

Here is rusted fabrics used in backgrounds of 4 pieces I recently completed. First a collage of the 4 pieces then detail photos of the rusted part. It is an underwater series and I used rusted fabrics for the ocean floor on these 4.


Here is another piece done years ago. You might remember half of it from the month I did last year on Art Quilting and Beyond. This is the whole piece before we halved it. You can see the rusted background better.


I totally love when Serendipity happens (more about that later) But this piece has a rusted background with blue down the center. To this day I have no idea how it got there. It happend after it was rusted is all I can tell you. We must have been dyeing with blue on that same day or something.
Anyway, I LOVE the way it turned out. I don't have a photo of the rusted fabric on its own but here it is in the finished piece.

RUST  AND  FOUND

Rust and Found - Detail


One short note for today. Especially if you hand quilt or stitch. The rust on the fabric does make it more difficult to hand stitch through. On a machine, no problem but you can hear a difference when stitiching through the rusted parts.

All for today! See you again on Wednesday!

Kelly L Hendrickson