I have always wanted to try monoprinting on gelatin. But the surface seemed so small and, while I do use paints and acrylic inks, I really wanted to try it with thickened dyes. So last month, in preparation for this month, I started playing around with various thicknesses of thickeners to see what would work best for me. I'm still playing (and I intend to play around with paints later this month), but these are my findings so far.

First, I needed a gelatin surface. I rejected pie plates as too small and the sheet pan I wanted to buy from my local restaurant supply as too large (with the early spring, my "drive-in cooler" is way too warm to chill the gelatin) and settled on an old glass 8.5" by 13" dish. This dish can no longer be used for brownies now that it has found its way into the dye studio, but I really don't need those calories (and in a pinch, I can always purchase ready-made brownies).

I did a little research and discovered that one tablespoon of powdered gelatin to one cup of water is about right for optimum wiggle vs. solid. I filled the glass dish with water to determine the amount needed (8 cups) and poured a little less than half that of cold water into my studio mixing bowl (again, we don't want to mix up the studio stuff with the kitchen stuff). I sprinkled in the 8 tablespoons of gelatin. I mixed it with a whisk and let it soften while I boiled additional water. I then added the boiling water to the 8 cup line and stirred it with the whisk. While the gelatin cooled a bit, I sprayed the glass dish with Pam so that the gelatin would pop out easily.
I poured the gelatin into the glass dish, covered it with plastic wrap and let it refrigerate overnight. I didn't try to skim the bubbles or anything because I planned to use the other side for my prints.
The next morning it was set and and I inverted the dish on top of the plastic wrap so I could use the wrap to put it back into the dish when I was finished for the day. I did find that sometimes I had to help it out of the dish with a plastic fork, but generally it popped out easily -- especially after it had been used once or twice. When it started coming out of the dish in pieces, I just pushed them together and used it anyway, but replaced it soon after that.
 |
| Blobby dyes -- ok, but not what I was after |
I tried various degrees of thickened dyes -- I have a lot of
really thick dye thickener from last month's experiments -- but found that when I added liquid dye concentrate it was globby and made my prints blobby. I kind of liked the effect, but I really wanted to use smooth dyes. I found that mixing the thickener as for dye painting and then mixing the dye powder directly with the thickener worked best.
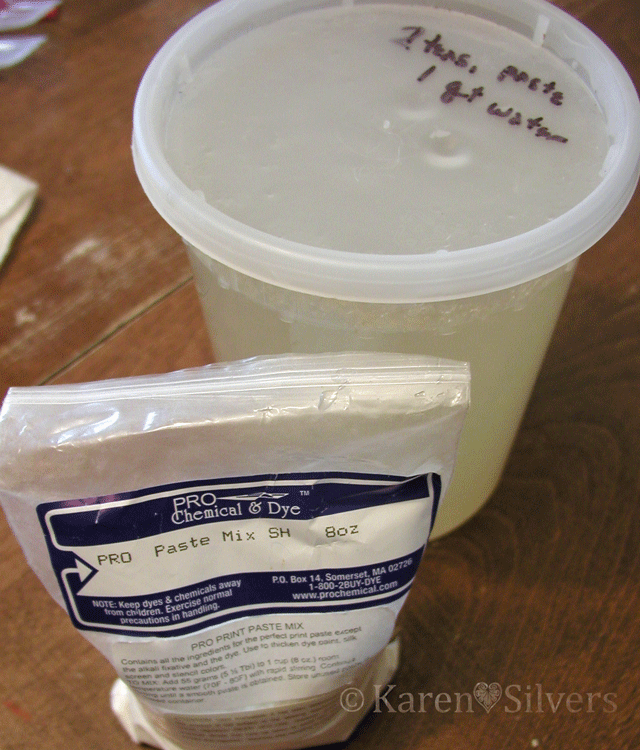
The measurements that I used were as follows: for one quart water, two teaspoons of thickener. Then add to that mixture one tablespoon dye powder for each cup of thickener.
I don't have a blender that I can donate to my studio right now (it's still needed for those pestos and certain summer drinks) so I found that if I sprinkle the thickener powder into the water while whisking, I can get a mostly lump-free liquid. Let it hang out in the fridge over night and it's perfect. Just stir it up before measuring it out for the dye.

After it's been used a bit, the gelatin takes on some nice color, but if it's wiped off, the color doesn't seem to transfer to subsequent prints.
I put the thickened dye in a plastic tray (I use these a lot for paint palettes) and spread it on the gelatin with the hard rubber brayer. It seemed to work the best, the spongy one absorbed the dye and didn't lay the dye down on the gelatin.
I arranged some "stuff" to act as a resist. I discovered that flatter is better for "stuff" because I like crisp edges. The plastic lid stuck up too high and I used a cutout circle of thin cardboard for later prints.
I laid a soda-soaked piece of fabric over and used the spongy brayer to smooth it down. I need to get another hard rubber one because the spongy one absorbed dye and left it in places where I didn't really want it, although it worked well to smooth the fabric over the less-flat "stuff." I soak my fabric in soda and spin the excess out in my washer -- I did use some pieces that were still damp and it didn't seem to matter much.
After peeling the print off, I removed the resist "stuff," put down another piece of fabric and got some lovely negative prints. I laid the prints in a single layer on thin plastic garbage bags that I had cut open; then I folded them up and let them batch overnight.
Some of the negative prints were less interesting and I put them on a pile to "overprint" later. Below are more "finished" prints.
This last one is my favorite. The strings were pretty saturated with dye and left lovely "ghost" marks on this one. Also, I moved the fabric around on the gelatin so that the dye covered the edges.
I plan to do more with this -- I'd like to experiment with warm colors. Also, I want to play around with acrylic paints and inks. But I'm really liking it so far...