A TECHNIQUE DRIVEN Blog dedicated to mastery of surface design techniques. First we dye, overdye, paint, stitch, resist, tie, fold, silk screen, stamp, thermofax, batik, bejewel, stretch, shrink, sprinkle, Smooch, fuse, slice, dice, AND then we set it on fire using a variety of heat tools.

Monday, February 27, 2017

Mystery revealed

It is time to reveal the mystery of Friday:


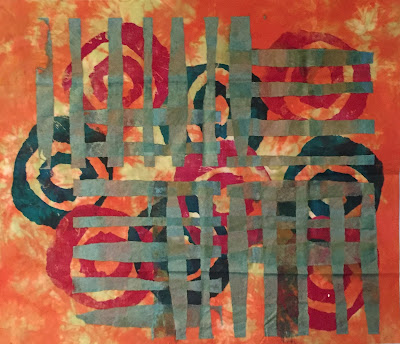
I started with a lwi dyed fabric. Next step was to use torn paper strips and screen print this using green metallic paint. This picture shows you how dominant that layer was - it is now the back of the fabric :-).


The fabric needed another layer and for this I used again torn paper, but this time in circles and screen printed them on the other side of the fabric. The stripes of the first screen print layer are still visible but softer.
I love the ideas you all came up with. Nobody had it correct, so I picked Jody as the winner of this fabric. Please email your snail mail address to: wil@wilopiooguta.com

As this is the last blogpost of the months January/February it is also time to reveal the winner of our ebook Playing with Fire.

Out of all the comments which were given to the mystery techniques I picked a comment of February 4 posted by Sarah. Sarah will you email me at wil@wilopiooguta.com and I will tell you how you can get your copy of the ebook.
For everybody else who wants to buy this ebook. Here is the link: https://gumroad.com/l/iLbHI.

I hope you all had fun these months and are inspired to use some of the techniques Kelly and I showed you.

Wil


Friday, February 24, 2017

Final mystery technique

And here is the final mystery technique for this month.


Please post in the comments how you think I created this fabric. I will reveal the technique in the blogpost for coming Monday. In that blogpost I will also draw the winner of our e-book Playing with Fire.

Wil

Thursday, February 23, 2017

Variety of Techniques - Week 8

And I'm back.....

There had been this idea rattling around in my brain and I wanted to give it a try.  The technique itself is not new. Soy wax resist.  But I wanted to use it in a new way...for me at least. I had this geode looking effect in my head.

I have done soy wax before with stamps and brushing it on but then I just dyed the whole fabric and
it was cool but not as controlled as I've been thinking about.  I have done silk scarves with soy wax resist the same way...mostly with stamps.

Now I wanted to be able to use paint and have more control over where the color went.

I started with a piece of my own hand-dyed cotton. Got out my soy wax and used a tjanting with the larger opening to apply the wax to the fabric in circles of various sizes.


Then I got the paints that I wanted to use. A creamy pale yellow-green and a brighter yellow.
I diluted them a good bit and painted first the pale yellow-green around the wax circle. At first I was making the circle more exact and quickly abandoned that for a more organic look.  When that paint was still wet, I painted the brighter yellow (again well diluted) aroung the wax edges in a thinner line.


Now I am not well known for having a TON of patience so when the paint was still a bit damp, I put the fabric between sheets of clean newsprint paper (the kind used for packing, not the kind with print on it). I ironed the piece between the paper several times until I got the effect I was looking for!!

The next question to test out is how it will respond if I let the paint dry totally. But that is a play day for the future!


I did this test on a small bit of fabric, apx 6" X 8". But I like what I ended up with well enough to plan on doing a larger bit of fabric soon!

Thanks for waiting the extra day! 

This is my last post for this session. Thanks for tuning in and thanks for all your feedback!!

Kelly L Hendrickson

Wednesday, February 22, 2017

Variety of Techniques - Week 8 reschedule

Sorry....minor change in schedule.

I'll be posting tomorrow!!!  My final post for this series......

Till then...

Kelly L Hendrickson

Monday, February 20, 2017

Variety of Techniques - Week 8 (mystery revealed)

Wow! Several of you got this one! Great job!

Yes, it is shibori painted hand-dyed fabric.

For those of you who might not know how to do that, here is a quick description.

Take fabric ( in this case a hand-dyed fabric but depending on what look you are going for, even commercial fabrics will work.)  Tape it to a round object. I have several sizes of PVC pipe for shibori. This is done on the largest circumferencce one.


Wrap the fabric with twine.  The space between the twine on the pole can vary...again according to the look you want.  For the water fabric I space the twine a bit farther apart.


Then scrunch the fabric together toward the end of the pipe. Just slide it down...being very careful NOT to slide it all the way off!  Been there...done that....very frustrating!  LOL!!
When it is scrunched together just paint the edges. Did not have a photo of the blue water piece of the mystery (blue paint) but this is another one where I wanted "surf" so used white paint.


For larger pieces of fabric you might need to re-wrap the fabric to cover the whole piece.


Let the paint dry. Unwrap the twine. Iron and here is the results.  Water and then the "surf" piece.


Previously I had also used this technique to make a more aspen looking forest. For this one I used two colors. After the first color (in this case black) is dried and ironed, begin the process from the beginning and use the second color.


Here is another piece I just finished in which I wanted to get the same forest feel but small trees in summer.


Well, there it is!!

And now the big news.....THE WINNER of the blue water painted shibori piece!!

And the winner is.....

JANE HARTFIELD!!

Congratulations, Jane! Just send me your mailing address and I will mail the fabric to you.
Here is my e-mail address...    Kelly@KellyLHendrickson.com

Thanks again all of you who played!!

See you on Wednesday!!
\
Kelly L Hendrickson


Friday, February 17, 2017

Variety of Techniques - Mystery Technique - Week 7

Ok.....just when I think life is running smoothly....it goes off the rails!  Then I have the sinking feeling that "WAIT!  What if these ARE the rails!!"  Scary thought.

Anyway, off the rails or on, life went wildly whirling yesterday and have caused a delay in the arrival of this week's mystery technique.

So, to make it short and sweet...

Here it is


This turned out to be one of my favorite methods to make "water" fabric! Can you see it?

Usual rules apply. Enter your guesses in the comment section below. The winner will be drawn from all correct guesses. If no correct guesses....the winner will be drawn from all those who entered. And don't forget...all those who enter these mystery contests will be intered in a drawing for our new e-book at the end of February!

See you here Monday with the reveal of the technique and the announcement of the winner. Have an amazing weekend you guys!!

Off and running now....trying to catch that off the rails train!!  Or......not.........


Kelly L Hendrickson

Wednesday, February 15, 2017

Mixed media

There are many materials you can use in combination with your fiber art, but admit it, concrete will not be your first idea :-). A couple of years ago I made these 2 small canvasses - each 8"x8". I started with embroidery stitches, or making marks, using perle cotton on hand dyed fabric. Wrapped these around canvas and stapled them.


Next step was to mix up concrete. I did not want the regular grey, so instead of using water, I mixed the concrete powder with paint. The color will not be as bright as the paint as the concrete of course is grey and this will show through. With an old credit card I swiped the concrete/paint mixture over the canvas. I wanted to have some of the original fabric visible. so I made certain that enough of the fabric still showed.


I like the unusual effect I got and I think there are more options to play with this combination of soft and hard material.
Next blogpost will be by Kelly and will be another mystery technique.

Monday, February 13, 2017

Mystery revealed

You all came with very interesting suggestions, but nobody had it correct. Unfortunately I did not take pictures during the creation of this fabric. I had planned to do something similar this weekend, but I have the flu and my body said no. This is how I did it:

- I started with a parfait fabric.
- Next step was a leaves linocut and thiox discharge. When you use thiox, do this in a well ventilated area, as the fumes are toxid!
- Third step was to apply a thin layer of paint on a copper tjap using a foam roller and stamp leaves all over. The tjaps show lots of tiny details which most stamps do not show.

As there was no correct guess, I picked Bethany as the winner for this week. Please send  your snail mail address to: wil@wilopiooguta.com

Friday, February 10, 2017

New mystery technique

The mystery fabric of this week is a complex cloth, 3 techniques have been used in it.


Coming Monday I will tell you more about how I made this fabric. Publish your idea of how I did it in the comments below this post. I will draw a lucky winner in the next blog post. And don't forget by publishing a comment you will be entered in the draw for our e-book.

Wednesday, February 8, 2017

Variety of Techniques - Week 6

So far in these sessions we have added all kinds of techniques to fabrics and at various stages.

Today, We are doing some subtraction.

Yep....discharge!

There are some products on the market which will remove color from fabric. And at least one that will remove the color and leave another!

But today we are going old school....bleach.

I've removed color from fabric using bleach with a bleach pen, bleach gel, etc.

This following is a combination of clamping and bleaching.

Safety Warning:  This process requires a well ventilated area!! Bleach fumes are not pleasant and not healthy!  If you can't get a ventilated area, you should wear a respirator mask with the appropriate filters.

Here is a photo of one of the pieces of hand-dyed fabric I did a while ago.  LOTS of clothespins and different types of clothespins.  I don't have this piece any longer but I liked how it shows up the pins on the red background.


Here is the same use of clothespins on a Kona black with bleach.  Love the pattern it produces.


This piece was folded like an accordion and clamped with Twixit clips.  The ones sold in various sizes for closing all kinds of bags and packages (think bread, chips, nuts, etc.)


All these discharge pieces were submerged in bleach for a certain amount of time (it is all relative to the effect you want really) Just remember....it will probably keep discharging just a bit more when you decide it is ready.  It is too far before you know it! In other words, you don't want to walk off and leave it unwatched. All these pieces were also submerged in an anti-chlor solution immediately after the beach bath.  Then rinsed several times, then washed, rinsed and ironed.  It is very important to use the anti-chlorine step to stop the bleach and more rinsing doesn't hurt at all either.

Doing this project made me want to try all kinds of other "clamps"!  What about large paper clips/ or rows of varying sizes of those black binder clips?  Or even those big clamps with the plastic tips...takes Andre the Giant to open them but it would make a cool effect!  Talk about a resist!!

I hope these inspire you to try other types of "clamps" and see what creative images you can acquire!

Kelly L Hendrickson


Monday, February 6, 2017

Variety of Techniques - Week 6 (mystery revealed)

As usual....I was so intrigued by all the guesses on this technique.  I'm keeping a list of some ideas that I want to try or tweak or some to just dream about!

This mystery technique is very easy to do. The hardest part is the prep...the waiting....the patience!!!
NOT one of my virtues by the way!

But the first time I discovered this technique was quite by accident. Serendipity....my favorite muse!
I'm sure all of us who dye our own fabric have had this happen

DRIED SODA ASH DYEING

OK...so you put your fabric in the soda ash solution to soak.  Then...Life happens and you totally forget it is there!  One day...several weeks later (or months even) you go to get your container to soak
some fabric in soda ash only to discover your forgotten previous fabric!!!


 it is very hard and dry.

(this is the siide view of the VERY stiff fabric standing on its own)


WHAT DO YOU DO???

Easy answer...you put it AS IS in a container, mix a procion dye solution and pour it over the very dried soda ash fabric.  Batch as usual.  Then wash, rinse and iron...again as usual.


And this is what you get.  Here is the result of the fabric above and another one that I did in another color.  (neither of these is the fabric in the mystery but I didn't have photos of that particular one)


I loved it so much I have since done it on purpose several times. But warning.....it takes a LONG TIME for the soda ash to dry completely.   When it is totally dry, the soda ash acts as a resist and the crystaline structure of the dried soda ash creates amazing valleys where the dye has bled into the areas in a rather feathery manner!

Now for the drawing results!  And the winner is........

SILKWORKS922

Just send me your mailing address.  E-mail me at      Kelly@KellyLHendrickson.com
and I will get the fabric right out to you!  Congratulations!!

I'll be back on Wednesday with another technique! Hope to see you then!

Kelly L Hendrickson

Friday, February 3, 2017

Variety of Techniques - Mystery Technique - Week 5

Oh my.....the end of another week already.

Sorry for the later post. Picasa and I have been having some serious "discussions" about my photos. Don't you just love arguing with you computer????  At least this time I finally won the argument!!

OK....so on with the show.

Here is the mystery technique for today.  As usual, post all guesses in the comment section below. The winner will be drawn randomly from all correct answers.  No correct answers - the winner will be drawn from all of the comments.

Ready?

Here it is......


I am looking forward to all your creative guesses!!

I'll see you back here on Monday to reveal the mystery technique.  Until then....

Have a WONDERFUL and creative weekend!!

Kelly L Hendrickson

Wednesday, February 1, 2017

Some more drizzle dye

Here are 2 other ways of using drizzle dye. The first piece of fabric is a halfyard, which was hung on a drying rack. With a syringe blue dye mixture was applied to the fabric. After it had run down, the fabric was turned around and the same process was done with a yellow dye mixture. This is how it turned out:


Besides dye, you can also use bleach in your syringe. This is a commercial black fabric on which I drizzled tiny quantities of bleach. Don't you love this result? Unfortunately I was never able to find this same black fabric anymore.


These were my 3 posts of this week. Coming Friday Kelly will show a new mystery technique.