
Hi! Lynda Heines here from Bloombakecreate.
I love to shop
thrift stores where I’m always on the lookout for stuff I can use in my art
from white shirts to dye to kitchen tools for printing.
For this post I am using three different kitchen tools to play with my gelli plate.

But before I get started I wanted to give you some tips I
learned from working with this printing plate on fabric.
- Any cheap craft paint work.
- Since craft paints dry too fast, I add Golden Open Acrylic Medium to slow down the drying time. This gives me time to play with my designs.
- Less is more – paint, that is.
- For any tools like these (except the one that makes lines) you have to push down into the plate to get an indentation. The line tool didn’t require any pressure. In fact, I wanted to be careful so I didn’t poke a hole into the plate.
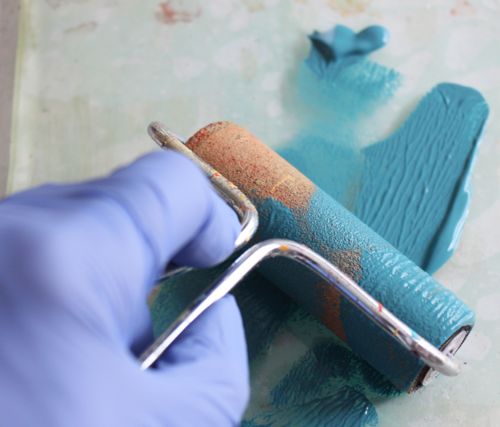
So let’s get started.
I begin by putting dots of paint on the gelli plate.

Then I add the Open Acrylic Medium.

Next I spread the paint on the gelli plate with my roller.
Then I took this tool (have no idea what it was used for) and made some cool lines.

Next I pressed the fabric into the plate. I love how I can see the
pattern through the back of the fabric.

Here is the finished lined piece, but I’m not done.

Let’s add a different color and this big potato masher.

Then some circles with the whisk.

And then add lines vertically.

And here is the finished print.

Here is another piece without the lines.

I just had to show you a closeup of that one.

The next two I cheated using a commercial batik as the base fabric. I only used one paint color on this first one.

This is the same batik fabric with a blue print using the potato masher and a yellow print with the line tool.

Since this was my favorite piece, I made a small wall hanging. I backed it with felt, hand stitched, machine stitched the edges, and then attached it to canvas I painted gold.

So much fun! But there is more. I’ll be posting a
little more later using some of my other kitchen tools.
What fun! The finished piece turned out great too!!!
ReplyDeleteThis comment has been removed by the author.
ReplyDeleteNice job Lynda! I really like potato mashers but never seem to have much luck finding them at my local thrift stores. I need to keep looking. I really need to look for the line tool too. Fun stuff. I love your finished project!
ReplyDeleteRobbie, Thanks.
ReplyDeleteLisa, Thanks. You just have to keep looking. I was in a thrift store last week looking for fabric and there were two mashers - one that may be my favorite now!!
I like the layering and how you handled the fabric bringing it to a finished piece.
ReplyDeletelove the way the stitching really adds to the piece. Gotta try.
ReplyDeleteThis is lovely, I really like it. What fabric did you use please?
ReplyDeleteHi Whyducks, Thank you! I just used white muslin fabric - nothing special.
ReplyDelete