A TECHNIQUE DRIVEN Blog dedicated to mastery of surface design techniques. First we dye, overdye, paint, stitch, resist, tie, fold, silk screen, stamp, thermofax, batik, bejewel, stretch, shrink, sprinkle, Smooch, fuse, slice, dice, AND then we set it on fire using a variety of heat tools.

Monday, October 31, 2011

Cool Hot Stuff

What can you do with burnt Tyvek?  Check out his gorgeous quilt:  http://eiloren.blogspot.com/2009/10/end-of-beauty.html

Neroli Henderson (her website is here) also has a tutorial for burning Tyvek leaves: http://web.me.com/eiloren/eiloren/Tutorials/Entries/2008/3/7_Tyvek_-_Leaf_tutorial_2.html

And here is her burned quilt: http://eiloren.blogspot.com/2010/05/burning-quilt-textile-art-with-heat-gun.html

While you're there check out the rest of her blog -- there are artist interviews and all kinds of cool hot stuff.  She uses heat on lots of different stuff and includes information on the materials she has used.


More With the Heat Gun and Lutradur

I used leaf stamps and Jacquard Lumiere paint on the heavier lutradur.  I let it dry, then I cut them out and blasted them with the heat gun set on HIGH.

I straightened them out while they were still hot (yes, I have burnt fingertips to prove it.)  I'm not crazy about these.  I will probably get out the paints and add a layer of color.
 These are the lighter weight of lutradur.  I discovered that they look much nicer with the heat gun set at the lower setting and some extra patience.  The "leaf" on the upper right was done on high, with the other two on low.  It took a bit longer, but the result is more what I was hoping for -- a kind of lacy result.


Again, I used the lower heat setting; but a much nicer result, I think.  A little more heat and a little more patience would benefit this one.
And because it's Halloween, I just had to use the spider web stamp.  I used the high setting on the heat gun and it's almost dissolved.  But still spooky, if you're into that...

Sunday, October 16, 2011

Melting tyvek


The other night I painted some tyvek pieces -- today I got my soldering iron out and fooled around melting it, since I don't have a heat gun.

Then I took my iron and put the pieces between two sheets of paper and ran it over the shapes. Closeup of some good texture here:

This one I turned down the iron a little and got a flatter piece.

And here's another colorway that I painted, and lightly ironed the whole piece.

I'm not sure what I'll do with these, I'd really like to see some posts about using the finished products in a project!

Updated wrappers

These are Rolled Gold Pretzel bags. I painted one on the front and one on the back. I heated them all on the unpainted side. The small bit is the strip of sealing on the bottom of the bag.

The ice cream wrappers bubbled flatter than the pretzel bag which was much harder to control. It just wanted to curl into a ball. I like the ice cream wrapper much better, easier to handle and the end result is much more vibrant.


Saturday, October 15, 2011

Melting Ice Cream (wrappers)

I saw this somewhere and I thought I would take one for the team and eat an entire box of ice creams. That of course was before I stopped eating sugar and grains BUT I still have the ice cream wrappers. In another burst of team camaraderie, I thought I would try painting and melting these little puppies.
Here is the self explanatory process I followed:

The wrapper

Time to paint with artists acrylics


Two pieces before the heating process

Heated with a heat gun

What I found was that the ice cream wrappers melt/blister into smaller bubbly sizes as in more textured than Tyvec while holding their shape better as in not curling into a ball - they stay flatter. They are also easier and more fun to acquire except now I will have to buy the ice cream for other people and ask them to carefully remove the wrappers without tearing. I like this product a lot but now will have a bit of a resentment while other people eat ice cream I bought!! Perhaps the beautifully textured surfaces of these pieces will be enough of a consolation; they are quite beautifully textured.

Wednesday, October 12, 2011

Using Heat to Add Texture to Fabric--Quilter Beth

I have been collecting fabrics of "unknown origin" to use in art quilt projects for quite some time. Many of them were purchased with "setting them on fire" in mind, so this month's technique is right up my alley! What I wanted to do today was get an idea how the fabric reacted to the heat so I could see if I might want to experiment further with it.

I used a heat gun to see how each fabric was changed by the heat. All of the fabrics (except one my friend brought along) contained polyester. I have a book called "Raising the Surface with Machine Embroidery" by Maggie Grey that contained a lot of ideas about how to manipulate fabric with heat.

Before I start, let me be clear that if you choose to heat fabric in any way, do it outside. The fumes are harmful to your health! I began the afternoon (outside in my garage) with a suggestion from the book--a chiffon sandwich. I made a sandwich consisting of two pieces of gray polyester chiffon, foil, and fusible web. (I used Heat and Bond Light since that is what I had on hand.) I covered my ironing board with parchment paper and put one of the chiffon pieces on top. I then pressed the fusible webbing onto that piece. I removed the paper backing from the fusible; and while it was still warm, I put some foil on it (shiny side up). I rubbed the foil with the edge of a blunt knife till I had as much color as I wanted, removed the clear top sheet of the foil, and ironed the other piece of chiffon on top of the fusible. (I covered the chiffon with parchment paper before ironing.) This is what that looked like. (The picture turned out darker than the actual fabric.)
Then, as was suggested in the book, I put the sandwich over a piece of velvet, covered with parchment paper, and pressed down firmly. I zapped it with a heat gun after that. I didn't heat it a lot. (I may try that later.) The chiffon sandwich is attached to the velvet.
Next, I spent time zapping different fabrics with my heat gun. Some turned out great; others were dismal failures. This first fabric is a gray polyester that used to be a bed skirt. I think it is my favorite of the day.
This is the original fabric.
I love the really bubbly effect.
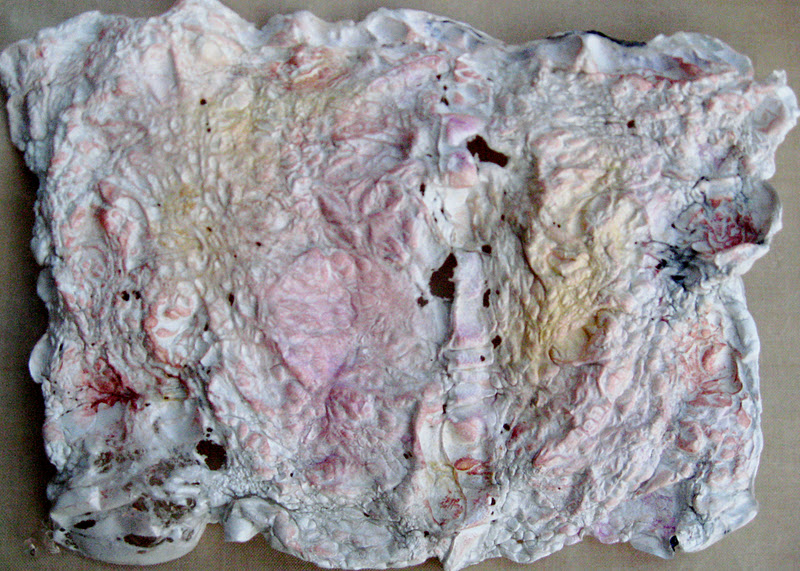
These two pictures are the same fabric--top picture is the front of the fabric; bottom picture is the back of the fabric. This fabric turned out very lacy and holey.
In the picture above, I added ink to part of a dryer sheet before I heated it. I wasn't impressed (actually the picture looks BETTER than the original if you can believe that.)
The original fabric is on the left. I thought this would be much cooler; but when I used the heat gun all that happened was that it burned. Again, the picture actually looks better than it does in person.
The original fabric is on the left. The only thing that happened to this fabric when I heated it was that it crinkled a little and sort of shredded.
This is my experiment with Tyvek. I really like the way it crinkled and bubbled. The picture below shows it after I rubbed some Pearl Ex powders onto it.
I tried heating red acrylic felt.
I'm thinking this might have gone better if I had stitched on the felt first (which the book suggested).
This is a strip of poly satin. It crinkled nicely. Then we added some fusible web and foil color to it.
 The picture above shows what happens when you make a silk sandwich (rather than a polyester chiffon sandwich) and heat it. It doesn't shrink or bubble or get holey. We added foil cut outs to it. When this was held up to the light, it was semi-transparent.
This white polyester fabric is the part of a bed skirt that goes under the mattress. I liked how it crinkled.

I can really see how some of these fabrics could make an interesting addition to an art quilt. Stitching, beading, painting, etc. could also enhance the look. Now, to figure out how to use these...

Tuesday, October 11, 2011

A Little Bit of Tyvek

This is some painted Tyvek that I heated with the heat gun after painting both sides.  This first photo is the side I hit with the heat gun.  The bubbles face away from the heat.  
I felt like I had more control over the heat -- when I use my iron, it seems really easy to get it too hot and cause holes.  Of course, it's much less flat than a piece done sandwiched in between two layers of parchment and ironed.  But I was able to reheat the curled edges and flip them so they didn't fold into themselves -- I used the clamp from the lutradur experiment so I didn't burn my fingers.

  This is the side that faced away from the gun.  The paint had soaked through from the other side and there are tiny pinpoints of color under the thin layer of gold iridescent ink.  I watered down the inks when I painted them on the Tyvek.   My daughter thinks this looks like a fungus.

And this is some building that is going on nearby.  I was wondering if this stuff is thicker than the stuff I bought.  Also, how do they install it?  Is it the backside of the insulation?  Or does it come on rolls and is stapled up?

Monday, October 10, 2011

Flaming Lutradur

Lutradur is a spun polyester fiber that comes in sheets in two weights.  I purchased this roll a couple of years ago at a quilt show, but it's available in packages of sheets in two weights at a lot of quilt shops.  Leslie Riley (http://www.lesleyriley.com/index.php) wrote a book about it.  You can print on it, stitch on it, paint on it -- or pretty much anything you can think of.  It's a lot like polyester interfacing, but has a nice lacy texture.  

I haven't done much with it -- somewhere in my archives I have an unfinished art quilt where I used it for snow -- if I find it, I'll share a photo.


 I got out the acrylic inks and painted a sheet of the ultra light and a bit of the heavier kind.  I used inks because they are thin and dry really fast.

Then I got out the heat gun that I liberated from my husband's side of the garage.  It gets really hot, so I used some clamps to hold the  painted lutradur so it wouldn't blow away or burn my fingers.  It smelled like something that should be done only in a well-ventilated area (aka outside).
It got a lovely lacy look -- especially where the ink wasn't.  I think if I wanted color, I would put on the paint or ink after burning it next time.

Thursday, October 6, 2011

My last fugitive media piece


Hi there, Kit Lang here.  When I left you last, I had used watercolour pencil-crayons, watercolour crayons and a little charocal on my flower.  After it dried and I had ironed it to set the colours, I cut out the petals and fused it to a background composed of two pieces of my hand-dyed fabric.


I also used a micron pen to write the script on the right. 

I'm really pleased with this first experiment using fugitive media, and it will be something I develop for use again and again.

Further explication of the piece and what the writing is at my blog.

Monday, October 3, 2011

Check out this fugitive art work

Check this out!  I really like the use of fugitive medium on this piece!

Old and New

Here are two Tyvek pieces I used in an altered book and two new pieces I did a few days ago. The black one is hard to see because the black is so deep but that cobalt edge is yummy. The other newer one is on the bottom. I enjoyed making an altered book even though I thought it was the LAST thing I ever wanted to do. It was a bit addicting!


Sunday, October 2, 2011

Better Late Than Never--Fugitive Media

I FINALLY got to play with my colored pencils and chalk pastels today. I had intended to do it last month (since this was last month's technique), but...life stepped in! I must say, I like the effect. This is the original fabric--a piece I had snow dyed this past winter.
This piece always reminded me of the geyser pools I had seen when we went to Yellowstone several years ago. My favorite was Morning Glory. The colors in this piece were wrong for that, but I used pictures of Morning Glory for inspiration. I wanted to define the outer circular shape a bit more and emphasize what looked to me (and to Judith when I got to meet her in Indy this past week) like bubbles.
(The difference is way more subtle in the pictures than it is in person.) I used the chalk pastels to emphasize the edge of the "pool" and add some shadows around the "bubble" areas. Hopefully, it gives it a bit more dimension. I used a little colored pencil too, but that barely shows up on this piece.
 Close Up of Fugitive Medium on Snow-Dyed Fabric

I now can visualize how I will hand quilt this piece (if time permits)...organic lines out from the edge of the pool and lots of circles for the bubbles within the pool. I even found some silver embroidery floss that I might use to give it a bit of shine--like a reflection. I might also add a little shine with a bit of metallic paint.

Thanks Judith for sharing this new technique...now on to "setting things on fire!"