towel, large flat surface with plastic or newspapers on it, lots of newspapers, iron, water supply, electric frying pan (dedicated to art), soy wax, fabric paints, things that make marks like potato masher, cut out sponge shapes, egg beater, cardboard tubes, paint brush or soft sponge, fabric to batik.
I used a purchased silk haboti scarf 8X54. Iron it first like I didn't. Start the electric frying pan and add soy wax - flakes not a solid chunk. I set the thermostat at about 150 degrees F, just hot enough to keep the soy wax liquid. Soy wax melts at a very low temp and washes out of fabric with a simple hot wash (more about this later). I wouldn't use nor recommend any other form of wax.
I covered my work surface (a 2'X4') home made ironing board with 6 mil poly film and plain cheap felt.
I made this ironing/silk screening/monoprinting surface out of a 2'X4' piece of 3/8" plywood from Home Depot. Cost about $8. I covered it with felt and 2 layers of warm and natural batting and a medium weight muslin fabric secured with a staple gun. I set it on collapsible horses ($12.) This surface is the BEST tool I use and I can collapse it in 30 seconds if needed.
I used a potato masher (they come in many shapes so get a variety) and set the end in the hot wax for about 30 seconds to heat the metal, shook off excess wax and applied in a pattern to the white silk.
Next I used some fabric paint that I thinned with water. You just need to try it yourself, get a feel for the consistency you like best. I started with paler colors since I would be adding 3 colors on top of each other. I applied the first (for me the lightest) color using the small square of soft sponge and put the scarf on a drying rack to dry in front of a fan.
Of course I didn't take a picture of just one layer of paint because I was so excited about what I was doing that I rushed through the entire process. I did use the rack and fan for each step so just take my word for it.
Above, you can see the potato masher imprint. The first color paint was light lavender. Dry completely between applications of wax and paint. I used this rack. The next tool I used was an egg beater and a metal bit from a lamp I threw away after scavenging any interesting parts that would make shapes!
Above, you can see the potato masher imprint. The first color paint was light lavender. Dry completely between applications of wax and paint. I used this rack. The next tool I used was an egg beater and a metal bit from a lamp I threw away after scavenging any interesting parts that would make shapes!
After this wax was applied, I sponged on fuchsia paint which over the lavender looked purply pink.
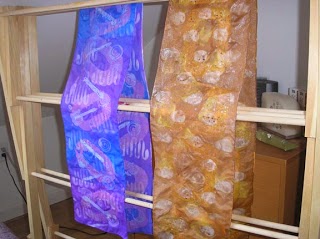
Then after this was dry I applied wax with a car washing sponge from which the center was removed. My last color was a vibrant purple alternated with a metallic dark blue (Probrite) paint. I allowed this to dry on the rack in front of the fan until it was completely dry. What I haven't mentioned was at the same time I was making this scarf, I was making another on the other side of the felt so that I could continue to work on one scarf while the other one was drying. Here are the two scarves finished and drying on the rack before wax removal.
When both were dry, I took them over to my conventional ironing board, covered with newspapers, laid down the scarf, covered with more newspapers and began removing the wax from the completed projects using the iron set on cotton and a few (3-4) layers of newspaper to absorb the wax. I pressed the scarf about 3 times with clean newspapers each time to absorb as much wax as possible. This will heat set the paint. In others words, if you don't remove the wax with a hot iron, your paint will wash out.
I filled a plastic basin with BOILING water and Ivory dishwashing liquid and swished it about using soft tongs to get the last remaining bits of wax out. I did that twice then rinsed. I let it dry on the rack and ironed.
This is much better looking in real life. It started to storm here and I lost the light. Both are habotai.
If you have any questions or I was unclear about something please let me know so I can make myself better understood. This is a fun winter time project!


Fabulous! I am so looking forward to having enough room to do this soon! Right now, most of my batik is done on pieces of foam board covered with wax paper... works okay for shirts, but not scarves.
ReplyDeleteI really like the warm coloured one. What a great set up!
ReplyDeleteThese pieces are wonderful. As always I appreciate the detailed photos of the set-up and process.
ReplyDeleteThanks for the great tutorial and pictures. I'd love to try this this year.
ReplyDelete