And we are back - Ready to venture further into the Woods.
Phase TWO
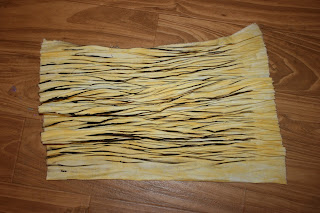
The paint will be well dried now. Take the tape off the end of the string and start removing the string. Then remove the fabric from the pole. Iron on the wrong side. And there it is...the beginning of your forest!
Now let the magic continue
Step Five - "One More Time"
Take your ironed painted fabric and use it to repeat steps One through Four. Be sure you get the fabric onto the pipe in the same orientation it was when you began. There is a place for changing directions of the lines...but not in the forest.
For this second time through, I used a white paint to create the aspen forest.
Patience is called for once again. Let the paint dry completely.
NOTE*****
You might have noticed an extra piece of blue tape on this wrapping. It is a chance to show you how to re-use your string...even if it is too short. As you are wrapping and run out of string, you can add another piece and keep going. Just use a small piece of blue tape to attach both string ends and carefully keep wrapping. Don't pull too hard for the first couple of wraps or the second string will pull out of the tape.
Tomorrow we will add the marks that transform this into a Yellow Aspen Woods.
And I'll show you some other uses of this very easy technique!
See you then!


This is great, Kelly! I can't wait to see the end result. I have plenty of PVC, string, fabric, paint... need to find some time to play!
ReplyDeleteLooking forward to tomorrow :-)
ReplyDeleteThis is very exciting and I love the way you have demonstrated step by step.
ReplyDeleteThis is so great and very timely for my tree study. THANKS!!!
ReplyDeleteThanks to you all! I'm so glad you like it. Can't wait until tomorrow posts! That is when the real magic happens!
ReplyDeletehttp://www.quiltingdaily.com/blogs/quilting-daily/archive/2013/03/27/paint-a-shibori-forest.aspx
ReplyDeleteJ'ai pensé à cet article. Merci pour la démo
Thanks, Marianne!! I posted that info on Day 3. Want to be sure credit is given where credit is due!
ReplyDelete