This is where the fun starts. You can plan your design carefully or you can begin by simply making marks on the screen and seeing what it looks like when it is printed. Often the screens don't look very promising but once you start to use them you see their real effect.
First thing to do is to melt your wax. While that is happening you can get your screens and mark making tools ready. I like my melting pot to sit on a large tile and have a piece of kitchen towel ready to catch any drips.
Turn your screen upside down as we are going to apply the wax onto the bottom of the screen, the side that will be in contact with the fabric. I usually cover my working table with some plastic, in case I get messy, which is more often than not.
When your wax is ready dip your mark making tool into the wax and print it onto the screen. I'm sorry if the photos appear a bit strange but I was finding it quite difficult to take a photo while I was actually doing the printing. In this one I have used a cardboard tube to add some circles. Don't worry if you get some blobs as these often add to the charm of the design - the hand of the maker?
I then used one of my tjantings to add some additional lines.
Leave your screen until the wax is completely dry. This doesn't take very long at all, even if you are in the middle of winter. Remember to turn off your melting pot once you have finished with it.
These are some screens that I have made, some of them are well over 12 months old and have seen a lot of use.
This screen was made by simply using a brush and dragging it lightly over the screen. If you like the shibori effect but don't want to go to all that trouble then this is the result you get from some very simple marks.
In this screen the small circles are from the cardboard tube, the larger circles made with a brush and the lower part has the brush dragged lightly across the screen, going over some of the circles as well.
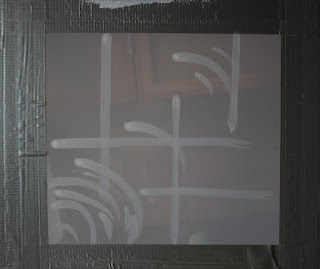
For this screen I used a smaller brush as I wanted more well-defined lines. It came about from a series of work I have been doing on Wheels and Windows. I wanted a very abstract design using the straight lines to represent the windows and the curved lines for the wheels. I wasn't entirely happy with this but decided to give it a try anyway. After all, we can always overdye or overprint can't we?
Some simple swirly circles done with a paintbrush. Afterwards I added some light lines with a different brush. In case you are wondering what the dark black and blue areas are, they are simply from staining on my screen. They don't affect the screen itself at all, just look a bit messy.
More circles, this time done with different size tubes, some straight lines done with a brush and some lighter lines dragged lightly across. You may be able to see some feathered lines around the edge of the screen. I added these so that I didn't get a harsh straight line when I printed.
Ready for the actual printing? That will be on Monday so stay tuned.
***Some people have asked if the wax can be removed later so that the screen can be used for other things. The answer to that is, yes and in the next post I show how to do that.***


Looking good, and I like that you don't have to be so detailed or labour intensive with your designing.
ReplyDeleteHi Maggi, I have been storing soya wax in my dye room for three years now. You may inspire me to actually melt some!
ReplyDeleteHi Maggi....I know soy wax is removeable but does it come off the screen completely so the screen can be used for other things...?
ReplyDeleteI have virtually the same question as Windy. Are these screens now permanently dedicated to the soy wax marks? Does the soy wax crack off?
ReplyDeleteOh, thank you for all of the detail. But especially for showing that it can be loose designs as well as more restrained designs.
ReplyDeleteThe idea of the feathered lines at the edge is a brilliant one.
Sandy in the UK
Thank you for asking the question about permanence Windy and Beth. You can completely remove the wax from the screen or keep it on there. I have one that has been in use for at least 12 months. I also recently removed an old design from one screen and it is fine for further use. I have addressed this in the next post but will add to the bottom of this post to make it more clear.
ReplyDelete