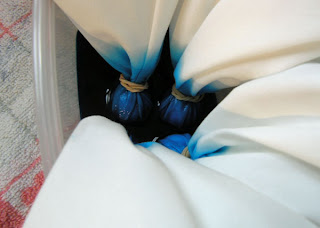
First of all, tie a marble in the middle of each piece.
Dip the points in a tray with water, SODA and dye-solution. Let's rest for 15 minutes.
Now you can choose to rinse the blue point or continue right away. Turn your blue tip upside down and tie the fabric again around the marble. Yes, the blue colour will zip through, but that is part of the fun. And if you want to keep it clean, just add some plastic on top of the fabric before turning it.
Now dip your marble-pakages in another dye solution (inlcuding soda), and leave for another 15 minutes.
For the third time, turn your marble downwards and tie the fabric again around the marble. Now bring the full package into a dye bath (including Soda), and leave it for another 30 minutes.
Rinse the marble-package, untie it and rinse again.
This will be the final result after fixation and ironing, four pieces which are more or less the same dye pattern, great for further use. The pieces to the right were packed in plastic after each step. Can you see the difference? And what do you prefer?


This is fascinating.
ReplyDeleteWhy do you think the ones on the left had lighter markings? is that due to the fact they didn't have the plastic covering the colour at each step?
Sandy in the UK
Beautiful Nienke. I like them all, but the ones that had been covered with plastic are my favorites.
ReplyDeleteGaaf!
ReplyDeleteooh -- I can't wait to try this. What happens if you pre-soak your fabric in soda ash? Or is this just another unnecessary step?
ReplyDeletedid you use pima cotton?
ReplyDeleteOH these look like fun!! I hope I'll be able to play tomorrow. Wish I could today but the clock is ticking and not in my favor!
ReplyDeleteMy favorites (by only a small margin) are the wrapped plastic wrap ones.
One question - I'm not sure I understand the "turn the fabric upside down part" and where and how to wrap with plastic. My brain just isn't catching that part this morning.
Very clever and I like the plastic wrapped results better. Great stuff!!!
ReplyDeleteI know what I am going to do this weekend!
ReplyDeleteWonderfull I hope to start tomorrow with trying. greetings from liesbeth
ReplyDeleteVerry nice techniek!!!
ReplyDelete@Sandy - yes I think batching in the plastic, secures the colourfixing better.
ReplyDelete@Karen - I have no idea if it will make a difference (I guess it will like in snowdyeing) but I would love to see your results!
@Debbie - I don't know, just regular PFD cotton will do.
@Kelly - I don't know the exact words in english and even not in dutch to describe this. But imagine your wrapped marble after step one, looks like a parachute. Then turn it upside down. The fabric will fall down and cover your marble again. It looks like a fountain perhaps, your hand will be covered with the fabric, holding the marble. Now tie again, which is the complete opposite of the first tie. So, a second layer of fabric is now around the marble. Is this clear? Otherwise I will ask Beth to translate ;-). And of course after the second dye bath, same procedure, turn your parachute upside down and let the fabric fall down around the marble again, tie for the third time.
I GOT IT NOW!! That was an excellent explanation, Nienke!! I'm afraid I'm quite the visual learner and missed that the first reading through. But now it is crystal clear! Thanks so much!!!
ReplyDeleteI like the fabric on the right. Brighter more saturated colours.
ReplyDeleteI will have to give this a go when I have the dye our again.
Your explanations and clarifications were great!
I understand a little dutch but not enough to speak it or write it!
Thank you for the tutorial.