
Now that we have the bases done, it is time to add all kinds of embellishments to them. We'll take them in the order posted yesterday.
First is the candy wrapper one. I took the bits I had adhered yesterday, then added some textile, and an antique button hook. I hand stitched the couching to hold the button hook on. I chose a metallic reddish-pink to bring out the same color in the candy wrapper.

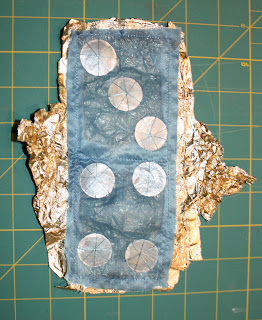
Next is the candy box foil lining. I took the blue fabric (a piece of silk organza I had done some clamp shibori on during a symposium) and stitched it on to make it more like two squared. Then I hand couched on some of those capiz shells to make the piece look like a domino.
Now for the accordion folded piece. I had some sage that has been in my studio for several years. I wanted to have the juxtaposition of the organic with the metallic. The sage is hand couched to the foil accordion.

And last but not least...The woven piece. I chose some of my fabric and wove that in with the metal foil strips. It needed something else. So I got out some of the belly button rings (something else that has been in the studio for some time). I had three red ones so I put them into the metal foil. Three of them are down the middle of the piece. Difficult to see too well because of the reflection with the camera flash. Then I attached the piece to some African bark cloth with adhesive spray and secured the whole thing by twisting the fabric strips on each end with metallic eyelets.

The three pieces mounted on the bark cloth will eventually be parts of one work. Perhaps I'll even have it done by the end of the month so I can show you.
So it just took a bit of auditioning different bits and figuring out the best way to adhere them.
Oh and here is a woven bit I did previously. It also has copper wire and metallic paper woven into it. It will be in a piece all its own later. And the blue one, "The Domino Effect' will be a major part of its own piece as well.

So, that is what it is like to be Foiling Around with metallic foils. The weekend is coming up so I'll give you that time to play around with these inspirations to get your creative juices flowing. I will be checking in on the blog so please leave comments or questions. I'll answer them as soon as I possible can.
Next week we'll be looking at another fun way to be creative with metal in your art work. It's really HOT so don't miss it!
Hope you are having fun!
First is the candy wrapper one. I took the bits I had adhered yesterday, then added some textile, and an antique button hook. I hand stitched the couching to hold the button hook on. I chose a metallic reddish-pink to bring out the same color in the candy wrapper.

Next is the candy box foil lining. I took the blue fabric (a piece of silk organza I had done some clamp shibori on during a symposium) and stitched it on to make it more like two squared. Then I hand couched on some of those capiz shells to make the piece look like a domino.

Now for the accordion folded piece. I had some sage that has been in my studio for several years. I wanted to have the juxtaposition of the organic with the metallic. The sage is hand couched to the foil accordion.

And last but not least...The woven piece. I chose some of my fabric and wove that in with the metal foil strips. It needed something else. So I got out some of the belly button rings (something else that has been in the studio for some time). I had three red ones so I put them into the metal foil. Three of them are down the middle of the piece. Difficult to see too well because of the reflection with the camera flash. Then I attached the piece to some African bark cloth with adhesive spray and secured the whole thing by twisting the fabric strips on each end with metallic eyelets.

The three pieces mounted on the bark cloth will eventually be parts of one work. Perhaps I'll even have it done by the end of the month so I can show you.
So it just took a bit of auditioning different bits and figuring out the best way to adhere them.
Oh and here is a woven bit I did previously. It also has copper wire and metallic paper woven into it. It will be in a piece all its own later. And the blue one, "The Domino Effect' will be a major part of its own piece as well.

So, that is what it is like to be Foiling Around with metallic foils. The weekend is coming up so I'll give you that time to play around with these inspirations to get your creative juices flowing. I will be checking in on the blog so please leave comments or questions. I'll answer them as soon as I possible can.
Next week we'll be looking at another fun way to be creative with metal in your art work. It's really HOT so don't miss it!
Hope you are having fun!
You are forcing me to eat candies :-)). Great results!
ReplyDeleteWonderful creations and very interesting ideas! I love all...congrats!
ReplyDeleteCarmina
Romania
What a great "metals" month this has been....
ReplyDeletenice work!!
ReplyDeleteI am busy saving candy wrappers... just need some time to play now! Thanks for the great suggestions and tutorials, Kelly!
ReplyDeleteI'm so glad you guys liked this part! I hope you give it a try and post your results!
ReplyDelete