A TECHNIQUE DRIVEN Blog dedicated to mastery of surface design techniques. First we dye, overdye, paint, stitch, resist, tie, fold, silk screen, stamp, thermofax, batik, bejewel, stretch, shrink, sprinkle, Smooch, fuse, slice, dice, AND then we set it on fire using a variety of heat tools.

Thursday, February 27, 2014

Overdyeing

Overdyeing is the best way I know of to "fix" things that aren't exactly what I wanted or aren't something I think I will ever use.

I took three out of the four turquoise fat quarters that I used in my turquoise experiment earlier this month, applied a beeswax resist using an egg carton,

then dyed them again in Kelly Green, Sapphire, and a mixture of the two--

These will each make a pretty nice little pillow, hopefully.

And the piece here on the left was also batiked with an egg carton--

Then overdyed with a purple & lemon yellow mixture to tone down the bright colors and make the background brownish, and it now looks like this:
 This is my last post about Ann Johnston's DVD, it's been a very fun month!


Monday, February 24, 2014

Double dip

Let's see what happens if I redo the whole process, first in one and after rinsing in the other direction.


Another interesting piece!
And these flagfolded pieces in a pot also gained by pushing the fabric in the dye solution:


Thank you Ann for learning me to push the dye into the fabric, will definetely continue my explorations!

Thursday, February 20, 2014

Dyeing two pieces with the same colors-very different results

These two pieces were folded up and each dyed with the following dye concentrates:

  • 2 T boysenberry
  • 2 T navy
  • 1 T tangerine
  • 1 T strong orange

The only difference was applying the soda ash solution to one piece before adding the dyes, the other adding the soda ash after the dyes had been applied and waiting about 10 minutes.

Here they are waiting in my sink to be rinsed out:

The before piece is on the left below, the after on the right--they don't look similar at all, do they?
This shows that the tangerine & orange blended a bit with the navy and made a nice green, while the same colors pretty much disappeared in the piece that had the soda ash applied afterwards.
I'm just experimenting with the low water immersion techniques--I'm not fond of either of these pieces and will probably overdye them, but this makes me realize how little variations in dyeing techniques can make a world of difference.

Wednesday, February 19, 2014

Reposting-Dyeing Turquoise using LWI

Laura's post--(sorry the pictures didn't show up in the one I sent to Beth for posting)

Using Turquoise in LWI dyeing

I experimented with using Turquoise dye powder and the low water immersion method, because Turquoise is the one color that the dye experts tell you has to stay on for 12-24 hours in order to bind to the fabric.  I love using turquoise, and was wondering how it would work to use this method that only requires one hour of batching your fabric.

I dyed four fat quarters using 1/4 cup water and 2 tablespoons of dye concentrate.

One piece was left in the dye for one hour, the second for 2 hours, the third for 8 hours, and the last for a full 24 hours.

The value different is subtle, and hard to see in these pictures, but the one-hour piece was almost an icy blue, while the 24-hour piece was a slightly deeper shade of turquoise.  There was hardly any difference between the one-hour and two hour pieces.

So, my conclusion is that if you are using Turquoise in your 1 hour LWI dyeing, you might want to mix up a stronger concentrate so it isn't lost during the washing out part of the process.

Using Turquoise in LWI dyeing

I experimented with using Turquoise dye powder and the low water immersion method, because Turquoise is the one color that the dye experts tell you has to stay on for 12-24 hours in order to bind to the fabric.  I love using turquoise, and was wondering how it would work to use this method that only requires one hour of batching your fabric.

I dyed four fat quarters using 1/4 cup water and 2 tablespoons of dye concentrate.

Inline image 1

One piece was left in the dye for one hour, the second for 2 hours, the third for 8 hours, and the last for a full 24 hours.

Inline image 2
The value different is subtle, and hard to see in these pictures, but the one-hour piece was almost an icy blue, while the 24-hour piece was a slightly deeper shade of turquoise.  There was hardly any difference between the one-hour and two hour pieces.

So, my conclusion is that if you are using Turquoise in your 1 hour LWI dyeing, you might want to mix up a stronger concentrate so it isn't lost during the washing out part of the process.

Tuesday, February 18, 2014

Dye results from Ineke

One of our readers, Ineke, sent some pictures of her experiments with LWI dyeing.


She put two pieces of fabric in a tray and noticed that there was still a lot of dye solution floating in the tray so she added another two white pieces on top of it:


What a great set of fabric!

With the remaining dye-solution, she created this fold shibori piece:


Another dyebath needed, so she added Jet Black (which is a blue-ish black)


So much more interesting if you keep making new layers of colour!

Two other pictures from her experiments:


Thank you Ineke for sharing!

This is what we call, 'Happy dyeing', hope that it inspires you to get the dye pots out of the cupboard! And please, share your results with us, you can always send an email to verfvirus at gmail.com.

Monday, February 17, 2014

The Dye Is Cast


I Wish!

Instead my hand is in a cast and many of my activities, including dyeing and typing two-handed, is postponed for four weeks!
Judith

A 'bigger' tray for tray dyeing

A new post from Nienke:
I really loved the long, small pieces I made with the cutlery tray, but the only problem is, it's so small. So I decided to build myself a giant cutlery tray with my silk painting rack and plastic.

Actually, it was Vicki Welsh great post A new dyeing tool in august 2012 which was saved in my favorites, who inspired me to make this:


Same procedure, fabric sodasoaked, orange dye solution at the bottom, fabric placed on top of it, pouring blue dye solution over it, pushing it for about 2 minutes and leaving it for one hour:


Once you start rinsing, you can't believe that it's not completely mud, but that's a good surprise!


And after ironing:


Love the little details in the fabric!


Happy dyeing and thank you Vicki for this great idea, adjustable one-time-trays.

Wednesday, February 12, 2014

Two Pieces Dyed Together

Now this was TWO pieces of fabric wrapped together on the 1" rope. I put two pieces of fabric on one "resist item" but BOTH in different ways. On these two pieces, I wrapped the turquoise piece on first then ended with the green piece. You can see all the intense blue color on the end that was not in that much contact with the rope. They were placed like paper towels on a roll:


Washed and ironed

The dye solution was intense blue, boysenberry and deep navy - one tablespoon each.


This turquoise fabric was on the "inside" of the green  (wrapped first on rope) and came out more uniform


Now these two pieces of fabric were wrapped on the washing machine drain hose SIDE BY SIDE.


 This first one was a LWI piece of bright orange and didn't it come our great. Reminds me of Koi in the water.


 wet
  Washed and ironed. This was a fat quarter.

This was a "failed" shibori piece. Figured I'd get my 2 cents out of it and it actually came out fairly well. The dye solution was the same as above, one tablespoon of intense blue, boysenberry and deep navy.


These were the two placed side by side and rolled. Even though it looks dark on the left, the "end" was on the top.

This was all TOO much fun and I hope to do more.

Tuesday, February 11, 2014

The Story of Two Dyes

In the last couple of weeks I dyed two pieces of fabric using Ann's LWI process.  One fabric I wanted mottled with multiple colors. The second I wanted to be more flat in color.  I used Ann Johnston's method on both fabrics and by using different combinations of dyes while using the same process, I got both of the effects that I wanted.

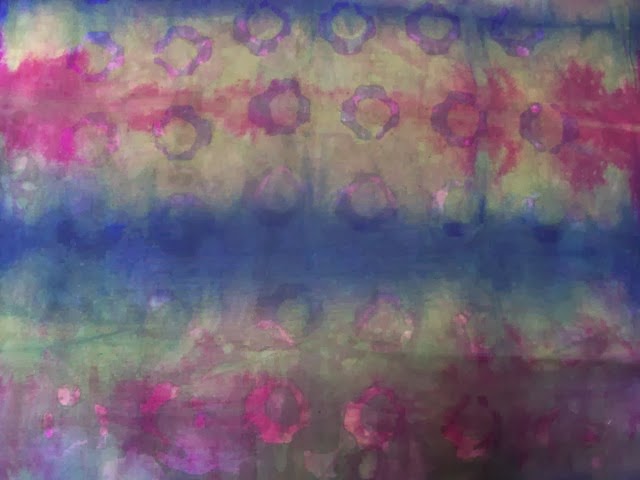
First, I dyed a fat quarter with a mixture of blues and purples, I didn't measure and didn't record which ones.  I used the dye concentrates (1 T of dye powder + 2 T of Urea + enough water to make one cup of liquid) that I made up previously.  Since it was a small piece of fabric I used only 1/4 cup of each liquid in the process--1/4 cup water to wet the fabric, 1/4 cup of water with the chosen dye concentrates to dye the fabric, and lastly, 1/4 cup of soda ash mixture to set the dye. Wait one hour and here are my results.  I love the mottling.


The second piece was a two-yard length of fabric that will become the front and back of a baby quilt for my new great-nephew.  I wanted it dyed a strong yellow so that I could batik several layers of blue over it. Because I want bright colors, I did not want any red mixed in my yellow dye (the red would have dulled the green from the blue and yellow mix). That really limited the yellows that I could use since most of them have an orange hue to them.  I used lots of lemon yellow and just a drop of sun yellow concentrate.  I took more pictures this time.

Here are the two  yards of dry fabric stuffed into a gallon ice cream tub and the 2 cups of water I am going to pour over it to wet it before I add the dye.

Here is my dye concentrate mixed in with the 2 cups of water for the dye solution.  Once the material was thoroughly wet, I added the dye solution.

Here is the fabric after I wet it with 2 cups water, 2 cups of dye, waited 15 minutes, and then added 2 cups of soda ash solution.  Notice it is not completely covered with liquid.  I worried a bit about that.

Here is the result.  A much more flat color since I used very little dye variation.  And boy, is it yellow! (The spot in the upper right is just a water spot that will dry)

Lessons Learned:
1.  One pure color is going to create a more flat color.
2.  Multiple pure colors, even if they are very similar, produce a more mottled, interesting fabric.
3.  I love LWI dyeing.


Monday, February 10, 2014

Another way of tray dyeing with Ann Johnston


Another experiment, inspired by Ann's DVD. Same type of fabric, same folding, same tray, same amount of dyes. Just put the harmonica folded package vertical (instead of laying flat) in the tray where the orange colour is welcoming the soda soaked fabric, waiting for 15 minutes.


Take the package out, clean the tray, and pour the blue colour in the tray.
Now turn the package upside down, into the tray and wait for a few minutes.


Then, push the sides into the tray, but leave the red middle-part on top. Voila, more stripes, for another type of quilt:


You know it's a good piece if you see this after rinsing ;-)"


Next monday, a bigger piece in a self-build installation, happy dyeing!