A TECHNIQUE DRIVEN Blog dedicated to mastery of surface design techniques. First we dye, overdye, paint, stitch, resist, tie, fold, silk screen, stamp, thermofax, batik, bejewel, stretch, shrink, sprinkle, Smooch, fuse, slice, dice, AND then we set it on fire using a variety of heat tools.

Showing posts with label silk. Show all posts

Monday, May 29, 2017

Coloring fabric with permanent markers and alcohol

For my last few posts, I thought I would give you a glimpse of some fabrics I have colored using a technique that has been around for a long time – but one I struggled with when I first started experimenting with it.  Basically, it is using permanent marking pens and high grade Isoprophyl alcohol. 

Here are a few examples of my earliest experiments on cotton:


These were fun, but I did not know they needed to be heat set before washing, and they ended up fading quite a bit.  So I put the technique aside, even though I was still very interested in learning how to use it.  Happily, I have since revisited this technique on muslin, rayon and cotton jersey and silk, and I found that heat setting will keep the colors from fading when I wash them out!

Some time ago, I found a couple of tutorials by Carol R Eaton. Carol is a great dyer and she shares many of her techniques on her blog carolreatondesigns.blogspot.com.  I visit her blog regularly, and was intrigued by her tutorials on using permanent markers and alcohol on silk.  Here is one I decided to try: http://carolreatondesigns.blogspot.com/2014/10/silk-sharpies-alcohol-yum.html.  This one caught my interest because she used empty containers to stretch the silk over, banding it in place, before she applied the markers and alcohol. But I just wasn’t ready yet to try this technique, so I filed it in the back of my mind for future reference.

That all came back this past month – I joined a group on Facebook that discusses painting with alcohol inks… close to the same thing, although I didn’t see any references to the markers, and I also did not see any examples of using the inks on silk.  So I did some searching on-line, viewed a couple of videos, then I went back to Carol’s tutorial.  Here are some of the results:

The scarf above was my first – I drew lines across the scarf, and large dots.  I tried doing it with the scarf folded in fourths, hoping the marker would go through the layers, but ended up having to go over the lines when I unfolded the scarf.  Then I used a pipette to drizzle the alcohol over the markings.  Smelly!  Best to have your work area well-ventilated.  Once the alcohol dried, I used my iron set to about a polyester setting to heat-set the ink, then washed the next day to remove the alcohol residue.  It came out far better than I thought it would!  It looked pretty crummy with just the marks on it, but totally transformed with the alcohol… magic!
I decided to try Carol’s method for the next scarf.  I have a large number of empty dye containers in a couple of sizes, so I placed several under the scarf, and secured with rubber bands:


Then I drew dots on the scarf with Deep blue, turquoise and lime green.  Next I applied the alcohol, and waited until the alcohol dried.  Then I removed the bands, heat set the ink, repositioned the containers, re-banded them, and drew some more dots.  This was repeated several times until the scarf was fairly well covered, leaving some white for contrast.
I really love how this one turned out, so on to the next one!  I did try an experiment with one of my Habotai silk scarves, but the colors I used were not great, so I rinsed the marks out as much as I could – more about Habotai a little later.
So, back to the blues & green, and I added purple on the next one.  I started out using the same process as the one above, but then added some free form markings too.

Well, I’m totally hooked on these for sure! 
So I went back to the Habotai scarf, just to play around and see how it compares with chiffon:


First experiment – I drew dots across the scarf which was stretched and banded over an empty container, then drizzled with alcohol.  I realized I didn’t need nearly as much alcohol as I had used, so on to the next experiment:


Here, I drew dots on one portion and a squiggle on another portion;

Still too much alcohol – pretty much obliterated the pattern.

Another “drawing”, but this time I used a q-tip to apply alcohol:


I think I’m gaining on it here!  Less is better with Habotai!

So what I am learning is to experiment, try different methods, and don’t give up!
I have ordered some Alcohol Inks, but just received them, so that will have to wait for another time.  But I am very pleased I overcame some of my earlier struggles with the markers and alcohol, and hope you try this… the colors you will get are fantastic!  By the way, if you want to give this a try, you can buy the scarves at Dharma Trading Co. www.dharmatrading.com.  I get the alcohol (usually 91% or higher) at my local pharmacy, and the markers are at craft stores, office supply stores, or online.  Let me know if you give this a try!


Tuesday, March 8, 2016

Pleats, Pleats, Me

A few more notions, in particularly purple Oakshott Fabric

I've been a bit more organised here, with markings at each end of the fabric to make even pleats.. These are roughly 1/4 inch deep and 1-1/4 inches apart.. Sew, press

Actually, I suspect that the unpressed pleats are just as interesting

Then crossed

Pressed again.. Oh, boy, fabric reduction by degrees...

And the back - also interesting..

A variation on yesterday's stripes-with-pleats, from my Summer Landscapes piece again.  I really like the way the pleats distort the patchwork

And here, even though this piece has batting and backing, you can see the light is altered by the layers and crossings.. Plain muslin/calico in the block - the sides of this piece are an odd brocaded furnishing fabric

Here I have made blocks - 5-inch squares were pleated in 2 directions, then trimmed (to 4 inches) and joined.  I tried to ensure that the pleats did not meet on the joins - this makes for easier pressing if nothing else

Working on the bias is interesting, too - here I have returned to the silk striped squares


Sewn, close together

Pressed

Snipped - I think this needs a wash...

Saturday, March 5, 2016

Com-Pleatly Crazy

Now, it's time for tucks, pleats and pintucks.. Most of these first samples are in silk taffeta

I have some nice wide-stripe silk taffeta samples, which are good to play with. I folded the fabric with the join of colour on the edge, and sewed a seam of relatively even width...


Crease and repeat...

Then fold the other way and make crossing pleats

Same fabric, pleats in slightly more random arrangements

Rinse and repeat again...

Interesting on the back, too.  I like the way this messes with the regularity of the stripes

And look, how much it reduces the sizes of the pieces (untouched sample at the back, and the pleated ones pressed)
One method of reducing your stash.

I've been on the road today, 8 hours teaching and 5 driving.. Now to bed, more tomorrow...

Friday, March 4, 2016

Apologies...

Last night's post was so difficult to arrange and upload, that I gave up on putting all the images I wanted to show here.. Tonight I'm in a strange house with limited time and web access, but I'll do some more of them below..
In a sort-of-random order

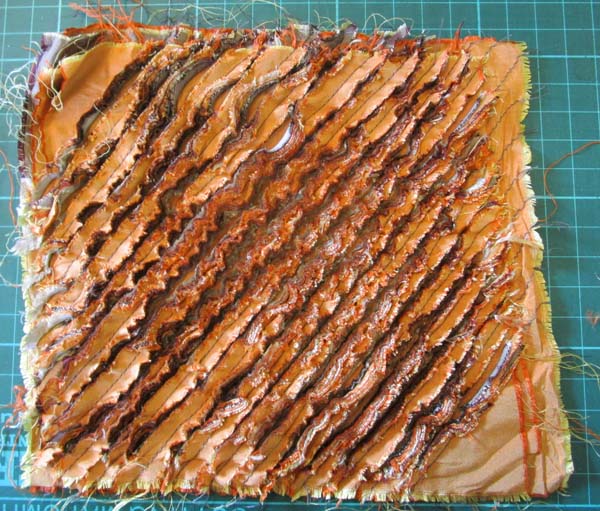
Doesn't have to be coloured cotton, this is silk taffeta - again 10 layers, but thinner, so closer stitching lines. Also calico/muslin. Note that I have outlined a part and not slashed

Detail and the whole piece - this is Moth Eaten. A quilt I disliked is recycled, and chenille-bodied. Copper wire antennae

Another brooch. Mainly reds, yellows, with a purple layer in the middle

Alternate layers of black and white, with a red leaf.  Also with extra stitching, which defines the lines of the leaf somewhat. I have also done black-and-yellow - perfectly bumblebee

And a last cushion.. Here I have stitched a diagonal grid, slashing only the outer parts.. Colours in the chenille are around the edges again

Sleep well, I'm for bed and sweet dreams...

Monday, November 16, 2015

Silk

In all my blogpost of this month I talk about procion dye powder. This is because I have experience with it. On other blogs I have read that there are other fiber reactive dyepowders, but I have never used them. In the first post of this month I mentioned a couple of suppliers. I had no intention of posting a complete list, but mentioned only the ones I had experience with.

Most of the time I work with cotton, but today I am showing you a raw silk piece of fabric which I snow dyed. As it is silk I could not use soda ash, but I presoaked it in vinegar. It was 3,5 yard of silk, so I needed a number of bottles of vinegar. Can you imagine how the studio smelled?

After the soaking the fabric was crunched, placed in a container on a raised platform and covered with a layer of snow. Dye powder was sprinkled over it, approximately 0,5 cup each of Teal Blue, Brushed Steel and Better Blue Green (all Dharma). A thin layer of snow was added to cover the dye powder. Left like this till the next morning. After rinsing, washing and ironing this is how the fabric turned out:


I did not take any process pictures, You know the drill by now :-).

And two detail shots:


Don't know yet what I will do with this fabric, but 3,5 yard should be enough to make some kind of garment.