A TECHNIQUE DRIVEN Blog dedicated to mastery of surface design techniques. First we dye, overdye, paint, stitch, resist, tie, fold, silk screen, stamp, thermofax, batik, bejewel, stretch, shrink, sprinkle, Smooch, fuse, slice, dice, AND then we set it on fire using a variety of heat tools.

Saturday, June 29, 2013

Closer to Finished

Remember one of my first attempts at gelli printing on fabric?  I have now backed it with felt and did some quilting/thread sketching on it.
Here is a detail.
And then I added some metallic paint.
It is now going to sit on my design wall for a while to see what else it needs before I call it done. The plan is to mat and frame it.

Monday, June 24, 2013

Gelli Printing With Wood Masher

Lynda here again with a short post about gelli printing with another one of my kitchen tools - a wood masher.


For this design, I covered the gelli plate with blue paint. I then dipped the masher into red paint and proceeded to stamp it on the plate. I also made sure to push down on the masher to remove some of the blue paint so the white fabric would show through.


And here is that print.  That white line on the right is from a string that was on the plate.  I planned to cut this up so it didn’t make any difference.


I thought this piece would make a great fabric bracelet. 
I cut out a piece 1½ inches wide and long enough to fit around my wrist, and backed it with felt. I then hand stitched it including the blanket stitch around the entire piece, added a button, and stretchy wire for closure.


Gelli printing is so much fun and so easy.  I hope these posts have encouraged you to try this. It's really quite addicting!

Saturday, June 22, 2013

Gelli Printing With Kitchen Tools


Hi! Lynda Heines here from Bloombakecreate
I love to shop thrift stores where I’m always on the lookout for stuff I can use in my art from white shirts to dye to kitchen tools for printing.
 For this post I am using three different kitchen tools to play with my gelli plate.

But before I get started I wanted to give you some tips I learned from working with this printing plate on fabric.
  1.  Any cheap craft paint work.
  2. Since craft paints dry too fast, I add Golden Open Acrylic Medium to slow down the drying time. This gives me time to play with my designs.
  3. Less is more – paint, that is.
  4. For any tools like these (except the one that makes lines) you have to push down into the plate to get an indentation. The line tool didn’t require any pressure. In fact, I wanted to be careful so I didn’t poke a hole into the plate.

So let’s get started.
I begin by putting dots of paint on the gelli plate.


Then I add the Open Acrylic Medium.


Next I spread the paint on the gelli plate with my roller.


Then I took this tool (have no idea what it was used for) and made some cool lines.


 Next I pressed the fabric into the plate. I love how I can see the pattern through the back of the fabric.


 Here is the finished lined piece, but I’m not done.


Let’s add a different color and this big potato masher.  


Then some circles with the whisk.


And then add lines vertically.


 And here is the finished print.


 Here is another piece without the lines.


 I just had to show you a closeup of that one.


The next two I cheated using a commercial batik as the base fabric.  I only used one paint color on this first one.


 This is the same batik fabric with a blue print using the potato masher and a yellow print with the line tool.


Since this was my favorite piece, I made a small wall hanging. I backed it with felt, hand stitched, machine stitched the edges, and then attached it to canvas I painted gold.


 So much fun! But there is more. I’ll be posting a little more later using some of my other kitchen tools.


A Stroll Through History

Well...the rather recent history on FIRE anyway.

A while back there was a technique introduced (at least to me) on this blog called "Smacking." While I was concerned when first seeing the title, the realization of what it meant for artists was exciting!

In the interest of trying very hard to catch up with all I've wanted to do, try out, experiment with, etc....I finally got to do some of this technique!!  (Better late than never, right?)

I had plexi and a "smack handle" but I would have had to walk all the way out to the barn to cut the plexi because it was too big.  In the meantime, I had gotten from FreeCycle a bunch of those clear plastic photo/sign holders. Figured they would work just as well so I was off and playing.

Below is the process I used and the result of my work.  I used a few colors of acrylic paint, a piece of my hand-dyed fabric that needed something else done to it, the sheet of plexi and the plastic frame.  You can follow the process in the photo collage below (starting top left and going clockwise).  I "smacked" the plexi with the paint-covered frame, then put the fabric down onto the "smacked" surface and pressed it down.


I'm very happy with the results (this piece will be going into my box of fabrics chosen for my "Pecan" series.  And yes...I'll be doing it again!! Now on to my next experiment.........

Saturday, June 15, 2013

Gelli printing with plants, stamps, stencils and more

Hi, I'm Holly McLean from the blog Through My Window and I'm excited to be guest blogging today about my Gelli printing. For many years, I've been using mono prints in my artwork in one form or another. Some twenty plus years ago I started with Styrofoam meat trays to make stamps and carve images into.
After the foam trays, I eventually found sticky back foam which is so much more versatile as it's easier to cut and is pliable as well, meaning that narrow strips can be cut and bent at will. I have a box full of various stamps that I've cut from sticky backed fun foam and mounted to Plexiglas, thicker foam, and even cardboard. I use these many times over  in my artwork.
 As I like to take photos and sketch when I'm not printing or sewing, I've also made a small collection of hand carved stamps, stencils and Thermofax screens. I like to combine all these resources when I get into a Gelli printing session. I send away my designs for the screens, but I make my own stamps and stencils. I have a heat cutting tool which makes cutting the stencils easy. Recently, I found clear plastic binder dividers are just the right weight of plastic and much cheaper than the overhead projector acetate I was using.

Since I sometimes take several minutes to work into the paint on the Gelli, I like to gather all my supplies that I think I might use first, such as paint, stamps, stencils, textural items, and torn and ironed pieces of white cotton fabric. I primarily use Setaclor fabric paints and I do not have an extender for the drying time. I try to work quickly.
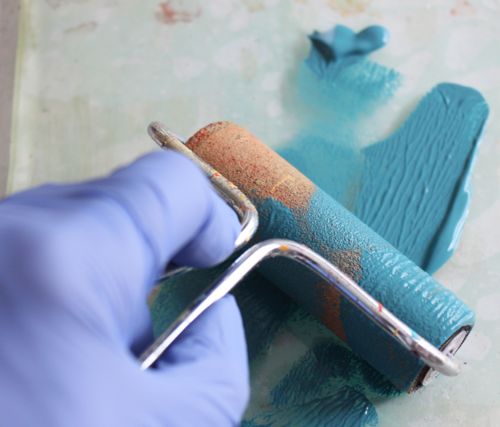
To get started, I roll fabric paint, usually Setacolor, onto the Gelli plate with a brayer and work into it in many different ways. One of the first things I may do is to draw into the paint on the Gelli with the wooden handle end of a paintbrush for small lines. I may also use the paintbrush itself to remove paint. You can see an example of this in the following print on the right side. After each swipe of the brush, I removed the paint from the brush with paper towel.

I started this print with a screen printed layer underneath on a piece of solid white cotton (the mossy green vine like plants). The stamped image I added after pulling the mono print.
 
This is the same print but with a stenciled plant added in bronze on the left after I pulled the print. I will sometimes stencil right onto the painted Gelli. I lightly hold the stencil on top and gently pounce on paint through a section of the stencil with a sponge brush. The stencil edges won't leave much of a mark or pick up much paint if you hold one corner of it away from the Gell.

Below, the pink plant on the left is again done by stamping after the fabric print is pulled. The white one on the right was done with a dry clean paint brush to remove paint from the Gelli before pulling the print. This piece isn't finished yet as I've just ironed on the appliqued leaves and will continue stitching.

This is one that I did in the same printing session that has been stiched, quilted and embellished. Again the background white plant was done by removing paint from the Gelli with the paintbrush.

My print themes tend to follow the seasons and the current flora or fauna. The tulips have just waned here and during their bloom, I sketched and made stamps before getting started with the prints. Below you see an example of a Gelli print that I did by:

1. Spreading paint with a brayer onto the Gelli.
2. Laying paper masks that I had cut form printer paper (these may be used a few times if you lift them carefully).
3. Using tulip stamps pressed directly onto the wet paint on the Gelli. The stamps are clean with no paint. This creates the ghostly background tulips you can see in the print below.
 I keep many old phone books where I collect flowers, leaves and even seaweed to use on the Gelli as a mask or as stamped image.

The print below happened to be made on a real gelatin mold which I stirred up to create the bubbles. I used pressed dried seaweed as a mask and cut out a paper seashell mask as well.  Just remember to reverse any image that is directional! The seahorse was stamped on using one of my homemade stamps after pulling the print.

 
Here's one that I've done in the same manner and stitched onto. I added color to the seashell with Neocolor II crayons.

I love to use pressed flowers from my garden as well.
I cut up and added bits of the print above to this piece:

Below, is an example of what the Gelli looks like with the paint brayered on and printed into with some textures (the circles are empty spools). A paper mask is laid onto the wet paint. The next step is to lay on the fabric and rub with my hand to transfer the image to fabric. Once the print is made, I use a palette knife to carefully lift the paper off the Gelli to use again.

In the same session I also pulled a print of a gold finch onto deli paper using a paper mask for the finch. Once dry,  I then pasted it into my sketchbook using matte medium. This allows me to play some more with the image.
The sketchbook is on the left and the fabric Gelli print is on the right. I've begun to color in the goldfinch with my NeocolorII crayons and will do some thread sketching ontoit  next.
I'm moving along with the thread sketching on the gold finch. It is nearly ready to be sandwiched and quilted. I intend to add some musical notes but I think after the quilting is done.
I hope I've given you lots of ideas for using the Gelli in your art quilting and journaling. I'd be glad to answer any questions!

Friday, June 7, 2013

How to make your own gelli plate

For those who want to make some " try-outs" before buying a " real" plate.This is a " homemade" plate.
3 cup of cold water, 3cup boiled water, 100gr. gelatin ( 4 euro)
Dissolve gelatin in cold water. Slowly add hot water.
 
Slowly pour dissolved gelatin into baking plate
 
 
Scoop off foam into trash can.Gently skim off bubbles
Let the gelatin narden then store in refrigerator for 12 hours.

I left the  gelli plate in the baking plate, while making my prints. ( it is very difficult to remove the plate) I was able to make 10 prints on cotton using this paint
Paint on my plate
 
 
Results


Cleaned the plate with cold water and put it back in the refrigerator. I can use the plat again for another 10 prints

So, now I know that printing with the " gelli plate" is something I can use .
I can order a " real" one now.

Thank you Judith to the accompaniment of the Gelli Plate