A TECHNIQUE DRIVEN Blog dedicated to mastery of surface design techniques. First we dye, overdye, paint, stitch, resist, tie, fold, silk screen, stamp, thermofax, batik, bejewel, stretch, shrink, sprinkle, Smooch, fuse, slice, dice, AND then we set it on fire using a variety of heat tools.

Wednesday, September 30, 2015

And Finally

Today is the last of my posts looking at techniques using synthetic fabrics and I'm going to share photos of the piece I made for an exhibition last summer.


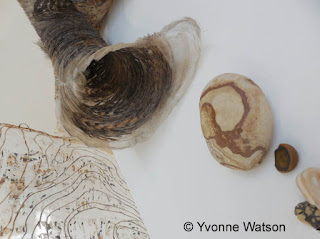
There was one long hanging piece and on the plinth were two pieces of pleated fabric together some stones that I had collected from the area that I was studying. I had used the stones as my colour source.
Below are close up photos of the pleated pieces.


I hope you have enjoyed joining me this month looking at techniques for synthetic fabric. Thank you to those of you who have commented. It's good to hear from you and please share any photos with us if you have tried any of the techniques
Yvonne


Monday, September 28, 2015

Latest Art Piece

Today I would like to share with you the methods I used to make one of my latest art pieces using synthetic fabric and some of the techniques I have shared this month.

I am interested in the change of landscape over time and the many layers, some of which are hidden, which are left behind by successive generations to relate a story.

I started with a photocopy of a map of an area in Dorset UK where I had spent a holiday. This area is littered with fossils and was the home of the author Thomas Hardy.


Needing more images for my paper lamination I used photoshop to manipulate some of the photos that I had taken whilst on holiday.


Two of my photos that I manipulated and below the transformed images. I then photocopied both of the black and white images.


 I also used text that I had manipulated on the computer. Hardy’s poems and the story of Tyneham a village that was taken over by the Ministry of defence in 1943.
The use of text is an important part of my visual language as I am fascinated with the shape and rhythm that the repetition of related words can create. My own manipulation of the text creates another layer to the visual narrative


One of my favourite of  Thomas Hardy's poems added to the stones photocopy.
I laid these images out and laminated them onto a piece of polyester.


During the time that I was making this piece I attended a course with artist Alice Fox on Rusting.
Alice showed us how you can paint fabric with tea and use objects to colour the fabric.
Silk or cotton is usually used for this technique but I was pleased that it worked on the polyester and not only where the paper was laminated onto the fabric.
I laid my fabric on polythene and painted it with tea. I then placed several pieces of rusty metal that I had acquired onto the wet fabric. I left it for a couple of days to dry thoroughly checking that the rust was transferring.
I then rinsed it out.


 After I removed the the fabric from the polythene I was left with some really interesting marks.
I took photographs for future reference.


After rusting the fabric I knew I wanted to make a long hanging piece. To give the piece more structure I used misty fuse to add another length of plain fabric to the reverse.
I originally thought it would hang on a wall but taking it down from the design board I noticed that it was more interesting with the light shining through it. 
It still needed some more visual interest so using my sewing machine I embroidered with a pin tuck foot and a twin needle and a gimp which I had rusted.


The lines reflect the contour lines of the map. 

I made another two pieces the same with slightly different imagery but without the embroidery.

I then used a 2 foot drain pipe to pleat these two pieces. I rolled the fabric around the pipe and gradually tied string around the pipe and squashed the fabric down the pipe.
I then steamed the fabric for about 20 mins. When it was thoroughly dry I untied the string leaving the pieces permanently pleated.

On Wednesday I will use my final post to show you the finished pieces in situ at the exhibition.


Friday, September 25, 2015

Paper Lamination

A technique that I use which involves the use of polyester is paper lamination.

I was introduced to this by Claire Benn when I used to study at C2C.

 Together with Leslie Morgan and Jane Dunnewold she has written a very comprehensive book Paper & Metal Leaf  Lamination.

Whilst you can also use silk for this process Claire recommends that if you are new to the process you use polyester. This will also mean that you have the opportunity to use a soldering iron to further develop the work.


Here is what you will need to get you started.


Sheer polyester fabric, matt medium, thermofax or screen, squeegee and images. These need to be either photocopies or newspaper.

I’m going to post a link to Claire’s video on you tube so I’ll not go into process detail but briefly you lay your images down on a bench covered with a drop cloth.

You pin a piece of polyester fabric tightly over the top and screen print with the matt medium.


I'm using some photocopies of family photographs


Screen print with a thermofax or silkscreen using the matt medium.

When the piece is thoroughly dry you need to carefully iron the piece without any steam using a hot iron. Cover the fabric with baking parchment to avoid any potential risk of  melting of the fabric!!

Having done this dunk the fabric into a bucket of water and leave for a short while. Cover the bench with plastic and with paper side up begin to rub away the paper.
Here are a few images of some of my work made using this method.


This piece is made using adverts for houses from our local newspaper. I laid them out
covered them with a piece of polyester and screened the matt medium through a screen on which I had put the image of the outline of a house.

These laminations can be used as resists for screen printing onto fabric using the medium of choice.

I prefer to use the laminations as art pieces. I often use two layers of lamination as in the pieces below. After the first pieces are made as the instructions above I lay the lamination over some more images and screen the matt medium through a blank screen.
When dry I iron the fabric then dunk it in the water and remove the back of the paper.
The second layer adheres to the spaces that were left bare by the first screening.


 This is a close up of a work in progress and shows two layers. The first was coloured paper cut from a newspaper and the second was some text that I had manipulated on the computer.
Below are two pieces I have sewn onto canvasses.


I will post a link to Claire Benn's video on you tube. It can be found here

Join me on Monday when I will show some of my most recent work


Wednesday, September 23, 2015

Stitch, Colour and Iron

I start today with an image that does not involve stitching but I accidentally omitted it from my last post


This piece was folded and then wrapped around a pipe. I then wrapped string around the pipe and scrunched the fabric down as you would as if you were going to shibori a piece of fabric.
The fabric was then steamed for about 20 mins. It was allowed to dry before the string was removed.


This piece was pleated on a Princess pleater and after steaming I removed all the threads. Then the piece was washed in a washing machine. I did this to see if this method created permanently pleated fabric and to my delight it does.

I have a book by Colette Wolff called the Art of Manipulating Fabric.
I have found this extremely useful for finding different ways of stitching fabric especially a chapter on smocking.
 If you google North American smocking there are lots of examples and You tube videos. I have used man made fabrics and then ironed them either with or without paper painted with disperse dye. When you stitch the fabric use normal sewing cotton which can easily be removed after the fabric is ironed.


Here is a piece of polyester chiffon that was printed and dyed before manipulating.
 I haven't found a use for this piece of fabric as the fabric is so soft that it will not hang. However it returns to shape as soon as you lay it flat. I have used the same method with other firmer fabrics that have been used successfully.


The image on the left is the back of the fabric and on the right the front of the fabric.
A piece of fabric was coloured yellow, stitched and then ironed with a piece of paper painted with scarlet disperse dye. Then the thread was removed.
Below the fabric was first coloured using paper coloured with disperse dye. The fabric was stitched, covered with a piece of paper painted with black disperse dye and ironed


I hope you will join me on Friday when I will look at paper lamination on polyester.


Monday, September 21, 2015

Manipulating fabric


 I’m going to show samples of ways in which work can be developed using the properties of manmade fabrics.
If you tie objects into the fabric and then steam or heat the fabric they will retain the shape of the object. Depending on the type and mixtures of fibres in the fabric this may be a permanent distortion or a temporary one which can be ironed out.

So how do you achieve these distortions?
 Over the years I have collected a box full of various object that I can use. I suggest you use metal or wooden objects but be wary of plastic buttons as sometimes they melt in the heat!


I’m not going to go into an in depth description of the method as there is so much information about the process on the internet and by Nienke on here
Basically you tie the object of your choice into the fabric at intervals and heat for about 15 mins or so. You can steam the fabric or heat it in a saucepan of water. After 15 mins remove the fabric carefully and leave to dry. Then carefully untie the fabric.


Here I have tied marbles into a stretchy polyester lining fabric. This was a white piece of fabric on which I had printed circles of text as well as other images. I tied in various sized stones and heated the tied fabric in a stainless steel bowl to which I had added scarlet disperse dye dissolved in enough water to cover the piece. One of the properties I like about the stretchy fabric is that you can add distortion without it affecting the surrounding fabric too much.

I have had quite a lot of success dyeing fabric this way without the addition of any carriers. I simply added the dye to the water and simmer for about 20 mins.

Having said to be wary of using plastic components when steaming fabrics I did explore the possibility of using rawplugs /wall plugs.
First I used a needle and thread to draw the fabric up into the plug and repeated this process over a small piece of fabric.


I steamed the fabric for 15- 20 mins then when it had dried I gently pulled the rawplugs off the fabric.
I then added some embroidery thread as embellishment.


I apologise for the photo but this wasn't a very large strip of fabric but you can see the peaks created by drawing the fabric into the plug and this fabric is now permanently transformed. Also lost is the beautiful shine that these fabrics have.

 I like to use metal nuts and here is a sample I made when I was exploring my paper making.
 First I had embedded paper pulp into monofilament knitting leaving spaces. When the paper was dry I folded it and tied the bolts into the knitting. I steamed the sample keeping my fingers crossed that the paper wouldn’t disintegrate. Luckily it all held together and below is the result. The image on the right shows a close up of the steamed knitting.


Another method I have used to manipulate fabric is by steaming the fabric between two pieces of folded paper.
 First I marked out the lines where I wanted the folds to be onto a sheet of freezer paper. Then I ironed the fabric between the marked sheet and another piece of freezer paper.
Placing the sandwich on a light table or window I traced the lines from the first sheet of paper and folded the fabric and paper along the lines.


I steamed the piece for about 20mins. If you have a heat press then you can press for a couple of minutes.


The image below shows a piece of fabric that has been ironed with a piece of paper
that has been painted with disperse dye.
 Underneath the fabric I have coiled some plastic string. This is parcel string that is made from manmade fibres.

 As the fibres are unknown I wear a mask and work in a well ventilated area.

On top of the fabric I placed the painted paper coloured side down and ironed with a hot iron. The string melts a bit and so distorts the fabric.
I have actually ironed the fabric flat after removing the painted paper and string really just to see what it would look like and I have to say I’m pleased with the result.


In the next post I will look at stitching fabric before steaming or ironing.


Friday, September 18, 2015

Onto Screen Printing

I put an image onto a screen using drawing fluid. When this was dry I used a squeegee to apply screen filler on top. When this was dry I washed out the drawing fluid.
This is a method I use a lot for applying imagery onto screens. I put the drawing fluid into a refillable roller ball pen so it is easy to draw on the screen.


Using thickened disperse dye I screened the image onto various fabrics.


The first was a piece of mixed fibre striped upholstery fabric


Followed by a piece of taffeta


When you are screening onto sheer fabric you only need one pull of the squeegee across the screen otherwise you do not get a good print. I usually take a print onto a piece of paper or a spare piece of fabric first before printing on the sheer. As you can see this looks very messy but when it has been steamed and washed out it transforms into a delicate printed piece of fabric which can be used on its own or layered with other fabrics.
Here are a couple of images of the striped fabric and the taffeta after more layers of print were added. The striped fabric is on the left and the taffeta on the right.


Below are the fabrics after steaming and washing

 Taffeta


Striped upholstery fabric and below is the polyester chiffon. You can see that all the messiness has disappeared and the fabric is lovely and soft


Next week I will be looking at manipulating the fabrics.

Wednesday, September 16, 2015

Printing directly onto fabric

Today I will show you my experiments printing directly onto fabric with thickened disperse dyes.

If you buy the thickener from Prochemical and dye it contains all the necessary ingredients for printing and there are instructions on the site.Here

I started with some monoprinting on chiffon using a couple of plastic lids. I stuck a handle onto the large lid so it was easy to lift.

I painted the thickened dye onto the lid with a paintbrush varying the brush strokes as I went along
 Then pressed the lid onto the fabric.


After I had steamed and washed this piece I lost quite a bit of colour. It’s still a lovely piece and I’m only sad that I didn’t use a larger piece of fabric.

I decided that I would mix some new dye into the thickener and make the colour slightly stronger. I had added dye that I had mixed at 10% with water to the thickener. Logic should have told me that the thickener would have diluted the colour but confess I was eager to print.
With the newly mixed dye I printed onto a piece of taffeta.


Here you can see the marks that you can make with the paintbrush. I love this technique and have also used it with foam blocks and Perspex circles.
This is before it was steamed and washed out. Below is the after steaming and washing photo.


You can see the colour has changed a bit but I am not disappointed. In reality the colour is more vibrant. I would have liked the blue to be brighter but when I’ve used up this dye I will invest in some more from a different supplier.


Printing with leaves on Taffeta


Fabric pre - steamed and below after steaming.


 On Friday I will look at screen printing directly onto manmade fabrics.


Monday, September 14, 2015

Preparation for steaming

Today I would like to talk about the materials needed to print directly onto manmade fabric.

When I first started to look at printing directly onto fabric there wasn’t a great deal of information about printing onto manmade fabrics.

Now Prochemical and dye produce their own thickener for printing on polyester fabrics. In order to batch the fabric you need to steam it and instructions for this are on their website.
You mix the thickener with the dye and then use your preferred method of printing onto your fabric.
I use monoprinting and screen-printing.
I have not tried Prochemical’s thickener as I have my own recipe now so I would be really interested to know whether any of you have experimented with thickeners.

For steaming my fabrics I have two methods depending on the size of the piece.
For small pieces I steam them in an old pressure cooker that I bought at a jumble sale.

It needs to be something that your no longer use for food. Below you can see that there is a wire basket that sits on a trivet and this holds the fabric away from the water.


I have also invested in a two plate portable cooker so that I can put my cooker outside weather permitting and so prevent my kitchen or studio getting steamed up.


For steaming larger pieces of fabric I use an old baby Burco which I have had for over 40 years and it was second hand from my sister !!!
I have placed a piece of wire inside so that the fabric is kept away from the water which is placed in the bottom of the Burco.


Recently I wanted to steam a long piece of fabric so I invested in a tube of air vent ducting.

My husband very kindly cut a hole in a piece of metal that fitted the top of the Burco and we set the tube inside. Luckily for me a lid of a Bain Marie I had fitted the opening at the top exactly.


The image on the right shows the tube covered with a thick cloth to help with the insulation.

This is rather a Heath Robinson contraption and we often joke in our house that Mr Robinson has visited again!! However it works a treat and I’m grateful that my husband can help me and usually save money!!
You can also make a steamer by marking a circle the size of the top of the Burco on the bottom of a metal dustbin and drilling some holes in the dustbin. You then stand the dustbin on top of the Burco. The steam from the water in the Burco goes up through the holes in the dustbin.

Before steaming the fabrics they need to be wrapped in paper so the dye doesn’t transfer onto the folded or rolled fabric.
When I buy goods online they often come packaged with long pieces of brown paper that have been crumpled so that the goods arrive undamaged. I save all this paper and flatten it out and use it for steaming my fabrics.
Lay the fabric onto the paper leaving a substantial piece of paper uncovered at the top.


Continue to fold over the fabric inside the paper making sure that the fabric is not folded onto itself.


Just one thing to note you may find that with some fabrics the folds are permanent after steaming. If you are not sure if your fabric will be affected then roll the fabric by putting a cardboard tube on the paper and rolling both fabric and paper around the tube.

You can do a test on fabric to see how it reacts by crumpling a corner in your hand then ironing it. If the creases come out then you are safe to fold if not then roll the fabric. I have found that the cheaper the fabric the more likely it is too crease but that’s NOT a hard a fast rule just an observation!!

In the next post I will look at monoprinting.