A TECHNIQUE DRIVEN Blog dedicated to mastery of surface design techniques. First we dye, overdye, paint, stitch, resist, tie, fold, silk screen, stamp, thermofax, batik, bejewel, stretch, shrink, sprinkle, Smooch, fuse, slice, dice, AND then we set it on fire using a variety of heat tools.

Showing posts with label stash buster projects. Show all posts

Friday, May 26, 2017

Thread Bowls


So… after learning how to make my Shabby Chic Scarves, then moving on to create several Fabric Collages using the Sulky Solvy technique, I came across these instructions for thread bowls by Wendy Hill, author and Textile Artist.  I’ve been collecting thread ends and other fibers for quite a while, not knowing what I would use them for, but knowing that some day the right project would come along!  The rest is history.  These bowls are not super sturdy, but they are real eye-catchers, and I think they are just the beginning for me.
After trying out Wendy’s instructions, I also bought her book


I feel I could have stopped at her tutorial, but the book does add a few ideas to the mix, for future inspiration.  Bottom line, here are 2 more great ways to use up some of your scraps (in this case thread), and create some lovely fiber art pieces! 

Wednesday, May 24, 2017

Fabric Collage

"Study in Contrast"
After I had been making my “Shabby  Chic” scarves for awhile, I decided to try using the technique to create a fabric collage.  I love mixing textures and fabrics and layering them, as I did to make the scarves, so why not use the same technique to create a wall hanging?  I could see that there would be some slight modifications needed.  For instance, instead of sandwiching the fibers between layers of Sulky solvy, I started by using fabric for the bottom layer, and then I placed other fabrics, yarns and ribbons on top.  Then I pinned a piece of Sulky solvy on top.  Then I grid stitched the layers together, rinsed out the Sulky solvy, and dried the collage.  Once it was dry, I pressed it with a pressing cloth (didn’t want the metallic fibers to melt!), then I fused it to a heavy weight stabilizer, bound it and suspended by yarn loops on a piece of Juniper wood from the wood pile.
I have done a couple other pieces using this technique:
"Meandering"
This one is very similar to the first.

"Study in Copper"


This one is larger, and I suspended it on a Café rod.

I really love this technique, and I’m sure there are many ways to use it for other fun projects.  I have one more to show you, so be sure to check my next post!

Friday, May 19, 2017

Covered Journals


I don’t remember where I found instructions for constructing composition book covers – there are so many great tutorials on the internet, not to mention the great blogs written by fellow fabric lovers!  Eventually I compiled instructions and modified them to create a Crazy Quilt version such as the one shown here.
Here are the basic instructions for making the cover (not including the modification to create a Crazy Quilt pattern):
Composition Book Cover

Materials needed
2 Pieces of fabric 16” x 10 ¾” – Outer cover and lining
2 pieces of fabric 10 ¾ x 13 ½” – cover flaps
14” ribbon – book mark
Instructions
Flaps
For each side, fold fabric in half, wrong sides together; press and pin along the fold. 
Assembling the cover
Place outside piece, face up, on mat.  Find the center, then pin the ribbon to the center.  Put Flap pieces down on each side of outside piece, matching raw edges together; pin in place.  Place lining piece, right side down, on top; pin.  Mark the curved corners using the composition book corners, to create the stitching line.  Start sewing 3-4” from the bottom edge of one side, using a ¼” seam allowance.  Leave a gap for turning.  Remove pins as you sew, but be careful of pin holding the ribbon – if removed too soon, the ribbon might shift and not be sewn down.  Press seams, trim corners, then turn right side out.  Use a turner to poke corners out.  Press seams, turning the raw edges of the turning gap in.  Pin all outside edges, then edge-stitch 1/8” from the edge.  Press.  Insert composition book.
For you quilters, I know you can imagine how to create a quilted piece to serve as your outer piece.  You can also make this with a solid piece of fabric, but it will look better if you do some decorative quilting on it before sewing the cover.  I did some with just solid pieces of fabric, and they are not as attractive – see below:
However, if you are just looking for a quick cover idea, this will work and takes less time!
By the way, a quick tip on inserting the composition book:  slide one side into the flap, then bend the other side back a little before sliding into the other flap.  Once in straight, then gradually bring the covers together and the book will slide into place.  Another fun way to use up that fabric, and a great gift item for anyone who journals or for a student taking notes in class!

Wednesday, May 17, 2017

Covered Notepads


I consider these notepad covers a stash buster, but they are also a great item for gift giving, or selling at craft shows... they don't cost a lot to make and they are really attractive and very handy as well!

I found a really great tutorial on line several years ago for making these.  Here’s the link for instructions to make this great gift item!  You will note that the author shows how to use an altered photo technique to create your own unique fabric, but any beautiful fabric will do!  Above is an example of several I have made using fabrics I hand dyed.  The bright orange one is the result of a surface design round robin I participated in several years ago.  So use your imagination, and show off your great fabric stash!  

Monday, May 15, 2017

Stash Buster: Grocery Totes


I love making grocery totes, especially since I also love using them!  I made my first batch from some purchased fabric about 8 years ago, and once I got used to keeping them handy in my car, I use them weekly when I do my marketing.  Benefits?  No plastic bags to return to the store to recycle!  Plus they are portable, reusable, washable (a really big plus in my book!), and they help me keep my fabric stash from taking over the studio!  And of course, since I love to dye fabric, it gives me an incentive to dye more, and I sell them at the local gallery and craft shows.
If you sew much, you have probably made a tote or two in your time, so maybe these instructions are not going to get you too excited.  But I am going to share my method just in case there is someone reading this who wants to give it a try.  Again, I found instructions somewhere on the internet, but have made some modifications over time that I think have improved on the original.

How to make a grocery tote bag
Materials
1 piece of fabric, 40” long by 16” wide
2 pieces of ribbon, 19” long by 1 ½” wide
Thread, notions
Instructions
1) Fold fabric in half, lengthwise to create a piece 20” long, matching raw edges.
2) Stitch sides, using ½” seam allowance.


3) Finish raw edges (I used a serger to finish, but you can zigzag or fold under and use a straight stitch if you prefer).  Fold edges down 1 ½” and press.  Stitch down.

4) At the bottom edge, measuring from the side edge in, then up from the folded edge, draw lines to form a 4” square on each side (I use a template).  Cut out square and discard.


5) Fold upper side opening to bottom opening.  Pin in place, then stitch.  Repeat on the other side.  This creates a flat bottom.


6) Finish raw edges of ribbon strips by folding under ¼” and stitching in place.  Measure in about 2 ½” from the side seam and mark – this will be where you align the outer edge of your ribbon.  Repeat on the opposite side of the front of the bag then repeat on the back side of the bag.  Pin one ribbon strip to the front, both edges. Stitch each edge down securely.  I stitched in a square, then I crisscrossed to add strength.  Repeat for the second ribbon.

Enjoy your tote, and get ready to make more!


Monday, May 8, 2017

Coiled Fabric Vessels


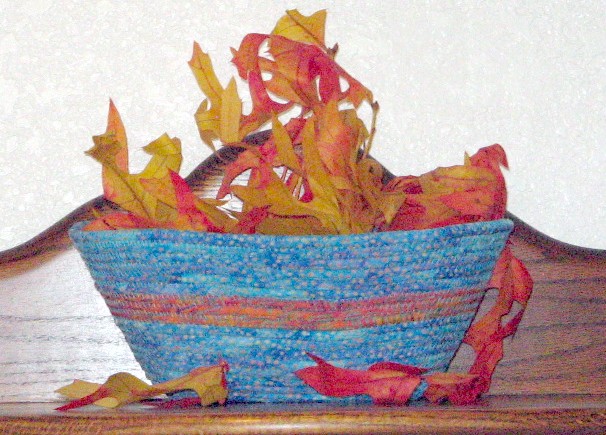
To begin, I have to give credit to my friend Sherrie Spangler for turning me on to making coiled fabric bowls.  I have admired them for a long time, but Sherrie posted a couple of easy-to-follow tutorials on her blog sherriequilt.blogspot.com that got me started on my way.  If you have never tried making these bowls, I encourage you to visit her blog and search on coiled bowls… great way to get a start on using up the ever-growing fabric stash!
Here are a few examples of what I have made over the past 5 years or so:
Bowl with autumn leaves


Oval bowl

Multicolor bowl w/medallion


Covered bowl with fluted edges


Bowl with leaves and medallion


Seed pot with feathers

These are just some examples of what I have made… some with a variety of scraps, some with hand dyed fabric, some with fabric purchased specifically for the project.


After following Sherrie’s tutorial for a while, I found two books that helped me to expand my skill set to include more than just round bowls.  The first book is “It’s a Wrap II” by Susan Breier.  I got this book in July, 2013 and it taught me how to make different shapes, and how to make lids as well as some neat new ways to finish the bowls with medallions, loops and other finishes.  Sometime in 2014, I found the book “Sewing Pottery by Machine” by Barbara Warholic, and her techniques took me to a whole new level.  I will be reviewing both books later this week if you are interested in learning about them. Meanwhile, I would love to hear from you if you have tried making bowls or have any questions or comments about the topic.  Happy coiling!


Wednesday, April 23, 2014

Stash Buster Projects - Part 2

Last August, I came across a blog post by Carol Eaton that got me very excited… you can read the post here.  In it, she showed photos of one of the members of her fiber arts collective, Rosalind Spann.  Rosalind was offering information about her coiled fabric bracelets, and it struck me that this was something I really wanted to try.  What a great way to use up fabric stash and create wonderful, one of a kind accessories!  Alas, Rosalind is not on the internet, so I had to see if I could figure out how to make these using my experience with coiled fabric bowls as a starting point.  I cut a 9 inch length of cord to start.  The big challenge was how to attach the ends the cord together before wrapping with fabric.  I’m still working on perfecting my method, but recently tried adhesive cloth tape, available in the first aid section of my grocery store.  I have also used zig-zag stitching, and a combination of both methods. 
Once I have attached the ends together, I wrap strips of ½” wide fabric around, anchoring with a little glue to start, then finishing up with a little glue when I have wrapped the whole circle and trimmed off the excess fabric. If desired, you can embellish with yarn, ribbon, beads, etc.
In the beginning, that was all I did.  The bracelets were cute, but not very sturdy.  I wasn’t sure what I could do to improve on the design until recently. I just tried using a clear, water based acrylic sealer found at the local building supply store.  The sealer comes in either spray form or in a can you can apply with a brush… I prefer the latter.  The surprise is that once the sealer dried, the bracelets became stiff… much sturdier than before!  And now they are a lot more durable and less likely to be soiled. 

Another variation I tried is to tape together 2 circlets to make a wider bracelet.  Below is a shot of the batch I have finished so far:

I’m having so much fun making these!  I plan to sell them at craft shows so I can make more!
I hope you have enjoyed these posts, and would love to hear about your favorite ways to use up fabric scraps.  Spring is here… time to de-stash and clean out those craft rooms!

Tuesday, April 22, 2014

Stash Buster Projects - Part 1

I’m sure many of you have a similar problem to mine… too much fabric, not enough projects to even begin to put a dent in the pile! I am forever trying to find ways to corral the ever-growing stacks, but the only way I seem to be able to reduce the stash is finding projects that will allow me to use not just large pieces, but those pesky scraps that I just can’t bring myself to discard! A couple of years ago, I read a tutorial by Sherrie Spangler that described how to make really fun scarves, using Sulky Solvy, a water soluble stabilizer, and scraps of fabrics and yarns. Sherrie does a great job of describing the process in several posts on her blog, http://sherriequilt.blogspot.com/. If you visit her blog and search on “scarf” you will find the tutorials that got me started making scarves as a stash buster. Sherrie and I have since met in person, and we marvel that, even though we both use the same process, we each have developed our own personal style, making our scarves very different in appearance!
Here is a photo of one of Sherrie’s scarves:

And below, one of mine:

These are very enjoyable projects that help use up the stash, but warning:  I have added back as much in new purchases as I have decreased the stash making these scarves… they are addictive, but have been a very popular item at the craft shows where I sell!  Another project I have enjoyed making to use up fabric is notepad covers:

This is a fairly simple project, but a great way to use up small pieces of fabric.  The above example is using 2 pieces of hand dyed fabrics, but you could also piece together or fuse smaller scraps to create the cover.  I used double sided fusible stabilizer to create the structure, then a heavy zig-zag stitch around the edges.  The notepad is a standard 5” x 8” lined tablet available at office supply stores.  There is a pocket on the inside of each cover – one to slip the notepad into, the other for notes and/or pen.  I have one I made several years ago that I use a lot, and it’s still going strong!  These are great gift items, and they help use up some of that fabric!  For more complete instructions, check here for the tutorial by Beth Wheeler!
I will be posting about another great stash buster tomorrow, so don’t forget to check it out!