A TECHNIQUE DRIVEN Blog dedicated to mastery of surface design techniques. First we dye, overdye, paint, stitch, resist, tie, fold, silk screen, stamp, thermofax, batik, bejewel, stretch, shrink, sprinkle, Smooch, fuse, slice, dice, AND then we set it on fire using a variety of heat tools.

Wednesday, May 31, 2017

The end, but hopefully only the beginning!


Well, I hope you have enjoyed reading my posts this month!  I touched on a variety of things you can do with your fabric stash, and a few fun techniques you might want to try!  I hope you will check out the tutorials and links I included… one of the best things for me about the internet is the incredible wealth of information I have found to give me inspiration and knowledge.  So have fun, play, try new things and enjoy the journey!  Thanks for spending some time with me, and thanks to Beth for inviting me to be a guest blogger again at “… And Then We Set it on Fire”!


Monday, May 29, 2017

Coloring fabric with permanent markers and alcohol

For my last few posts, I thought I would give you a glimpse of some fabrics I have colored using a technique that has been around for a long time – but one I struggled with when I first started experimenting with it.  Basically, it is using permanent marking pens and high grade Isoprophyl alcohol. 
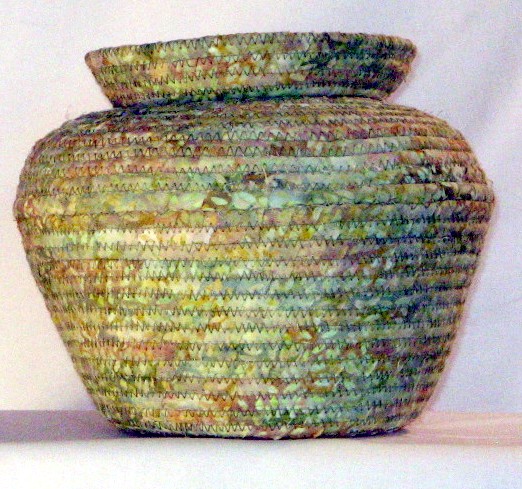
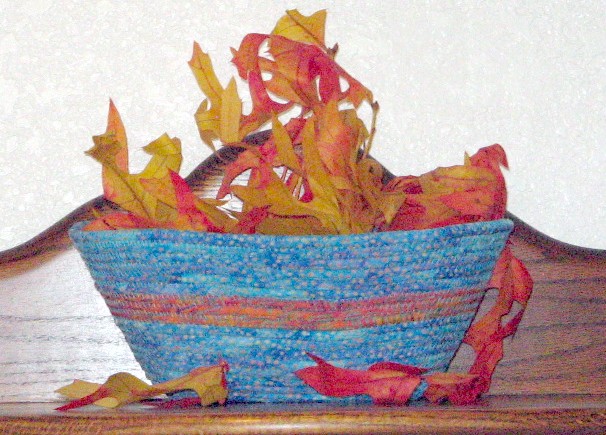
Here are a few examples of my earliest experiments on cotton:


These were fun, but I did not know they needed to be heat set before washing, and they ended up fading quite a bit.  So I put the technique aside, even though I was still very interested in learning how to use it.  Happily, I have since revisited this technique on muslin, rayon and cotton jersey and silk, and I found that heat setting will keep the colors from fading when I wash them out!

Some time ago, I found a couple of tutorials by Carol R Eaton. Carol is a great dyer and she shares many of her techniques on her blog carolreatondesigns.blogspot.com.  I visit her blog regularly, and was intrigued by her tutorials on using permanent markers and alcohol on silk.  Here is one I decided to try: http://carolreatondesigns.blogspot.com/2014/10/silk-sharpies-alcohol-yum.html.  This one caught my interest because she used empty containers to stretch the silk over, banding it in place, before she applied the markers and alcohol. But I just wasn’t ready yet to try this technique, so I filed it in the back of my mind for future reference.

That all came back this past month – I joined a group on Facebook that discusses painting with alcohol inks… close to the same thing, although I didn’t see any references to the markers, and I also did not see any examples of using the inks on silk.  So I did some searching on-line, viewed a couple of videos, then I went back to Carol’s tutorial.  Here are some of the results:

The scarf above was my first – I drew lines across the scarf, and large dots.  I tried doing it with the scarf folded in fourths, hoping the marker would go through the layers, but ended up having to go over the lines when I unfolded the scarf.  Then I used a pipette to drizzle the alcohol over the markings.  Smelly!  Best to have your work area well-ventilated.  Once the alcohol dried, I used my iron set to about a polyester setting to heat-set the ink, then washed the next day to remove the alcohol residue.  It came out far better than I thought it would!  It looked pretty crummy with just the marks on it, but totally transformed with the alcohol… magic!
I decided to try Carol’s method for the next scarf.  I have a large number of empty dye containers in a couple of sizes, so I placed several under the scarf, and secured with rubber bands:


Then I drew dots on the scarf with Deep blue, turquoise and lime green.  Next I applied the alcohol, and waited until the alcohol dried.  Then I removed the bands, heat set the ink, repositioned the containers, re-banded them, and drew some more dots.  This was repeated several times until the scarf was fairly well covered, leaving some white for contrast.
I really love how this one turned out, so on to the next one!  I did try an experiment with one of my Habotai silk scarves, but the colors I used were not great, so I rinsed the marks out as much as I could – more about Habotai a little later.
So, back to the blues & green, and I added purple on the next one.  I started out using the same process as the one above, but then added some free form markings too.

Well, I’m totally hooked on these for sure! 
So I went back to the Habotai scarf, just to play around and see how it compares with chiffon:


First experiment – I drew dots across the scarf which was stretched and banded over an empty container, then drizzled with alcohol.  I realized I didn’t need nearly as much alcohol as I had used, so on to the next experiment:


Here, I drew dots on one portion and a squiggle on another portion;

Still too much alcohol – pretty much obliterated the pattern.

Another “drawing”, but this time I used a q-tip to apply alcohol:


I think I’m gaining on it here!  Less is better with Habotai!

So what I am learning is to experiment, try different methods, and don’t give up!
I have ordered some Alcohol Inks, but just received them, so that will have to wait for another time.  But I am very pleased I overcame some of my earlier struggles with the markers and alcohol, and hope you try this… the colors you will get are fantastic!  By the way, if you want to give this a try, you can buy the scarves at Dharma Trading Co. www.dharmatrading.com.  I get the alcohol (usually 91% or higher) at my local pharmacy, and the markers are at craft stores, office supply stores, or online.  Let me know if you give this a try!


Friday, May 26, 2017

Thread Bowls


So… after learning how to make my Shabby Chic Scarves, then moving on to create several Fabric Collages using the Sulky Solvy technique, I came across these instructions for thread bowls by Wendy Hill, author and Textile Artist.  I’ve been collecting thread ends and other fibers for quite a while, not knowing what I would use them for, but knowing that some day the right project would come along!  The rest is history.  These bowls are not super sturdy, but they are real eye-catchers, and I think they are just the beginning for me.
After trying out Wendy’s instructions, I also bought her book


I feel I could have stopped at her tutorial, but the book does add a few ideas to the mix, for future inspiration.  Bottom line, here are 2 more great ways to use up some of your scraps (in this case thread), and create some lovely fiber art pieces! 

Wednesday, May 24, 2017

Fabric Collage

"Study in Contrast"
After I had been making my “Shabby  Chic” scarves for awhile, I decided to try using the technique to create a fabric collage.  I love mixing textures and fabrics and layering them, as I did to make the scarves, so why not use the same technique to create a wall hanging?  I could see that there would be some slight modifications needed.  For instance, instead of sandwiching the fibers between layers of Sulky solvy, I started by using fabric for the bottom layer, and then I placed other fabrics, yarns and ribbons on top.  Then I pinned a piece of Sulky solvy on top.  Then I grid stitched the layers together, rinsed out the Sulky solvy, and dried the collage.  Once it was dry, I pressed it with a pressing cloth (didn’t want the metallic fibers to melt!), then I fused it to a heavy weight stabilizer, bound it and suspended by yarn loops on a piece of Juniper wood from the wood pile.
I have done a couple other pieces using this technique:
"Meandering"
This one is very similar to the first.

"Study in Copper"


This one is larger, and I suspended it on a Café rod.

I really love this technique, and I’m sure there are many ways to use it for other fun projects.  I have one more to show you, so be sure to check my next post!

Monday, May 22, 2017

Shabby Chic Scarves


One of my favorite ways to use silky fabric scraps, yarn, dyed cheese cloth and other fun fibers is to make what I call a “Shabby Chic” scarf.  As usual, I found a wonderful tutorial on-line written by Sherrie Spangler, a fiber artist who has become a friend first on-line, then in person over the past 5 years.  Sherrie takes wonderful pictures, and is a talented fiber artist who is very generous about sharing what she makes on her blog sherriequilt.blogspot.com.  If you are not familiar with Sherrie’s blog, be sure to check it out for lots of inspiration and ideas!
So I am going to start this post with a link to Sherrie’s Scarf Tutorial – she has written about her process several times on her blog, but this one was the post that got me started. You will notice that Sherrie’s scarves look different than mine. I tend to load my scarves with a lot of different snippets, but Sherrie prefers to leave hers lighter and airier - two different versions using the same process.  That’s the beauty of leaving the process loose to allow for individual interpretations!


Above is a picture taken while I am stitching the scarf together.  All the fabrics, yarns, ribbons, etc. are sandwiched between 2 layers of Sulky Solvy water soluble stabilizer.  When I have finished grid stitching (rows of stitching across, then down the length of the scarf) I will rinse the scarf to dissolve the stabilizer, leaving a light airy piece of wearable art!

My next 2 posts will show other things you can use this process to create, so stay tuned!


Friday, May 19, 2017

Covered Journals


I don’t remember where I found instructions for constructing composition book covers – there are so many great tutorials on the internet, not to mention the great blogs written by fellow fabric lovers!  Eventually I compiled instructions and modified them to create a Crazy Quilt version such as the one shown here.
Here are the basic instructions for making the cover (not including the modification to create a Crazy Quilt pattern):
Composition Book Cover

Materials needed
2 Pieces of fabric 16” x 10 ¾” – Outer cover and lining
2 pieces of fabric 10 ¾ x 13 ½” – cover flaps
14” ribbon – book mark
Instructions
Flaps
For each side, fold fabric in half, wrong sides together; press and pin along the fold. 
Assembling the cover
Place outside piece, face up, on mat.  Find the center, then pin the ribbon to the center.  Put Flap pieces down on each side of outside piece, matching raw edges together; pin in place.  Place lining piece, right side down, on top; pin.  Mark the curved corners using the composition book corners, to create the stitching line.  Start sewing 3-4” from the bottom edge of one side, using a ¼” seam allowance.  Leave a gap for turning.  Remove pins as you sew, but be careful of pin holding the ribbon – if removed too soon, the ribbon might shift and not be sewn down.  Press seams, trim corners, then turn right side out.  Use a turner to poke corners out.  Press seams, turning the raw edges of the turning gap in.  Pin all outside edges, then edge-stitch 1/8” from the edge.  Press.  Insert composition book.
For you quilters, I know you can imagine how to create a quilted piece to serve as your outer piece.  You can also make this with a solid piece of fabric, but it will look better if you do some decorative quilting on it before sewing the cover.  I did some with just solid pieces of fabric, and they are not as attractive – see below:
However, if you are just looking for a quick cover idea, this will work and takes less time!
By the way, a quick tip on inserting the composition book:  slide one side into the flap, then bend the other side back a little before sliding into the other flap.  Once in straight, then gradually bring the covers together and the book will slide into place.  Another fun way to use up that fabric, and a great gift item for anyone who journals or for a student taking notes in class!

Wednesday, May 17, 2017

Covered Notepads


I consider these notepad covers a stash buster, but they are also a great item for gift giving, or selling at craft shows... they don't cost a lot to make and they are really attractive and very handy as well!

I found a really great tutorial on line several years ago for making these.  Here’s the link for instructions to make this great gift item!  You will note that the author shows how to use an altered photo technique to create your own unique fabric, but any beautiful fabric will do!  Above is an example of several I have made using fabrics I hand dyed.  The bright orange one is the result of a surface design round robin I participated in several years ago.  So use your imagination, and show off your great fabric stash!  

Monday, May 15, 2017

Stash Buster: Grocery Totes


I love making grocery totes, especially since I also love using them!  I made my first batch from some purchased fabric about 8 years ago, and once I got used to keeping them handy in my car, I use them weekly when I do my marketing.  Benefits?  No plastic bags to return to the store to recycle!  Plus they are portable, reusable, washable (a really big plus in my book!), and they help me keep my fabric stash from taking over the studio!  And of course, since I love to dye fabric, it gives me an incentive to dye more, and I sell them at the local gallery and craft shows.
If you sew much, you have probably made a tote or two in your time, so maybe these instructions are not going to get you too excited.  But I am going to share my method just in case there is someone reading this who wants to give it a try.  Again, I found instructions somewhere on the internet, but have made some modifications over time that I think have improved on the original.

How to make a grocery tote bag
Materials
1 piece of fabric, 40” long by 16” wide
2 pieces of ribbon, 19” long by 1 ½” wide
Thread, notions
Instructions
1) Fold fabric in half, lengthwise to create a piece 20” long, matching raw edges.
2) Stitch sides, using ½” seam allowance.


3) Finish raw edges (I used a serger to finish, but you can zigzag or fold under and use a straight stitch if you prefer).  Fold edges down 1 ½” and press.  Stitch down.

4) At the bottom edge, measuring from the side edge in, then up from the folded edge, draw lines to form a 4” square on each side (I use a template).  Cut out square and discard.


5) Fold upper side opening to bottom opening.  Pin in place, then stitch.  Repeat on the other side.  This creates a flat bottom.


6) Finish raw edges of ribbon strips by folding under ¼” and stitching in place.  Measure in about 2 ½” from the side seam and mark – this will be where you align the outer edge of your ribbon.  Repeat on the opposite side of the front of the bag then repeat on the back side of the bag.  Pin one ribbon strip to the front, both edges. Stitch each edge down securely.  I stitched in a square, then I crisscrossed to add strength.  Repeat for the second ribbon.

Enjoy your tote, and get ready to make more!


Friday, May 12, 2017

Book Review – Sewing Pottery by Machine by Barbara Warholic


This book, like “It’s a Wrap II”, took me to an even higher level of skill and potential.  I have always loved pottery, and even aspired to becoming a potter in my younger years.  But I found that making clay pots took a skill set I didn’t possess, and I had pretty much given up on that dream until I bought this book.  The author gives detailed instructions on how to create several pottery shapes, and it is now possible for me to make “pottery” with cord and fabric that look much better than any of the feeble attempts I made at creating pottery with clay back in my youth!  Here are some of the pieces I have made using Warholic’s instructions:
Jar with Lip

Round Bowl with Leaves and Medallions

Seed Pot

Indian Pot with Leather and Bead Embellishments
Oval Bowl with Leather and Fabric Medallion

Each of these vessels are made of multiple components, and sewn together by hand to create pots or vases. I highly recommend this book for those of you who, like me, love the “pottery” look and want to transform fabric and cord into eye-catching home décor accessories!

Wednesday, May 10, 2017

Book Review – It’s a Wrap II by Susan Breier


Before I found this book back in 2013, my only instruction on how to make coiled fabric bowls came from a lovely tutorial I found by Sherrie Spangler on her blog http://sherriequilt.blogspot.com/ ( search on coiled bowls and you will see several posts on her bowl making process). With photographs and easy-to-follow directions, I began to make bowls, primarily to use up my ever-growing fabric stash.
By chance, visiting a quilt shop a couple of hours from home, I spotted “It’s a Wrap II”, and had to have it.  By now, I was ready to take my bowl-making to a new level, and Susan Breier’s book gave me some valuable tools to do just that.  From how to make different shapes, to ways to finish your project with loops, medallions and other embellishments, this book will take you beyond basic bowl making to learning how to design your own original creations. Beautiful examples will inspire you to go beyond your comfort zone, and each finished project will leave you anxious to start on the next one!
Published in 2010 by Martingale & Company.
Here are a few of the projects I made using Susan’s book as my guide:
Oval Bowl

Covered bowl with knob handle

Basket with knotted handles

Bowl with beaded embellishment

So if you are ready to take the plunge, or maybe have tried bowl-making but want to learn some great techniques to expand your skill set, give “It’s a Wrap II” a gander… happy sewing!


Monday, May 8, 2017

Coiled Fabric Vessels


To begin, I have to give credit to my friend Sherrie Spangler for turning me on to making coiled fabric bowls.  I have admired them for a long time, but Sherrie posted a couple of easy-to-follow tutorials on her blog sherriequilt.blogspot.com that got me started on my way.  If you have never tried making these bowls, I encourage you to visit her blog and search on coiled bowls… great way to get a start on using up the ever-growing fabric stash!
Here are a few examples of what I have made over the past 5 years or so:
Bowl with autumn leaves


Oval bowl

Multicolor bowl w/medallion


Covered bowl with fluted edges


Bowl with leaves and medallion


Seed pot with feathers

These are just some examples of what I have made… some with a variety of scraps, some with hand dyed fabric, some with fabric purchased specifically for the project.


After following Sherrie’s tutorial for a while, I found two books that helped me to expand my skill set to include more than just round bowls.  The first book is “It’s a Wrap II” by Susan Breier.  I got this book in July, 2013 and it taught me how to make different shapes, and how to make lids as well as some neat new ways to finish the bowls with medallions, loops and other finishes.  Sometime in 2014, I found the book “Sewing Pottery by Machine” by Barbara Warholic, and her techniques took me to a whole new level.  I will be reviewing both books later this week if you are interested in learning about them. Meanwhile, I would love to hear from you if you have tried making bowls or have any questions or comments about the topic.  Happy coiling!