A TECHNIQUE DRIVEN Blog dedicated to mastery of surface design techniques. First we dye, overdye, paint, stitch, resist, tie, fold, silk screen, stamp, thermofax, batik, bejewel, stretch, shrink, sprinkle, Smooch, fuse, slice, dice, AND then we set it on fire using a variety of heat tools.

Wednesday, January 14, 2015

TYVEC

I had been saving Tyvec envelopes for YEARS (where were they now?) so I had everything we needed. We decided to use ProBrite fabric paints because of the mica which gives the hues a warm glow. We tried some experiments which didn't work but when we have perfected them, you'll be the first to know. 

These are the 6 pieces I painted and heated.


I was looking on YouTube trying to find some videos on Tyvec that didn't involve putting it on your house when I came across this one.


So I set off on a Tyvec bead making adventure. This is where I started.


I started by painting both sides of the Tyvec different colors


This is the sea mist green and chocolate bead with gold string.


This is the same material but rolled with the other (chocolate) color out


This is the long triangle of Tyvec painted on both sides and the slits along the edge.


Rolled on to a knitting needle and the end secured with a straight pin.


Very nice.


Thicker metallic threads


Another piece that is really wide.


Secured with a pin


OOO! Crunchy looking but actual quite soft


With beads. You can see the drop of Elmers I put on the knot to make sure it held.


What would a bead look like from a tiny piece of un-notched Tyvec look like?


Looks like it came from a horror movie - the bead from the Black Lagoon!

Monday, January 12, 2015

Ugly duckling 3

This time the duckling is a deconstructed screen print which had too much white on it.


I soda soaked it and accordeon folded it like this:


Placed it in a glass jar, added ice cubes on it and seafoam procion dye powder.


After this dye bath it looked like this. Much work was still needed.


Of course you can buy stamps, but I love working with unusual stamps. For this piece of fabric I stamped with bubble wrap and punchinella. For the bubble wrap I used teal Golden Acrylic and for the punchinella Pebeo Setacolor transparent fuchsia. 


The colors used in the deconstructed screen printing were red and blue so using similar colors would keep the whole design together.


After the two stamping session this fabric still needed more so I decided to give it another dye bath. I forgot to write down the exact colors I used, but they were different yellows, one was straw and the other might have been golden yellow or sun yellow.


This fabric was a difficult one, but I am satisfied with the result I got. Here is a picture of a detail:


Friday, January 9, 2015

Ugly duckling 2

Here is the second ugly duckling. I don't remember anymore how I dyed this piece of fabric, but it did not turn out great:


First step to improve it, is to over dye it. I soda soaked it, crunched it and placed it in this glass jar. It is the middle piece. Added ice cubes and a couple of teaspoons of rosebud procion dye powder.


The next day it looked like this:


Much improved, but I wanted to do more to it. My stamp this time was a slice of loofah and as paint I used burgundy Lumiere textile paint.


And a second layer using a bigger slice of loofah and gold nugget metallic Bella paint.


With this as result. Isn't it gorgeous?

Wednesday, January 7, 2015

Ugly duckling 1

When you dye your own fabric - even as an experienced dyer - you will not always love the fabric you created. Some pieces of fabric start their life as ugly ducklings, but with some help you can turn them into pretty swans. They just need some more attention :-). In the coming 3 blog posts I am going to show you what I did with some of them.
Here is a picture of how the fabric started out, a clamped shibori:


I accordeon folded it - sorry but I forgot to take a picture of this - and placed it on top of 2 other pieces of fabric in this glass jar. Added some ice cubes and burnt orange procion dye powder.


The color of the fabric improved, but it needed more. I used a piece of corrugated cardboard as a stamp. The piece of tape on the back made it easier to lift and reposition it. As paint I used Pebeo Setacolor transparent fuchsia and raw sienna.


After the stamping the fabric looked like this:


Much improved, don't you think? In two days I will show you another transformation.

Monday, January 5, 2015

Batik with thickened dye

My two favorite supplies to use in surface design are hot wax and thickened dye. You will not wonder why this batik technique is my favorite.

Like in any batik project, you need to apply hot soy wax to your fabric using whatever tools you have.


This is an antique potato masher my friend Marcella gave me. It is definitely one of my favorites.


The pieces above and below are done with a ordinary bore's hair paint brush. All of these pieces are done on pre-soaked (soda ash) cotton.


Next I make up my thickened dye and get out the old credit cards. These are unused gift cards (although who wouldn't use a Godiva gift card??)

Here I am scraping on the thickened dye with the card.


The cooloest thing about this technique is that after applying dye to one side of the fabric, you can scrape an entirely different color on the back.


I did this one on one side only because it was done with a tjanting tool in handwriting.

Another great winter batiking project. Hope you give this a try!

Friday, January 2, 2015

Simple Batik Tutorial

Things you will need:
towel, large flat surface with plastic or newspapers on it, lots of newspapers, iron, water supply, electric frying pan (dedicated to art), soy wax, fabric paints, things that make marks like potato masher, cut out sponge shapes, egg beater, cardboard tubes, paint brush or soft sponge, fabric to batik. 

I used a purchased silk haboti scarf 8X54. Iron it first like I didn't. Start the electric frying pan and add soy wax - flakes not a solid chunk. I set the thermostat at about 150 degrees F, just hot enough to keep the soy wax liquid. Soy wax melts at a very low temp and washes out of fabric with a simple hot wash (more about this later). I wouldn't use nor recommend any other form of wax.


I covered my work surface (a 2'X4') home made ironing board with 6 mil poly film and plain cheap felt. 


I made this ironing/silk screening/monoprinting surface out of a 2'X4' piece of 3/8" plywood from Home Depot. Cost about $8. I covered it with felt and 2 layers of warm and natural batting and a medium weight muslin fabric secured with a staple gun. I set it on collapsible horses ($12.) This surface is the BEST tool I use and I can collapse it in 30 seconds if needed.

I used a potato masher (they come in many shapes so get a variety) and set the end in the hot wax for about 30 seconds to heat the metal, shook off excess wax and applied in a pattern to the white silk.


Next I used some fabric paint that I thinned with water. You just need to try it yourself, get a feel for the consistency you like best. I started with paler colors since I would be adding 3 colors on top of each other. I applied the first (for me the lightest) color using the small square of soft sponge and put the scarf on a drying rack to dry in front of a fan.


Of course I didn't take a picture of just one layer of paint because I was so excited about what I was doing that I rushed through the entire process. I did use the rack and fan for each step so just take my word for it.
Above, you can see the potato masher imprint. The first color paint was light lavender. Dry completely between applications of wax and paint. I used this rack. The next tool I used was an egg beater and a metal bit from a lamp I threw away after scavenging any interesting parts that would make shapes!


After this wax was applied, I sponged on fuchsia paint which over the lavender looked purply pink.


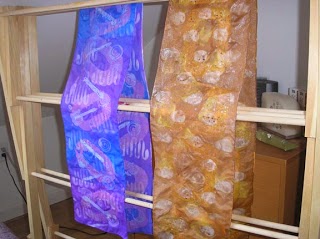
Then after this was dry I applied wax with a car washing sponge from which the center was removed. My last color was a vibrant purple alternated with a metallic dark blue (Probrite) paint. I allowed this to dry on the rack in front of the fan until it was completely dry. What I haven't mentioned was at the same time I was making this scarf, I was making another on the other side of the felt so that I could continue to work on one scarf while the other one was drying. Here are the two scarves finished and drying on the rack before wax removal.


When both were dry, I took them over to my conventional ironing board, covered with newspapers, laid down the scarf, covered with more newspapers and began removing the wax from the completed projects using the iron set on cotton and a few (3-4) layers of newspaper to absorb the wax. I pressed the scarf about 3 times with clean newspapers each time to absorb as much wax as possible. This will heat set the paint. In others words, if you don't remove the wax with a hot iron, your paint will wash out.


I filled a plastic basin with BOILING water and Ivory dishwashing liquid and swished it about  using soft tongs to get the last remaining bits of wax out. I did that twice then rinsed. I let it dry on the rack and ironed.


 This is much better looking in real life. It started to storm here and I lost the light. Both are habotai.


 If you have any questions or I was unclear about something please let me know so I can make myself better understood. This is a fun winter time project!

Thursday, January 1, 2015

Happy New Year Everyone!!

Just a quick post to wish you all a happy, healthy and creative New Year. 

Tomorrow we start a month of surface design potpourri. In case you haven't noticed, there is a list of the resident artists on the right margin. There are links  as well to their websites or blogs so you can get to know them better. Below that list is a listing of the months each resident artist will be hosting. Some of us have helpers who assist us with our monthly technique. Some artists want their month to be a surprise (smile).

We thought we would try something new this year and ask our viewers to volunteer to do a day or two on a project or technique they really like or use a lot. We have dedicated April to posting what YOU are doing and we can share it with the world. I KNOW you are out there and have loads of talents so please contact me at beth dot from dot maine at gmail dot com and we can start planning a showcase of YOUR work.