A TECHNIQUE DRIVEN Blog dedicated to mastery of surface design techniques. First we dye, overdye, paint, stitch, resist, tie, fold, silk screen, stamp, thermofax, batik, bejewel, stretch, shrink, sprinkle, Smooch, fuse, slice, dice, AND then we set it on fire using a variety of heat tools.

Friday, February 19, 2016

Parfait Dyeing

Rosalita Feero is back with another one of her posts from 2011. Not only is this a great technique but  great way to use up some leftover dyes at the end of a dyeing session. It's also a great beginner technique. After parfait dyeing, you'll be hooked.


I chose parfait dyeing for my April technique. I own a little fiber art business called Stoney Ridge Fiber Arts that I presently run out of my home. The main trust of my work is art quilts or what I call wall art. I love this technique for dyeing fabric and use it in the background of my pieces.


This is one of my pieces where I used a parfait dye for the background and some of my hand dyed fabric for the leaf. I find using the hand dyed fabric enhances the joy of making art. The process is simple and anyone can do it. I am going to try to give you what you need for instructions to be able to accomplish beautiful fabric to use.

(Side note..... the stamp on the bottom is one I made and it says dragonfly)


First I would like to give you an abbreviated list of safeguards.

  • Do not eat, drink, or smoke in areas where dyes and chemicals are used.
  • Work in well ventilated area.
  • It is wise to use newspaper, plastic tablecloths, etc. to protect your work area. (Ask me why I have pink, blue and other colored grout on my tiled counters.)
  • Wear a disposable dust/mist respirator if you dye fabric only occasionally. If you dye fabric on a regular basis, wear a MSHA/NIOSH approved respirator with cartridges for dusts, mists and fumes.
  • Contact wearers should be careful around powders to avoid eye irritation.
  • Wear rubber gloves to protect hands.
  • A complete list of safety rules can be found on the ProChemical website (www.prochemical.com)Below is a list of items you will need to do Parfait Dyeing:
Bulleted List
This is the bare bone material list that you need:
  • Dust/mist mask or respirator
  • Funnels
  • Measuring cups and spoons
NEVER USE ANY UTENSILS THAT HAVE BEEN USED IN THE DYEING PROCESS FOR FOOD USE AGAIN.
  • Soda ash
  • Mixing cups
  • Mixing sticks (I use chopsticks)
  • Soda Ash
  • Something to wipe up spills. (Sometimes I use a piece of fabric - it turns into a nice piece to work with.)
  • Rubber gloves
  • Dye remover for your hands. (ReDuRan)(Not mandatory...it will wear off eventually...LOL)
  • Fabric (100% cotton)(I use Southern Belle fabric made in China. You can get it from JoAnn on line.)
  • Dye (I use either procion mx dye from ProChemical or from Dharma Trading Co.)
This is a list of items you will need for this project. If you get bit by the dyeing bug, you will want to research to see other items that make dyeing easier.


Parfait dyeing is a form of low level submersion dyeing.

Soda Ash Solution

(This makes one gallon - cut recipe for less)

1 gallon of warm tap water (between 75 degrees and 95 degrees F)
1/2 cup salt (non-iodized)
1/2 to 1 cup of of soda ash (Can be purchased in pool supplies in some stores)

Dissolve soda ash and salt in the water.

Dye Solution

(This makes 8 oz of dye solution)(USE YOUR MASK HERE)

1 tablespoon of procion mx dye
Make a paste with the dye and a small amount of plain warm water( again in the 75-95 degree range) in a one cup measure and try to make sure that all the powder is mixed in and then fill to the one cup line and gently mix again. (I store my dyes in plastic bottles with a spouted cap.)


  1. First prepare you fabric by washing in hot water with a little synthrapol. (3 fat quarters)
  2. Use a screw-top quart containers or a container that will hold a quart for your dye container. I use a screw top plastic quart freezer container. The idea is to have a fairly small container with straight sides.
  3. Wet one fat quarter with 1/4 cup plain warm water in your dye container. You may scrunch or twist or pleat the fabric to get different design results.
  4. Decide how dark you want your fabric. Put the amount of dye from the following in an eight ounce cup. I use a 250 ml beaker or equivalent. (See above)
  5. Pale = 1 drop of dye concentrate
  6. Medium = 2 teaspoons dye concentrate
  7. Dark = 2 tablespoons of dye concentrate
  8. Darkest = 4 tablespoons dye concentrate
  9. Add plain water to this cup to make a total of 1/4 cup (60ml) of the dye liquid.
  10. Pour this solution over the wet fat quarter and press down to distribute the dye. If you want a more solid design, move the fabric around a bit. I like the spontaneous result so I do not move it around.
  11. Measure 1/4 cup (60ml) of soda ash solution and pour this over your fabric.
  12. Wait ten minutes; wet another fat quarter with plain water and arrange it on top of the first layer.
  13. Follow steps 4 -12 for this layer.
  14. I often will stop at two layers because I like the way they come out. However, it is intended for three layers.
  15. Follow steps 4 - 12 for the last layer.
  16. Let the parfait sit for at least one hour after the last layer of fabric and soda ash solutions is added. Press or turn the top layer a couple of times during this time. Fabrics can stay for overnight for stronger color. I usually can not wait that long.
  17. After the setting time, pour off the excess dyes and then rinse in cold and wash with some synthrapol in hot water. (This can be done in the washer with synthrapol and a color catcher added.)
  18. Dry, iron and enjoy.
These directions are courtesy of Ann Johnston's book "Color by Accident".


First Layer.


Yellow dye and soda ash added. (I used Pro Chemical Dye Sun Yellow, #108)


Blue dye and soda ash added for second layer.( I used Pro Chemical Turquoise # 410)


Last layer dye and soda ash added. (I used Pro Chemical Deep Navy #414)


Here we are just waiting to exhale :o)


You really didn't think I could stop at one did you?

TAH-DAH

Bottom layer:


This layer was folded like a fan and then twisted before putting in the dyeing container. You will note the difference in this layer and the next.


Layer 2
This layer was just scrunched up and put on top of layer 1.


This is the top layer. You can see that the top layer does not have any yellow and is much more muted.

All that know me know that I am a what-if kind of gal. So I thought "What If". Here is what happened.


I took only 1 piece of fabric and squirted multiple dyes on it.

I also like to use cheesecloth on my art projects, so, I put a piece of cheesecloth in with all the dyeing I did.

Here are the results:


I hope you have enjoyed this technique. PLEASE, if you have any questions please let me know. You can get a starter kit for beginning dyers at the following link for $19.50:

Thursday, February 18, 2016

Repost of "Marble Crazy"

This is a post from 2011 by another of our founding member, Rosalita Feero.


Hi All,
Sorry I am so late posting my marbling play day with Kathy Molatch. We had a great day and learned a little more about marbling. However, we also learned we need to know a lot more.
As Kathy mentioned, I mixed the Carageenan without putting Calgon in it. My water is hard and really needed the water softener. We mixed it in later but I don’t think it did as well as it would have if I had put the Calgon in from the get go.
Here is a start on what I want to accomplish. The problem is the paint did not stay where I wanted it.


I sort of like this one but still not quite what I want.
At the end, we got a little funky. I am a what-if kind of gal. So………..


This was not as great. I used transparent purple first and then it was hard to work the opaque paint afterwards.

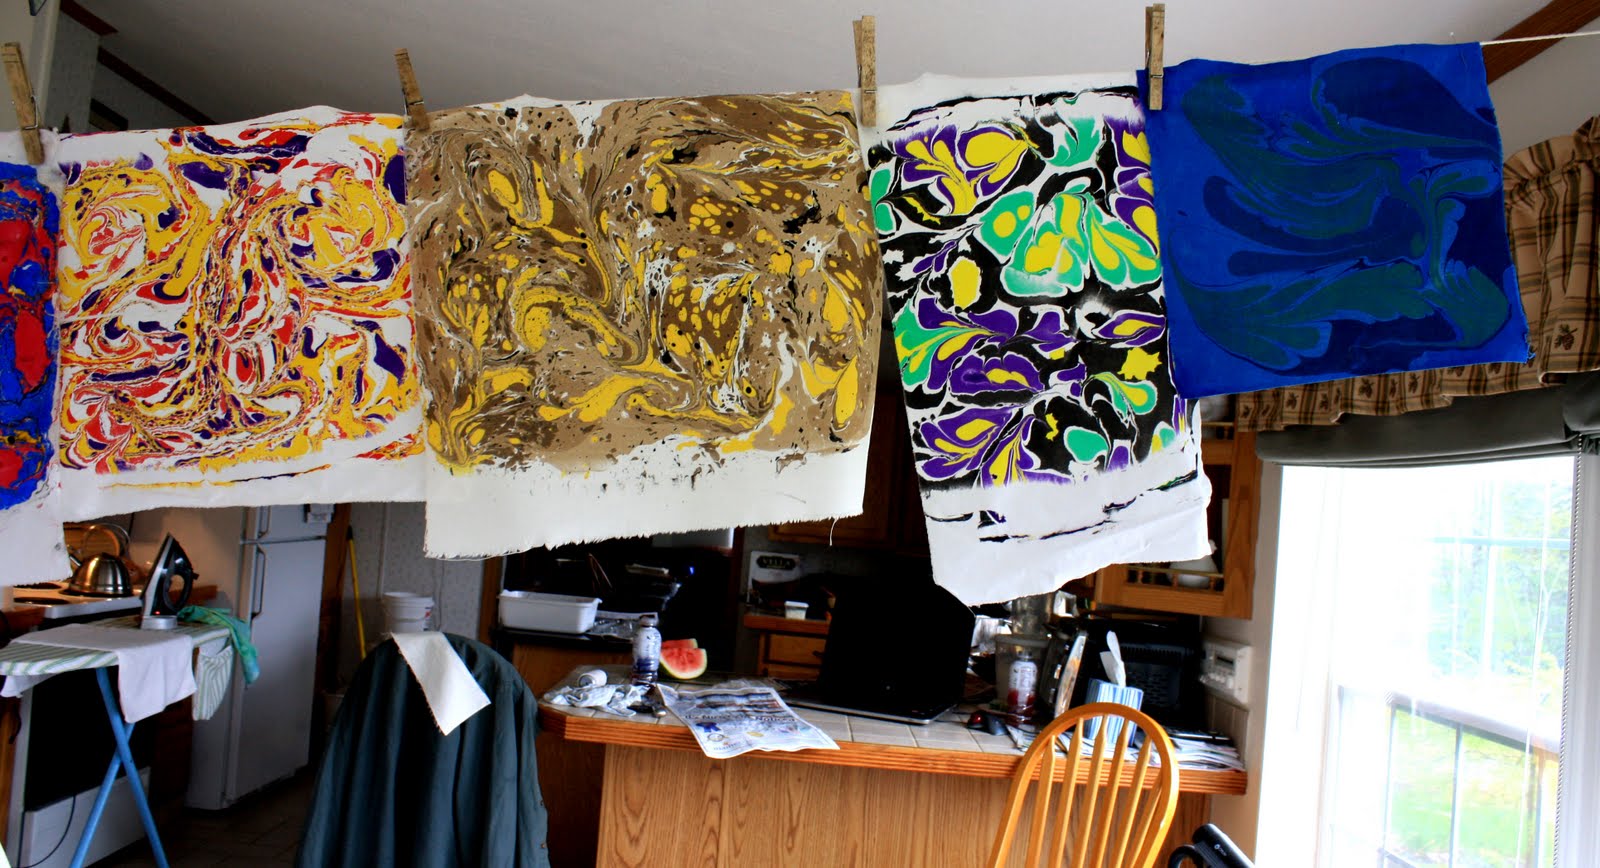
Here is a picture of my days marbling.


I had a great day and hopefully will find some more time soon to try again.


Wednesday, February 17, 2016

My Marvelous Marbling Moments by Judith DeMilo Brown

Another post from 2011by Judith DeMilo Brown

Saturday was a play date with FIVE.  Since Rosalita and Kathy had both had great success with their marbling, I asked if the play date could be them showing the rest of us how to marble. Everyone agreed. Rosalita prepared the Carrageenan and presoaked the material in alum.  I brought my FW Acrylic Inks to try.  Success!

I don't personally care for the highly swirled marbling but loved Rosalita's flowers and blobs so I was going for those results.  Here are my two flowery attempts.  The pink flower is not bad but I don't care for the green leaves.


Then I moved on to the blobs.  On the first one I tried to lay the fabric down by myself.  That was a mistake.  You can see lines where I hesitated when laying the fabric down on the carrageenan and inks.


But I love the blobs!  I think pieces of that fabric will be quilted and turned into mini works of art.  So I made more blobs.  I love my blobs below. It makes me think of green eggs and ham.


 Unfortunately, I just have the one to show to you today.  The rest were still wet and I left them at Rosalita's to dry.  But I got really good at making blobs and started making them into better compositions. Can't wait to show  you.

Okay, so lessons learned for the day. 

  1. FW Acrylic Inks work well.  Rosalita especially thought the black was superior to the airbrush black paint she was using.
  2. I loved working with the white ink to create rings inside other colors and white on white.  You can see the rings in the green eggs and ham picture and you can see the white on white I got in the outer edge of the pink flowers.
  3. While Rosalita needed to use the surfactant with the paint, I did not need it for the inks to disperse well.
  4. Cargeena is tempermental.  First thing in the morning it was working great. After lunch two of the three trays were sinking the ink  (see the results of sinking rather than dispersing ink below).  We let it sit for another 1/2 hour or so, skimmed the surface again, and tried again, and it worked fine. ?????
5.  While I have  never considered marbling, I tried it for the blog.  I now want to do more!  True marblers may hate my blobs because I am not swirling them, but I like them.   I will keep happily blobbing along.

Tuesday, February 16, 2016

Marbling - part two

Good morning!  These are photos of finished pieces at the end of the day.


More finished pieces.  Looking at these photos, I realized that not only did Rosalita choose opaque, she also gravitates toward the warm side of the color spectrum.  I'm on the cool side with my transparent paints.

This is one of my pieces done on dark navy.  The dark, almost black background really made the colors pop.

A view of my finished pieces.

This marbling session really taught me a lot.  I can't wait to get into this in my studio, which I'll be doing this weekend.  I hope that some of you out there in fiber land get the opportunity to try this technique and post some results.

Monday, February 15, 2016

A blast from the past

We decided to post a few techniques done 6 years ago in our first days. This was a great two-part post about Marbling from Kathy Molatch, a founding member/artist.


Thursday, February 11, 2016

New Video

Hi all,

Sorry the video did not work.  A new video is now in it's place and the link works.  Yeah!  Here is the link to the stencil post.  Or, you can watch the video here.


Wednesday, February 10, 2016

Originality-Making Your Own Stencils-Continued

ORIGINALITY-MAKING YOUR OWN STENCILS-CONTINUED-by Deborah Babin

STENCILS

Often times, as I am working on an art piece I realize I need to stop. This is something I embrace. I have learned that at any given moment it is possible to come to a point where I do not know what the next step is. In my early years this was bothersome; however, now I know that this is likely and I accept it. I put the work aside and think about it for a while. Typically I re direct my attention to another piece; this is a cyclical process. If I do not think of new ideas for the piece within a reasonable time, then I put it aside...it goes into a bin...a waiting room, so to speak. I never know when I will come back to it; but, eventually I do. And, when I do, I am excited to see it and I usually know exactly what to do next. 

Many times I add paint; either by direct application, painted stencils and/or stamps. 

Recently, I made a new kind of stencil.


Another solution I have for pieces in the waiting room bin is to cut them up, re-stitch and add on; this is VERY gratifying for me.

Example


Recently, I began to stitch pieces of fabric together and came up with this combination. I did not like the results very much, but I knew there was something interesting happening within. I put it aside and after a few days I decided to extract a section. (see yellow outline)

I use strips of mat board to block off areas and examine them; and, sure enough, I saw an area I liked. I cut it out and refined it a bit. The result was good and now I can preceed.  


I decided that the open areas needed details. I liked the linear stripes on the left panel that are printed on the fabric; it is good to repeat motifs. To do this I placed torn strips of green painters tape to mimic the white horizontal stripes.


Then I painted within the spaces of tape with shades of gray acrylic paint.


I am happy with the results. These new motifs are perfect for stitching. 


The remaining open areas have been painted with other stencils, which I will detail in my next post.