A TECHNIQUE DRIVEN Blog dedicated to mastery of surface design techniques. First we dye, overdye, paint, stitch, resist, tie, fold, silk screen, stamp, thermofax, batik, bejewel, stretch, shrink, sprinkle, Smooch, fuse, slice, dice, AND then we set it on fire using a variety of heat tools.

Thursday, March 17, 2016

Holey, moley, more holes..


Now, if you want multiple holes, they each need their own little facing piece

Sew, trim, turn, press, you know the drill

Nice.. Squares make house-windows, circles like little moons.

Now, the padded version.. Layer batting/wadding, then RS up, then RS down, draw, sew...

Trim out the batting/wadding as close to the stitching as possible

Trim the seam allowance to 1/4 inch and snippety-snip

Turn through...

Press

and quilt...

More 3D shapes tomorrow...

Wednesday, March 16, 2016

Holey, holey, holey

And now for something completely different... Think of this as manipulating No Fabric at all...

Making Holes


Take two pieces of nice Oakshott fabric, and place them face to face (yes, I know, woven, no Right Side.. Use Imagination...) Draw a harmonious shape with a pencil

(A digression - I use pencils a lot - they have a nice old-fashioned feel to them, mark most substances in a fairly non-permanent manner, and Never leak in your pockets..)

Anyway, make haste to your machine, and sew all around on your line, overlapping the start and finish. Use a small stitch and don't bother to do anything with the thread ends.. Have I told you that I'm both Lazy and Fussy? It's a good pair of characteristics in my view - I like to do it the Easy Way, but I also like to Get It Right.. I hate tieing off ends...


(Blogger is making fussing noises again.. I'm going to sulk if this doesn't work again..)

Oh good! the threat worked!
Trim out the centre of your shape, leaving about 1/4 inch seam allowance

Snippety-snip all around, being careful not to cut the stitches please. Contrasty thread, as it's a sample, match yours, please

Turn through the centre, press firmly.. Yippee! You've made a Whole Hole!
Topstitch if desired

And, by gum, this makes for Easy Applique Circles...

Other shapes are good -

Here I have made a selection - note that if your shape has straight sides you only need to snip into the corners.. Shapes with intrusions (think stars) are possible, but may need stitching down, or use a crisp fabric?
More tomorrow

Tuesday, March 15, 2016

Yesterday's Failed Image


And a note that, as the square is so much easier to set into a surround, that's what I did
Long day, short temper, bad internet.. Gribble, gribble..
More tomorrow

Monday, March 14, 2016

Crinkles continued...


As yesterday, so today...
Take two squares, the large one twice as big each way as the small
Gather the edges, like yesterday's circles, matching the corners...
Discover that the photo of the next stage has failed
Discover also that the sample is at work, but you are at home
Curse lightly in three languages
Defer that part till tomorrow

OK, try something else
Two squares as above
Pin the corners, pleat the sides in 3 places

Sew all around
Squish

Add stitch...
Rose Square


Same again, pleat twice

Sew, so...

Press... Squishy, squishy...

More, and the missing image, tomorrow

Sunday, March 13, 2016

Crinkle, crinkle, little flower

This has got to be one of my favourite things...

Cut two circles, one twice as big across as the other (these are 5 and 10 inches) Oakshott cotton again

Cut a small slit in the centre of the smaller one, and crease to mark the quarters on both

Using a doubled thread, gather the quarters so that the larger circle matches the smaller, (use a matching thread, I have used a contrast for the sample)

All the way round... Pin between the quarters and distribute the gathers evenly

Sew all around by machine

Like so... (matchy, matchy, please...)

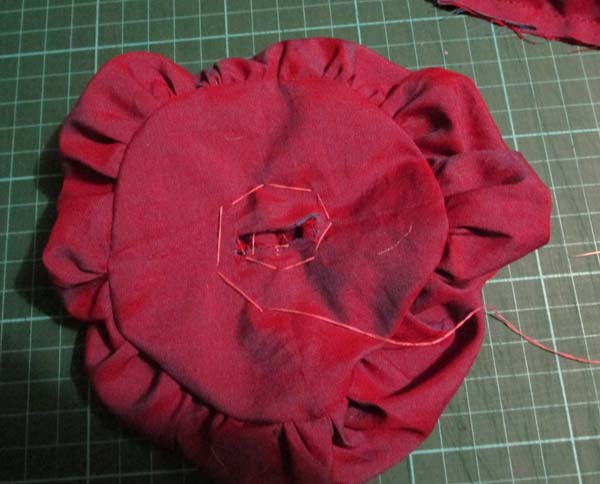
Turn out through the hole like so... Now go downstairs/to your armchair and sit in front of the fire, with a cup of tea and some chocolate (this is a very important part of the process)

With your doubled thread as before, start in the middle with a back-stitch or two to secure the start..

Turn the piece over and push the top fabric with your thumb to make a small pleat. Stitch up from the back, through the top layer and back down.

Turn a little and repeat..
And again..
And so on

Keep working round in a spiral, pushing the fabric inwards and working out towards the edge as you go. Make the top match the back for size

Back will look like this

Front... More stitches will mean a flatter result

Make 12 of these

Trim, turn out and press. Sew into a ring, then add the centre

Add beads if desired (do this last, or they disappear under the folds)

Nicely 3D

One in cream, also with beads

Rusted linen, silk, quilted ground...
Sleep well...


Saturday, March 12, 2016

More Technology, Part the Second..., or Ruffle Kerfuffles

When, in the early 70s, I bought my 1928 Singer 15 class treadle machine (from an advert in the Post Office window, for £3) I went out almost at once and bought a Ruffler.. it cost more than 4 times what the machine had, and paid for itself in ruffled layered 1970s skirts at once..
Here's one just like it

From various angles, as fitted on the said (still used every day) machine.. Note that the little fork goes around the needle-clamp - this is what drives the ruffling action.
You may also note that the settings (first photo) are 1, 6, 12 and *
That is, every stitch, every sixth, every twelfth, and off.. I'm holding a bit of card behind the foot for clarity, but this is not part of the attachment.  Note also that I have used up all the paint from the bed of the machine..

I cut long strips to demonstrate this jolly toy. Here it is set on "every stitch" and ruffling along..

Make sure your foot is firmly attached, and that the needle-clamp is also firm - this action is a bit inclined to throw things around, and I did break a needle doing these...
The amount of ruffling is affected by the stitch-length set on the machine, and also by an adjuster on the foot..

Small image, sorry, but this shows the relative reductions in length. All these started out the same as the bottom piece.  The middle one has 6- and 12-stitch ruffling..
As with yesterday's slotted feet, the ruffler can add a straight piece underneath

Looks like this when finished


Or between 2 layers of fabric.  This (as the middle layer vanishes and the top and bottom do not) is Very Bad For The Brain...


Purple on top, light green underneath, dark green is ruffled...  If you plan to make the ruffles with hemmed edges, do this first.. You can also ruffle a folded piece, so that there is no hem visible - if you want to do this, press well and machine-baste close to the raw edges to hold these together first...
And so to bed.. I've been teaching Trees today, so now I'm for fire and chocolate, then sleep...