A TECHNIQUE DRIVEN Blog dedicated to mastery of surface design techniques. First we dye, overdye, paint, stitch, resist, tie, fold, silk screen, stamp, thermofax, batik, bejewel, stretch, shrink, sprinkle, Smooch, fuse, slice, dice, AND then we set it on fire using a variety of heat tools.

Monday, March 7, 2016

Pleat, pleat, pleat


Now, stripes and pleats mix very well
With lines in all directions,
No time to show, but I will tell
In verse (defies inspections)


Join up some strips of pretty hue
And sew with stitch of colours
Press nicely and re-sew the two
Lines on the joining edges


Thus, make a pretty line of light
With haste, pressed and presented
And laid along from left to right
(not needful to be scented..)

Sew all along to hold them down
With yet more rainbow threads
Having first made the pleats lie down
Their tidy little heads

Return the lines, remake the folds
And stitch again with force
To make a three-dimensional
Effective line of course

So this is it, the final shape
Of course you'll find another
So play with pleats all the long day
(I'll not inform your mother)

Enough of this appalling verse
(You know it could be So Much Worse...)

HH


Sunday, March 6, 2016

Pleatishness, more


Probably the simplest pleats are Pin Tucks - made with a nice bit of 19th-century technology.. here you see two pin tuck feet, with different numbers of grooves. Each needs the appropriate Twin Needle.  here I am going to get all Stern and point out that you actually do need a machine which zigzags to do this - I get a dozen enquiries a month from vintage machine-users asking if it's possible to do twin-needle work on a straight-stitch machine.. Er, No!
Anyway, digressing aside, the needles come in lots of sizes, and the feet come with lots of different sets of grooves..

So, thread your machine (all these years you were wondering what that second spool pin was for? This is it.. If the machine has three tension discs, take one thread into each side, otherwise just run the two threads side-by-side all the way through the regular thread path until you reach the needles, then thread one strand into each. It's nice to use two colours, so you can see what happens.. the bobbin is threaded in the usual way

Sew a straight line.. The fabric pops up magically between the needles and is pin-tucked automatically


Your first though may have been to wonder why the extra grooves are there - this is why - you can run the foot over the previous tuck to get closely-spaced lines

Now try some wibbles and wobbles, and crossings, and such...

And here's the back.. Tension needs work, I think..
You can also run a fine cord into the pin tuck..
More tomorrow.. Sleep well...

Saturday, March 5, 2016

Com-Pleatly Crazy

Now, it's time for tucks, pleats and pintucks.. Most of these first samples are in silk taffeta

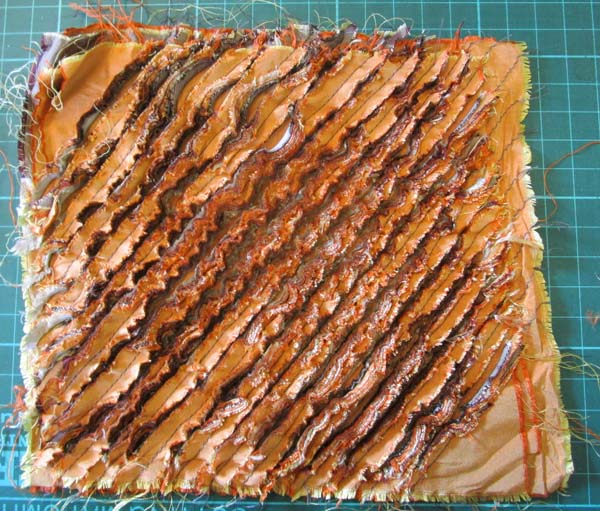
I have some nice wide-stripe silk taffeta samples, which are good to play with. I folded the fabric with the join of colour on the edge, and sewed a seam of relatively even width...


Crease and repeat...

Then fold the other way and make crossing pleats

Same fabric, pleats in slightly more random arrangements

Rinse and repeat again...

Interesting on the back, too.  I like the way this messes with the regularity of the stripes

And look, how much it reduces the sizes of the pieces (untouched sample at the back, and the pleated ones pressed)
One method of reducing your stash.

I've been on the road today, 8 hours teaching and 5 driving.. Now to bed, more tomorrow...

Friday, March 4, 2016

Apologies...

Last night's post was so difficult to arrange and upload, that I gave up on putting all the images I wanted to show here.. Tonight I'm in a strange house with limited time and web access, but I'll do some more of them below..
In a sort-of-random order

Doesn't have to be coloured cotton, this is silk taffeta - again 10 layers, but thinner, so closer stitching lines. Also calico/muslin. Note that I have outlined a part and not slashed

Detail and the whole piece - this is Moth Eaten. A quilt I disliked is recycled, and chenille-bodied. Copper wire antennae

Another brooch. Mainly reds, yellows, with a purple layer in the middle

Alternate layers of black and white, with a red leaf.  Also with extra stitching, which defines the lines of the leaf somewhat. I have also done black-and-yellow - perfectly bumblebee

And a last cushion.. Here I have stitched a diagonal grid, slashing only the outer parts.. Colours in the chenille are around the edges again

Sleep well, I'm for bed and sweet dreams...

Thursday, March 3, 2016

Last of the Slasher Mysteries...


Cut through the top layers and not the base, this time the cuts are still on the diagonal but within the straight line squares
Some of the squares, I cut right through...
Washed as before..

Fantastic texture - the first time I saw this, it was used as a crocodile's back in a quilt
Leaf-on-top
The last few bits of those pinks and oranges, cut into a stack of leaves and laid on top of a background piece, then stitched and washed as before.  Keep the shapes simple, but the grain is not so important on these


Stitched, then washed...


Tomorrow, something completely different...

Wednesday, March 2, 2016

More Frizzled Edges

Now, it's possible to make very subtle and deliberate colour effects with chenille technique.. For my third sample, I found a lot of odd thin strips in the Blue Box (what, you don't have a Blue Box? How unlucky)


I started with a couple of dark blue layers, then laid strips of assorted blues across these.. the fabrics can overlap a little and should not be sewn together. I made lots of layers with a sort of sea-and-sky thing in my mind


After a while I laid in a piece of bright yellow


Then a few more strips of blues


Finally, another dark layer all over and a bright yellow circle.. Not sure, could be sun or moon


Sewn - note this time I have made wibbles, but still basically on the diagonals

And here it is washed... The moon, (definitely a moon now) reflects sweetly in the sea. The further up in the mix you put that contrast stripe, the clearer it will be in the end product

I quite often make biggish pieces and cut them up - these brooches are about 2-1/2 inches on their longest dimensions, and were made from 1/8 metre sandwiches..
After cutting and washing the chenille, I lay it onto a stiffener (Vilene/Pellon) and a backing fabric, and stitch around with a straight stitch. Trim to size just outside the stitch, then zigzag the edges..
.
And here's an odd piece sewn raggedly onto a book cover.. the central layers of this one were quite small scraps - you can see the colour-changes coming through
As long as you have one complete layer at the bottom, almost anything else will cohere nicely..
More tomorrow...

Tuesday, March 1, 2016

Be A-Frayed, Part the Second

Now, I really adore the tactile handle and
softness of Chenille, but it has visual qualities that are desirable too..
One of the things I have experimented with is making imagery using the technique - this is not easy..
I'm fond of landscapes, and this seems like fields and grasses, perhaps
(Part of my Summer Landscapes piece)
However, in order to get any kind of imagery onto chenille, you need a degree of contrast which you may not imagine before you try. 
Here's Sample Two
I've used the same set of Oakshott colours and background as yesterday's sample, plus a top layer of the same dark purple as the base, and a leaf cut from a vivid eggy yellow.  The leaf is raw-edged, not sewn down, and placed so that the grain matches the underneath layers - this is quite important - make sure you decide which way you want it to go before you cut.  Note that I now have 11 layers (12 where the leaf is) - if you have a weedy modern machine you may find it has a coughing fit here; if so, take a couple of layers out.
Press, pin, sew, as before

This time I've kept the sewing very simple, just parallel lines about 1/2 inch apart

This time, I'm going to use The Technology - but I start every channel with a little snip from my scissors

And the very short channels will be cut like this all the way
Longer channels, however, are much easier done with a Slash Cutter

I honestly thought this was a majorly stupid buy until I had used it the first time..
What a nice toy..
Slip the cutter into the channel, push (along, not down) and it slices neatly through all the layers at once

Do check to see that you have reached the base layer in all the channels

All cut

And Washed again (note, this was photographed wet, so it looks rather dark)  Note how much the leaf has blended in, and the colours of the underlayers emerged...

Here's a cushion I made - the chenille is made from the 8 layers of the colours round the outside.. This one has a similar leaf, and change-of direction sewing

More tomorrow..