A TECHNIQUE DRIVEN Blog dedicated to mastery of surface design techniques. First we dye, overdye, paint, stitch, resist, tie, fold, silk screen, stamp, thermofax, batik, bejewel, stretch, shrink, sprinkle, Smooch, fuse, slice, dice, AND then we set it on fire using a variety of heat tools.
Sunday, April 21, 2013
Friday, April 5, 2013
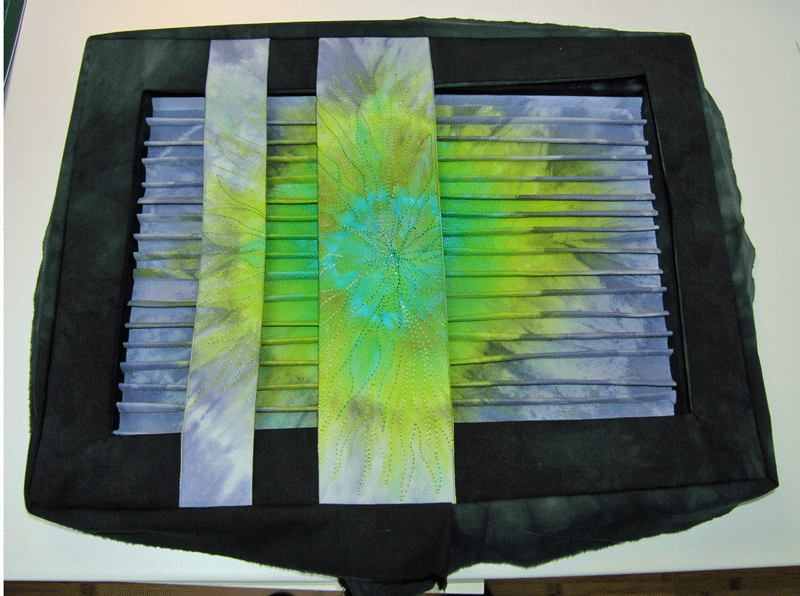
The final piece
It's time for finishing the piece. I decided to add two rows on top of the frame:
I used fabric 3 and 4 to make a quilt-sandwich and with free-motion stitching, I followed the paintcolours:
Pinned them to the fabric frame:
And sew a long border strip of 5 cm, 2 inches approx, around the frame.
Please measure the frame very precisely, and draw that line on to the fabric.
Just take care in the corners! I stopped 0,7 cm from the end, secured the stitch and cut of the thread. After folding the borderstrip in het new direction, I started sewing exactly in the same place I ended my previouw stitch (or better, one mm further). This border is meant to cover the sides of the canvas frame.
It looks a bit clumsy after sewing ;-)
But wait till you stretch the piece around the canvasframe, with a stapler/tacking machine:
(PS do you see the single hand stitch line on top and bottom? That's were I stitched the pleated piece onto the canvas, it's enough to keep it where it is)
Voila! Your piece is ready. You might staple a cord from one site to the other as well to hang it properly.
I hope you enjoyed this 3D project, and look forward to seeing your results in the coming weeks!
And remember, in the Netherlands we know this expression 'in je eentje ben je sneller maar samen kom je verder' which is translated in 'you are faster on your own, but get further together'!
That's why I love this group. Thanks for joining, reading and commenting!
Thursday, April 4, 2013
Getting Started--Quilter Beth
I spent yesterday afternoon dyeing fabric. I have my four pieces ready to go. I used Golden Yellow for the centers, Fire Engine Red for the second ring, and Mixing Blue for the outer ring. The piece in the bottom right corner got a little wonky--not sure what happened there.
I won't have time to work on the next step for a little while. I'm anxious to try this slicing and dicing method, though.
Framing the pleated piece
Now it's time to examine some possibilities with the 3rd and 4th piece:
This is what I like. So, let's start to make the frame for the pleated piece. First, cut the pleated piece exactly fitting the inner part of the painterscanvas. Leave the white canvas, you can sew the pleated piece to it.
For the frame, I like a grey colour, so I took a piece of hand dyed grey, two layers, and made a passe-partout with batting.
After stitching the two layers of fabric plus the batting together, you can turn the first layer inside to the back. Pin it with for the time being.
Do you see the wood of the frame peaking through? Lets coat the frame with some leftover fabric to avoid this:
After doing so, the pleated piece can be sewn on to the canvas by hand with a small stitch.
Now that the base is ready, lets cover the frame with our fabric passe-partout and examine again what we shall do with the other pieces:
We're getting close, more tomorrow!
Wednesday, April 3, 2013
The pleats
So, let's pick the two pieces which look most similar to eachother.
Fuse them with fusible web / vliesofix. Remove the paper afterwards.
Put the pieces on top of eachother
And cut them together to get the same size:
Now, don't move your pieces, and start cutting 1,5 cm (about 0,55 inch) both layers at the same time:
Voila, your 3D paintsplash is visible.
Tomorrow, 'what to do with piece 3 and 4'!
Fuse them with fusible web / vliesofix. Remove the paper afterwards.
Put the pieces on top of eachother
Now, don't move your pieces, and start cutting 1,5 cm (about 0,55 inch) both layers at the same time:
Now iron the strips on a piece of thin fabric. Start with strip 1 piece A, followed by strip 1 piece B. Continue with strip 2 piece A, followed by strip 2 piece B.
Remember, don't move around with your cutting mat or the pieces..., you will not be able to refind the correct sequence anymore.
After ironing, fold every second strip double, and stitch it at the edge. It doesn't matter if it is 100%perfect but try to keep a straight line.
Voila, your 3D paintsplash is visible.
Tuesday, April 2, 2013
Dyeing for an optical illusion
So, if we want to make a 3D piece, we need enough fabric to play around. In this piece, I dyed 4 pieces of fabric, 30 x 30 cm, in exactly the same way.
First of all, tie a marble in the middle of each piece.
Dip the points in a tray with water, SODA and dye-solution. Let's rest for 15 minutes.
Now you can choose to rinse the blue point or continue right away. Turn your blue tip upside down and tie the fabric again around the marble. Yes, the blue colour will zip through, but that is part of the fun. And if you want to keep it clean, just add some plastic on top of the fabric before turning it.
Now dip your marble-pakages in another dye solution (inlcuding soda), and leave for another 15 minutes.
For the third time, turn your marble downwards and tie the fabric again around the marble. Now bring the full package into a dye bath (including Soda), and leave it for another 30 minutes.
Rinse the marble-package, untie it and rinse again.
This will be the final result after fixation and ironing, four pieces which are more or less the same dye pattern, great for further use. The pieces to the right were packed in plastic after each step. Can you see the difference? And what do you prefer?
Monday, April 1, 2013
Optical illusion in textiles
Happy easterdays for those of you who celebrate this.
It's april and I thought it might be a good idea to get the dyepots out again and see if we can experiment with some new techniques.
What I would like to share with all of you is the process of this 3D textilepiece with a slight optical illusion like a paintsplash hitting the fabric:
It's april and I thought it might be a good idea to get the dyepots out again and see if we can experiment with some new techniques.
What I would like to share with all of you is the process of this 3D textilepiece with a slight optical illusion like a paintsplash hitting the fabric:
It's always difficult to get some depth in a picture, so let's try it from this corner to give you an idea:
In the next few days, I will describe the process for making this project. Please gather your white fabric, procion MX dyes, some marbles, and a painter's canvas. Tomorrow the fun will start!
Subscribe to:
Posts (Atom)