
Here we are - Day One of our forest adventure. Not doing any forest-y stuff? Join us anyway as there are other adaptations for this technique. I'll be posting a few and I'm sure in this group of creative people there will be several others. Perhaps you could imagine a few of your own you would like to share!
Don't you just LOVE serendipity? When it happens, things just seem to fall into place and all is right in my artistic world. This happened for me about a month ago. In one of my Yahoo groups, the challenge was to create a piece inspired by our favorite poem. The concept for me came immediately. "The Road Not Taken" by Robert Frost is my Life Poem of sorts. (Click HERE if you want to read it) Now came the challenge of executing the Yellow Wood.
Then there it was, a tutorial on creating a painted woods!!! I tend to click and click when I'm surfing the net so when I find something, I have little or no hope of ever finding it again. I have no idea where I found this so if you know, let me know and I will be happy to give credit to whom credit is due.
Ready? Here we go!
You will need:
Fabric (about a FQ or so for your first piece works great!)
PVC pipe (the 4" outside diameter works with a FQ)
Masking Tape
String
Paint
Black Pigma Pen

Phase ONE
Step One - "Getting Ready"
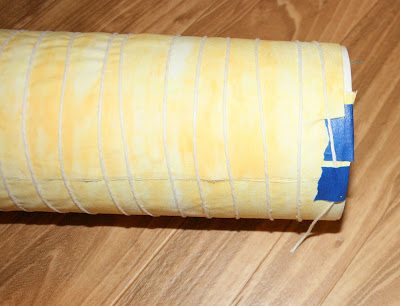
You will want to choose a fabric with the color you want for your background. I chose a yellow piece for obvious reasons. Decide where the top of your piece will be and lay that edge lengthwise on PVC pipe with one corner on the end edge of the pipe. Wrap the fabric around the pipe and secure both ends with tape.


Step Two - "Wrapping It Up"
The string is next. (I think on this project you WILL need the string to wrap the pole to create the more precise lines for the trees and to keep it all together when you paint it. The paint causes more drag on the fabric when you are applying it.) You can use various thicknesses of string or even small diameter rope. I used just some general purpose string left over from a shibori project. Tape the end of the string at the corner of the fabric away from the end of the tube. Wrap the string around the pipe, moving toward the end of the pipe as you go. Here is another opportunity for a design decision. You can wrap the string close together or wider apart depending on the final look you are going for. When you get to the end of the pipe, tape the string to the fabric an the end of the pipe and cut off any excess. Leave just a small "tail" to be sure it doesn't pull loose.


Step Three - "Shibori Happens"
Go to the end of the wrapped fabric away from the end of the pipe. Untape the string from the pipe and tape it right back to the nearest corner of the fabric. Now with both hands, start scooting the wrapped fabric toward the end of the pipe, creating folds as you go. You just want it all scrunched up at the end of the pipe, not off of it. Now tape the end you were just holding onto for the scooting and secure it with a piece of tape.

Step Four - "Paint The Trees Red" (or any other color)
I use plain acrylic paints because all my pieces are destined for my art work so the "hand" isn't an issue. If you do need to keep the fabric soft, I imagine thickened dye would work and definitely fabric paints. I use a sponge brush because it covers a wide area. I used a medium brown for this layer. Just brush or dab it onto the exposed edges of the folds. If you want thicker trees, put more pressure on the sponge brush and it will cover more of the fold. Now let the paint dry completely, preferably overnight. You don't want it smudging all around for the next bit!

So the first layer of our forest is done. I'll be back bright and early tomorrow for the next part. See you then!
Don't you just LOVE serendipity? When it happens, things just seem to fall into place and all is right in my artistic world. This happened for me about a month ago. In one of my Yahoo groups, the challenge was to create a piece inspired by our favorite poem. The concept for me came immediately. "The Road Not Taken" by Robert Frost is my Life Poem of sorts. (Click HERE if you want to read it) Now came the challenge of executing the Yellow Wood.
Then there it was, a tutorial on creating a painted woods!!! I tend to click and click when I'm surfing the net so when I find something, I have little or no hope of ever finding it again. I have no idea where I found this so if you know, let me know and I will be happy to give credit to whom credit is due.
Ready? Here we go!
You will need:
Fabric (about a FQ or so for your first piece works great!)
PVC pipe (the 4" outside diameter works with a FQ)
Masking Tape
String
Paint
Black Pigma Pen

Phase ONE
Step One - "Getting Ready"
You will want to choose a fabric with the color you want for your background. I chose a yellow piece for obvious reasons. Decide where the top of your piece will be and lay that edge lengthwise on PVC pipe with one corner on the end edge of the pipe. Wrap the fabric around the pipe and secure both ends with tape.


Step Two - "Wrapping It Up"
The string is next. (I think on this project you WILL need the string to wrap the pole to create the more precise lines for the trees and to keep it all together when you paint it. The paint causes more drag on the fabric when you are applying it.) You can use various thicknesses of string or even small diameter rope. I used just some general purpose string left over from a shibori project. Tape the end of the string at the corner of the fabric away from the end of the tube. Wrap the string around the pipe, moving toward the end of the pipe as you go. Here is another opportunity for a design decision. You can wrap the string close together or wider apart depending on the final look you are going for. When you get to the end of the pipe, tape the string to the fabric an the end of the pipe and cut off any excess. Leave just a small "tail" to be sure it doesn't pull loose.


Step Three - "Shibori Happens"
Go to the end of the wrapped fabric away from the end of the pipe. Untape the string from the pipe and tape it right back to the nearest corner of the fabric. Now with both hands, start scooting the wrapped fabric toward the end of the pipe, creating folds as you go. You just want it all scrunched up at the end of the pipe, not off of it. Now tape the end you were just holding onto for the scooting and secure it with a piece of tape.

Step Four - "Paint The Trees Red" (or any other color)
I use plain acrylic paints because all my pieces are destined for my art work so the "hand" isn't an issue. If you do need to keep the fabric soft, I imagine thickened dye would work and definitely fabric paints. I use a sponge brush because it covers a wide area. I used a medium brown for this layer. Just brush or dab it onto the exposed edges of the folds. If you want thicker trees, put more pressure on the sponge brush and it will cover more of the fold. Now let the paint dry completely, preferably overnight. You don't want it smudging all around for the next bit!

So the first layer of our forest is done. I'll be back bright and early tomorrow for the next part. See you then!
Sorry this got posted a bit late in the day...I've never done a scheduled post before and hadn't pushed all the right buttons!!
ReplyDelete