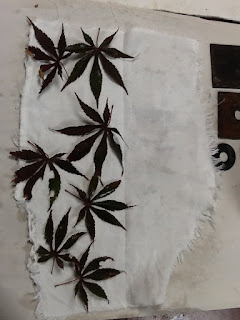
Judith, thank you for sharing these beautiful prints. I love the colours, and the way you arranged your materials to get great patterns - clearly you're guided by your artist's eye!
Thanks also for sharing the links to Wendy Feldberg's tutorials. The on-line resources she's developed are pretty amazing. I highly recommend that readers check them out.
In this post, I'll share some of the things I do and the tools I use in the printing process.
Getting ready to print, here's a selection of plant materials (Japanese maple, coral bell, and geranium leafs, and maple keys). Also wooden dowels - some wrapped in plastic to reduce transfer of colour between processes) and string.
Here are some of my favourite 'found objects' to add to bundles... All of these are iron - you can see that they've been used and carry the rust of prior cooking.
My cotton and linen fabric pieces have been mordanted, dampened, and I've laid out plant materials on two fabric pieces. I spray dampen the fabric before laying out the leafs so that I can increase the contact between the fabric and the plant materials. Sometimes, I use a rolling pin to flatten the leafs to the fabric as thoroughly as possible.
Rolled up and tied as evenly and tightly as possible - ready to go into the pot.
And I'll also make a bundle in which I will use Japanese maple folded into a triple layer with leafs between each layer.
Now I'll fold the fabric around squares of iron, and add a washer - just to see what it does.
All bundled up, and ready for the pot.
I just purchased this lovely cooking pot from a retiring wool dyer at a flee market - perfect! It's big enough to handle my longest dowel. I used this pot for cooking this time, and immersed my bundles in water with an unshelled walnut in in.
For small bundles, I sometime use this handy little steamer. I'm using it here to steam a few pieces that are already eco-printed... seeing if the colours will intensify with more heat.
And here's what came out of the other rolled dowel bundle, in which I used parchment paper to prevent transfer printing. The colours and images are much more subtle, somewhat dreamy to my eye. It may be that this bundle would have been more intensely coloured with longer cooking (the parchment paper may have slowed up the heating within the bundle).
One more bundle to open - the one with the iron squares.
I like this one - the way the leafs have printed in a bit of a grid, influenced by the metal squares. I'll probably do this again, with a larger piece of linen. I'll omit the washers though :-)
Bear in mind that colours often change after pieces have dried - they often darken and can intensify. I like to let pieces dry for a few days, then launder gently in a mild soap, then iron.
So there you have it - back to Judith later this week for more inspiration!


really wonderful prints Janine.
ReplyDeleteBeautiful!
ReplyDeleteI have never gotten results as deep in color as these! I am looking forward to improving my process. thanks! Amazing.
ReplyDeleteJust getting the chance to look at these posts...great prints here. I particularly like how you used an old iron block to fold with! I keep looking for great finds like this! I also just experimented with parchment paper with some happy accidents but will use it judiciously in the future.
ReplyDelete