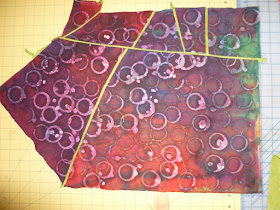
Here is the fabric that I started out with. It is a two-sided batik. I dyed cotton with thickened dye--one side with red and one side with blue. Of course, the color bled through but one side is still more red and the other side is still a bit more blue. The beginning size was 21" by 17".

Here is the hand-dyed green cotton that I used for the lines. I like complimentary color combinations and the shade of green is light enough that there is a nice value difference.
I read Kathy's directions. I cut the green into 1/2 strips on the bias. I stitched a single line along one side of the batik and two lines along another to help me put the fabric back together. Of course I used the two different colors of thread so I could tell the front from the back. Then I sliced, stitched the strip, and sewed the pieces back together. Too bad I forgot to look for the stitching lines to make sure I had the front side and correct edge. LOL You know what they say, there are no mistakes, only design opportunities.
Here are some more process pictures.
Here is the finished piece before and after I squared it. The finish size is 17 3/4 inch by 13 3/4". What do you think?
Lessons Learned:
- This is a small piece and took forever. Kathy, you must be a saint with lots and lots of patience to create your large quilts using this technique!
- I used a straight edge to cut the green strips but cut the material without a straight edge---meaning the slices were not completely straight. I like the results but I expect it would have been easier to sew back together if the lines had been perfectly straight. Kathy, what do you do?
- The finished piece had to be steamed to get it to lay straight. It was a small piece so it did not represent too big of a problem but I could see where it could get out of hand quickly in a larger piece. Is that a problem for you, Kathy?
- Overall, it was tons of fun and I am going to try in again on this monoprint made last month.


 I
I
Wow it turned out very nice! I love the colourchange in the different pieces. And yes, it is a lot of work. Yesterday I was lucky enough to see one of Kathy's pieces in the Color Improvisations Exhibition in real, as it was in the Netherlands -quiltfestival. It was about 2.5 x2.5 meters.... It was stunning, but how long will it take to make this?? Respect!
ReplyDeleteI like what you've created!
ReplyDeleteI like this -- especially the way the lines bisect the circles. The colors are great too. I was wondering what would happen if I cut bias strips and curvy cuts.....
ReplyDeleteWhat a nice piece! You really put a lot of lines in and it looks deliciously complex. Fixing the early mistake ended up with a silver lining, because you got some nice places where the different colors of the batik abutted one another -- that would not have happened had you sewed everything back together in its original orientation.
ReplyDeleteStraight edge: I definitely use a ruler to cut the half-inch strips; it would be insane to do that freehand. I don't think it makes a lot of difference technically whether you slice the background fabric with a ruler or freehand. On my larger pieces I tend to use a ruler not so much to make the lines straight (they end up distorting anyway in the course of construction) but to hold the fabric in place so it doesn't shimmy away or make ripples ahead of the blade.
Pressing: I usually don't have much problem in getting the piecing to lie flat. That's because I press obsessively at every seam. Sometimes when I press a larger expanse the edges bulge a bit but if so, I will trim off the bulges before I attach a straight edge to it. This is one reason why my pieces end up a whole lot smaller than I started with. Especially if you stick to straight (or freehand straight) lines this shouldn't cause problems. Lots of opportunity for bulging if you do curved seams, so I recommend you avoid them.
I like your basic batik pattern and with the green lines and different field division it becomes great !!
ReplyDeleteI LOVE this piece. The colors really play well together. Nice work Judith. Great questions too.
ReplyDeletehis is a fabulous tutorial to explain a method that results in very inspiring opportunities!!!!
ReplyDelete