Saturday, July 30, 2016

Pictures from the Schweinfurth Art Center

The Schweinfurth currently has an exhibit called "Transgressing Traditions."  It is the second annual juried member international show for the SDA.  There are three pieces I thought were related to the type of work I have been doing so I am winding up my presentation with them.

First is this dress. The dress reminds me of my dresses due to the reference to life and death and the use of leftover material.


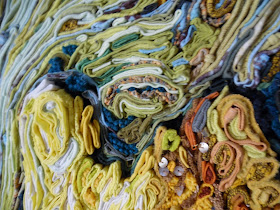
The second art work also uses old clothing as it's source material.  It is also a 3-D piece but may be harder to tell from the picture.  Think of a deep picture frame that is filled with rolled pieces of fabric and you'll have a better understanding of what you see.  The front side of the rolls are not all even which adds to the interest of the piece when seen in person.  I tried to capture that in the detail picture.


The third art work, and my favorite, is this one.  Read the artist statement.  What it not to love there?


If you have not yet been to the Schweinfurth to see the SDA show, it is on display until Augusta 21.  It is an amazing show and will certainly get your creative mojo exploding.

Friday, July 29, 2016

Far From Finished But it is the End of the Month

The garment is far from finished but I am making progress.  No paper skirt added yet and the top is still far from finished.  Someone asked me once about wearing them.  LOL  The question surprised me.  My first thought was only if you want your dress to disintegrate while you wear it.  These art garments are definitely ART garments and not upcycled clothing.

Anyone, here are pictures from the front, the back, and details.


I hope you have enjoyed this month!

Wednesday, July 27, 2016

And the thread?

Here is the shirt after another week of work.I have really been pushing myself so I can show you something closer to finished.  Now that my hands and arms are getting stiff we'll just see how much more I get done before the end of the month.  Someone once asked me how long finishing one of these garments takes.  The best answer I can find so far is "A long time."  While this one is coming along I still need to start the skirt.


I have used a variety of thread in the garment.  Different colors and thicknesses and content of thread can all be used, again depending on what you want to emphasize or be more subtle.  I can't even say which I like best but here are a few I have used.


Colors:  The color for each piece will vary depending on my vision for the finished item.  I have some lovely lace I wanted to use to hold the cotton shirt together so I have used black thread primarily.  I have also used purple because it is dark but I have used it sparingly.  And, as always, I have used a variety of neutrals.  I generally use the neutrals in the more simple and quicker to make stitches since the stitches will generally only be seen upon close examination.


Type of Thread:  For this garment I have used cotton, silk, and wool thread.  All work better if you use some bees' wax on them first.  Silk is a bit hard to use but looks lovely with the silk shine. I have used it mostly for the buttonhole stitches around the lace.  I love the hairiness of the wool thread.  Cotton is the staple.


Thickness:  Again, I wish I could give you one answer but I use one, two, three, or all six embroidery threads depending on how thick of a line that I want.  I also use crochet thread and much heavier threads (see the yellow thread in the picture).  So far I have not used yarn but I do want to try it on a future garment.


Monday, July 25, 2016

Stitches for the Garment

When I make one of my garments I use very basic stitches such as the running stitch, the seed stitch, the buttonhole stitch and overcast stitch.  The basic goal of the stitches is to hold the fabric together.  That is kinda like quilting but like quilting you can also use the stitches for some decorative work.  My caution though is to not let the stitching become more important than the garment.  Please do notice that these are not your grandmother's stitches.  I made no attempt to make them neat, tidy, and orderly.  How boring!

 Buttonhole Stitch

 Running Stitch

Overcast Stitch

I use a variety of stitches for several reasons.  First, depending on the way the material is fractured  a particular stitch will work best.

Second, some stitches are more prominent than others.  Sometimes I want a stitch that is more substantial like the buttonhole stitch and sometimes I want a subtle stitch like the seed stitch.

Third, a variety of stitches just creates more interest and surprises.  I want people to really examine my work and not just glance at it and move on to the next artist's work. That is particularly important if you have more than one piece of work and want each of them to be examined. 

Fourth, Val who is a very wise artist told me that you want your work to be interesting from three distances.  First from a distance so people will see it from across the room and cross to see it closer.

Generally people will only cross the room and come within a few feet or yards from the work.  If it is no more interesting from this mid-distance then the person will move on to the next work of art. That means the art work has to have new things to see from a mid-distance or from a few feet or yards.

If the mid-range distance has new things to see then the viewer will want to get closer to see if there is even more to see.  Now is the time that the subtle color, textures, and designs are seen.

That is a successful piece of art.

Friday, July 22, 2016

Using Paper and Other Materials.

I am currently working on a cotton shirt originally out of my closet.  I didn't take a picture of the shirt before the compost  pile or when I got it out.  The decomposition pattern was interesting and I wish I could show it to you.  The upper right shoulder and top part of the arm were gone.  There were other holes, large and small, but also other areas that seemed totally unaffected other than spots of mildew.  

Here are some pictures after I had worked on it for a couple of weeks.  You will notice that I pinned netting to the upper right of the garment to give some some shape it too.  I tried to work on it before the netting but it was just too difficult to visualize the garment.  The goal at this point is to add a skirt to the shirt to turn it into a dress.  I just like the flow of a dress.  The goal is flexible and may change as I work on the shirt.  I think the skirt will start out as netting to which I will add the music pages, lots of decomposed fabric scraps, the black lace I used on the top, and some organza.


I plan to use a combination of fabric and paper.  I have never done that before and we'll have to see how it works.  My plan is to use some vintage music pages to incorporate the black from the top into the skirt.  Here is a piece I have added to the shirt.

There are a couple of ways to use paper as fabric.  The first way is to fuse a stabilizer on the back.  That will allow the paper to move more like fabric and to be stitched without tearing or ripping where sewn.  The second way is to use Howard Feed-N-Wax wood polish and conditioner to soften and wrinkle the paper.  I looked for the instructions and simply could not find it.  Wad up your paper.  Add some Feed-N-Wax.  Continue to wad and massage the paper till the Wax is all absorbed by the paper.  Iron it between newsprint to get the excess wax out of the crumpled paper. It does not strengthen the paper at all but does allow it to be flexible.That is the   method I used in the picture above.


For the fabric I will first use pieces of garments that have decomposed past the point they can be used as a garment.  I have lots of those.  I will try to use decomposed fabric with interesting edges (see the pocket above?) and with a different weaving texture or a different color. There is just no point in using a fragment that blends in to perfectly with the background fabric.


I also will use of a variety of other fabrics such as silk or lace or vintage fabrics.  The key here is to make the garment look cohesive.  The new fabric should not take over or outshine the garment.  I am always careful to avoid patches with cut edges or other straight edges unless it is a seam left over from another garment.  Don't use too many in one garments.


Wednesday, July 20, 2016

Beginning the Journey

I get my garments out of my closet or from the local Goodwill. I only choose cotton or linen garments.  Linen is really better since it tends to thin and disintegrate more evenly than cotton.   Here are some garments waiting their turn into the compost pile.  I  know they need to be ironed but I am not going to iron them before composting them! LOL


The garments go into the compost pile to disintegrate.  I can't tell  you how long to leave them there.  The make up of your compost pile and the weather will produce different rates of decomposition and insect activity.  The second picture shows a sweater waiting to come out.


If you pull the garments out too early they will be less changed and less interesting although you might have some nice color on them.


If you wait too long then the garments are only scraps to use to repair another garment.  That is not a bad thing.  The scraps are still being given a new life.  And, continuing the metaphor relating the process to our lives, sometimes it takes a great deal of support from others to get our lives remade.


And sometimes it is just right.  This is right out of the compost pile with lots of detail shots. It will get washed before I use it.   That will add more holes so I'll be washing it on delicate after some pre-soaking.


Monday, July 18, 2016

Hanging by a Thread Garments

One of my passions for the last couple of years is bringing back to life nearly destroyed  garments.  I find it symbolic of our lives.  Sometimes we are nearly destroyed by life events and yet we can rebuild ourselves using our own pattern.  It isn't easy or quick but much more rewarding than staying destroyed by the events and wasting the rest of our lives.

First, pictures and detail pictures of a one of the garments that I have already turned into art.  It was part of my Parts Of A Whole show in April.  This one is named Transgender because it started out as a skirt and ended up as a pair of pants.  At one point  it was one of my favorite pair of summer pants.

In the next posts I will take you along a journey creating a work of art out of a composted garment.


Friday, July 15, 2016

Stitching and dissolving

Edited to include one more picture, see below**

Stitching on melt away stabilizer--there are lots of different weights of stabilizer to choose from, and you can also double up a lighter weight one if that's all you have in your stash.  here are products sold for nursing homes and hospitals sometimes called "bed bug bags" that are actually dissolving laundry bags and they're pretty large and a lot cheaper than Solvy or other craft products--just google them for more info.  The only down side is that you might have to buy a pretty large quantity at once.


Use a hoop if you have one, I didn't because I couldn't find mine when doing this... Draw your lines with a sharpie if straight lines are important to you because the stabilizer loves to pucker up!  Use a zigzag stitch for lines you want thicker, you'll only have to go over them a couple of times, too.
The basic grid was stitched with a narrow zigzag stitch.


Then I dropped the feed dogs, put on my free motion foot, and did a bunch of designs inside the grid, making sure all of my lines were attached to something else.

Here is the piece after melting the solvy, you can see that I wasn't 100% perfect at getting all my edges attached:


After it has dried, I plan to stitch this down using FM quilting onto a piece of felting I did a while back.

I also couched some yarn down in small leaf shapes, then filled them in with thread just to see if that would work--

**you can also use nylon netting inside two layers of Solvy to provide more stability.  Here I sandwiched some netting, then put a pink fabric circle on top and stitched it down, also  adding some petals. When the Solvy is melted, the netting can be melted using the stencil tool.


These are just some starting points, and I know all the readers of this blog have tons of great ideas of their own.  Hopefully I've inspired someone this month, it's been a lot of fun!