Monday, July 29, 2013

Kelly - "Seeing the Forest for the Trees" Pt3 - Quick forests and other things

OK...you know what to do now that the painted second layer is done!!  Remove the string and iron on the back (unpainted) side. Now you can see the birch trees!!  Well....almost.


Phase 3
Step 1 - Make marks on the white lines to make them look like birch or aspen trees. I use a #8 Pigma Pen for this.  Don't make them too regular. Also add in a few knots on some of the trees.


Step 2 - Now the final part that will make it like the Yellow Wood...
You will need a brayer (or something similar in diameter). Wrap it with a couple of rubber bands in an erratic manner.  Nothing even or over thought. Put several "fall" colors on a palette...just small amounts like orange, dark red, yellow, brown for example.  Spread them around a bit but don't mix them. Roll your rubber banded brayer in the paint to pick up several of the colors at the same time.  Run it once on extra fabric or paper to get the clumped paint off. The roller the paint onto the top part of the "forest" in many different directions. Or you can paint it all over like I did in "Two Roads Diverged" (see below)...it's all up to you!


Now you have your forest!!  Below is a piece I made in this technique for another challenge. This one is entitled, "Two Roads Diverged" and is inspired by the poem "The Road Not Taken" by Robert Frost.


I have suggested you wait a while for the paint to dry but if your paint dries quickly, you could actually do all this in one whole day.  Just make sure your paint is dry.

That's it for the forest/wood project. Below are a few other ideas and after those a couple of bonus tips!!

NOW...for those of you who don't have any woods or forests in your future....here are some others I have painted using this technique but for other designs.  Like WATER....


SKY


and even a Crazy Christmas Plaid (this is a smaller piece, apx 10" X 13")


So...you see...this is just a beginning. I KNOW this group can come up with other amazing uses for this technique.

BONUS TIPS
Tip ONE
All this is fine but how do you do this for larger pieces of fabric? You can always use longer PVC if you need a taller piece (considering the lines are in the horizontal position). But what about WIDER (making the lines longer)?? Here's how you do that. (Water and Sky above are wider pieces and were made using this tip.)

Wrap your pipe as usual. You will at some point start overlapping. That's fine...just keep wrapping. Do all your initial steps as usual. When the paint is dry and you remove it from the pipe, iron it and start the process again only THIS time, start by attaching the PAINTED end onto the pipe first, overlapping as you wrap just like the first time. You will now have the unpainted part exposed. Finish the steps (wrapping the string apx. the same distances as previously, scooting, etc.)  When the paint is dry, remove the string, iron and VOILA!! You have your whole piece done.


Tip TWO
To make the "plaid" you just do the first wrap as usual. Then after removing the fabric with the dried paint, iron it. Now wrap the fabric in the opposite direction -placing the painted lines lengthwise onto the pipe . Then just follow the steps again!  Of course, I think it looks best with two different colors of paint (or more) but it is all up to you and what look you are going for.


Let the CREATING begin!!!

First, I want to thank Marianne for posting the link mentioning this technique! (I knew SOMEONE from this group would know where I found it!) It was a post from Vivika on Quilting Daily about this technique done by Holly McLean. Thanks Holly and thanks for sharing it Vivika!

Thanks to all of you who have commented and posted your work. I hope you enjoyed this short demo and have added another technique to your surface design tool kit!! 

Sunday, July 28, 2013

Kelly - "Seeing the Forest for the Trees" Pt2 - Quick forests and other things

And we are back - Ready to venture further into the Woods.

Phase TWO
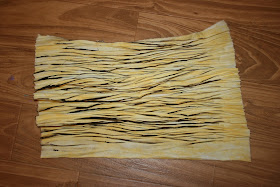
The paint will be well dried now. Take the tape off the end of the string and start removing the string. Then remove the fabric from the pole. Iron on the wrong side. And there it is...the beginning of your forest!


Now let the magic continue

Step Five - "One More Time"
Take your ironed painted fabric and use it to repeat steps One through Four. Be sure you get the fabric onto the pipe in the same orientation it was when you began. There is a place for changing directions of the lines...but not in the forest.


For this second time through, I used a white paint to create the aspen forest.


Patience is called for once again. Let the paint dry completely.

NOTE*****
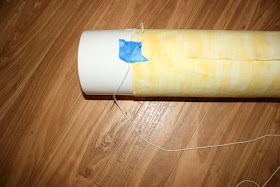
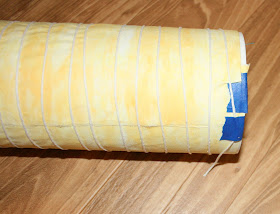
You might have noticed an extra piece of blue tape on this wrapping. It is a chance to show you how to re-use your string...even if it is too short.  As you are wrapping and run out of string, you can add another piece and keep going. Just use a small piece of blue tape to attach both string ends and carefully keep wrapping. Don't pull too hard for the first couple of wraps or the second string will pull out of the tape.


Tomorrow we will add the marks that transform this into a Yellow Aspen Woods.
And I'll show you some other uses of this very easy technique!
See you then!

Saturday, July 27, 2013

Kelly - "Seeing the Forest for the Trees" Pt1 - Quick forests and other things

Here we are - Day One of our forest adventure.  Not doing any forest-y stuff? Join us anyway as there are other adaptations for this technique.  I'll be posting a few and I'm sure in this group of creative people there will be several others. Perhaps you could imagine a few of your own you would like to share!

Don't you just LOVE serendipity?  When it happens, things just seem to fall into place and all is right in my artistic world.  This happened for me about a month ago.  In one of my Yahoo groups, the challenge was to create a piece inspired by our favorite poem.  The concept for me came immediately.  "The Road Not Taken" by Robert Frost is my Life Poem of sorts. (Click HERE if you want to read it) Now came the challenge of executing the Yellow Wood.

Then there it was, a tutorial on creating a painted woods!!! I tend to click and click when I'm surfing the net so when I find something, I have little or no hope of ever finding it again. I have no idea where I found this so if you know, let me know and I will be happy to give credit to whom credit is due.

Ready?  Here we go!

You will need:
Fabric (about a FQ or so for your first piece works great!)
PVC pipe  (the 4" outside diameter works with a FQ)
Masking Tape
String
Paint
Black Pigma Pen


Phase ONE
Step One - "Getting Ready"
You will want to choose a fabric with the color you want for your background. I chose a yellow piece for obvious reasons.  Decide where the top of your piece will be and lay that edge lengthwise on PVC pipe with one corner on the end edge of the pipe. Wrap the fabric around the pipe and secure both ends with tape.


Step Two - "Wrapping It Up"
The string is next. (I think on this project you WILL need the string to wrap the pole to create the more precise lines for the trees and to keep it all together when you paint it. The paint causes more drag on the fabric when you are applying it.) You can use various thicknesses of string or even small diameter rope. I used just some general purpose string left over from a shibori project.  Tape the end of the string at the corner of the fabric away from the end of the tube. Wrap the string around the pipe, moving toward the end of the pipe as you go.  Here is another opportunity for a design decision. You can wrap the string close together or wider apart depending on the final look you are going for. When you get to the end of the pipe, tape the string to the fabric an the end of the pipe and cut off any excess. Leave just a small "tail" to be sure it doesn't pull loose.


Step Three - "Shibori Happens"
Go to the end of the wrapped fabric away from the end of the pipe. Untape the string from the pipe and tape it right back to the nearest corner of the fabric. Now with both hands, start scooting the wrapped fabric toward the end of the pipe, creating folds as you go.  You just want it all scrunched up at the end of the pipe, not off of it.  Now tape the end you were just holding onto for the scooting and secure it with a piece of tape.


Step Four - "Paint The Trees Red" (or any other color)
I use plain acrylic paints because all my pieces are destined for my art work so the "hand" isn't an issue. If you do need to keep the fabric soft, I imagine thickened dye would work and definitely fabric paints.  I use a sponge brush because it covers a wide area. I used a medium brown for this layer. Just brush or dab it onto the exposed edges of the folds.  If you want thicker trees, put more pressure on the sponge brush and it will cover more of the fold. Now let the paint dry completely, preferably overnight. You don't want it smudging all around for the next bit!


So the first layer of our forest is done. I'll be back bright and early tomorrow for the next part. See you then!

Wednesday, July 24, 2013

No Strings Attached Shibori - Part Deux


As I mentioned in my previous post, I planned an over-dye session, so I wasn't really concerned when three turned out kind of boring.


This becomes much more interesting after a second trip through.


The patterning is so much better after the over-dyeing.

These were half yard cuts of my usual mercerized cotton fabric.  I mixed up a half cup of dye for each with about a teaspoon or less of dye powder.  I soaked the fabric in soda and wrung it dry in my washer before I wrapped the poles.  The fabric was still slightly damp when I added the dye -- I've found that this works better with damp rather than dry fabric -- the dye seems to spread more easily.

I laid the pipe with scrunched fabric on a plastic surface (the lid to a large plastic tub) and slowly poured the dye over the fabric.  I rolled the fabric in the dye that pooled on the surface and rubbed with my gloved hands to make sure that the dye was fairly evenly distributed. 
I would have gotten much different results had I dipped the pipes or used stronger dye solutions -- something to try on a different day.  And another trip through the land of wrapping and dyeing for these guys is not out of the question.

Tuesday, July 23, 2013

P.S. on Autumn Leaves in July

One of our readers, Lynn, wrote this comment on my recent post about Autumn leaves:

 'I too love leaves. One trick I have used is to use steam a seam light to fuse actual leaves to the fabric -- those leaf remnants that seem to be held together merely by veins.  I asked Lynn to send me a picture of an example of her technique, and here it is:

Lynn added this comment in her e-mail: " It is a small piece, maybe 12x15.   I was just experimenting.  It was remarkably easy to iron the leaf.   I tried ironing it first without fusible to make sure it would work. 
I love that Lynn was able to use a real leaf in this piece, and hope to try this myself!  Thanks for sharing your work, Lynn!

Sunday, July 21, 2013

Karen - No Strings Attached Shibori - Part 1

I'm sure someone else has already thought of this -- but it's a new idea for me.

Usually when I do shibori, I wrap the soda-soaked fabric around the PVC pole, wrap string around it, sometimes a rubber band at each end, scrunch it down, dip in or drizzle over with dye, batch, remove rubber bands, untie string, unwind string, unwrap fabric, rinse, wash, iron, and enjoy.  Phew.  I'm tired just writing about it.

But there has to be an easier way.  Right?  Since most of the work is in the prep, what if a couple of the steps were eliminated?  Like the string.  It's a hassle.  And, I've discovered, not really necessary.


I took my soda-soaked fabric, wrapped it around the pole, secured one end with a rubber band (I recycle the ones I get on broccoli and asparagus), scrunched, then secured the other end with another rubber band.


Then I rolled it in dye.  I mixed my dyes a little less strong than usual because I wanted to over-dye with a second round.


I like this one just the way it is.   I used one of the smaller diameter poles for this.


The one wrapped around the largest diameter pose was not that interesting -- a perfect candidate for over-dyeing.

Next: The over-dye results


Wednesday, July 17, 2013

Autumn Leaves in July?! by Judy Sall

Even though it's only the middle of July, I thought I would share some of my pieces with you that have the Autumn Leaves theme.
For as far back as I can remember, I have always loved autumn leaves, especially the fiery colors of red, orange, yellow and gold.  So it's not surprising that they have made their way into my artwork over the years.  When I began learning various surface design techniques, they surfaced, both in my wearable arts but also in the art and landscape quilts I began making.
Below are photos of a few examples, along with descriptions of how I created the pieces.  You may notice that the leaf shapes look similar in the different pieces, and that is because I use a set of leaf stencils to draw the leaves... purchased years ago at a craft supply show.
This was probably my first piece, and it was based on a photo I took of leaves floating on a lake.  I started with a piece of hand dyed muslin in blues.  After selecting the fabrics I would use for my leaves, I ironed on double-sided fusible interfacing, then traced the leaf shapes onto the fabric.  Removing the paper backing, I carefully cut out the leaves, then placed and fused them onto the foundation fabric.  Once I had the leaves all fused into place, I added batting and backing fabric, and then used free-motion stitching to create the leaf veins.  The piece hangs in our family room, and I still love to study it!
Here is another example of using autumn leaves as a theme - this fabric was pre-dyed using yellow, orange and red procion mx dyes on muslin fabric.  Next, I batched and laundered the fabric.  Then I traced the leaves on, covered them with melted soy wax, and after the wax cooled, I overdyed with dark brown dyes.  Once the dye had batched, I laundered again, then I made my quilt "sandwich" with batting and backing.  Using free-motion stitching, I outlined the leaves.  I used some remaining red/orange fabric to bind.  I have made a few of these, and love how the leaves glow as if the sunset was enhancing their fall colors.

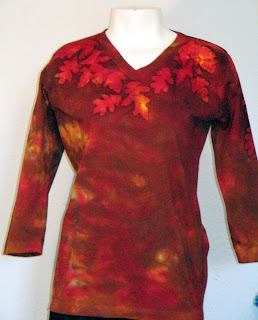
One of my favorite ways to use my autumn leaves is by adding them to clothing using soy wax batik.  I used the same method here as I described for the batik wall hanging, except I did not add any stitching.  

And finally, this a framed piece I made using leaves cut out, fused on hand dyed fabric with stenciled shadows, and then free-motion stitched.  Below is a shot of the original piece in progress.  After I stenciled the shadows, placed and fused the leaves and stitched the leaf stems and veins, I cut the whole piece into several smaller pieces for framing.  They were mounted on a heavy backing to give them stability before I cut and framed them. 
I like how the framed pieces are just a portion of the whole... just a snippet that isn't too overpowering.
I hope you have enjoyed my discussion about using Autumn Leaves as a theme.  What subject do you like to use in your artwork?  Do you have a recurring theme?  If so, I would love to hear about or see how you have incorporated it into your work!  Thanks for stopping by...