Tuesday, October 30, 2012

Stones and 3D Shibori

Well I was all excited about doing this month's technique and eagerly scouted the local thrift stores for  polyester scarves.  Sadly, it's the wrong time of year for that here in Wisconsin.  I thought that with all the Halloween stuff, I would find all sorts of poly scarves, but nooooo  (although I did score a lovely navy blue silk one that I plan to use in a discharge experiment).  I did find one scarf of dubious origin and some sheer curtains that I thought might work.

I was thinking that some mushrooms would look really good on a piece I've been working on, so I took some small river stones that I have been hoarding and tied them up in a chunk cut from the curtains.  I also tied some up in the suspect scarf and boiled them up together.


And it worked!  I only tied up a small corner of the scarf, thinking I might try some other shibori-style tying if it worked.


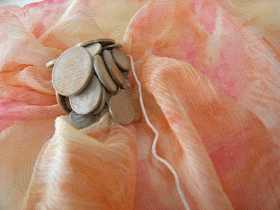
Here is a close up of the scarf and its lovely bubbles.  It's still wet in the photo.

And here is the sheer curtain.  The scarf seems to have bled and turned it a soft shade of blue.  Not sure what is going on here -- I'll have to try it again without the scarf.  But I love the shapes!

Friday, October 26, 2012

Polyester Satin


I gave it a try on  some heavy polyester satin to see if the shape change would hold up even on a heavy fabric. I used the same buttons on this piece and thought I'd try sprinkling paint on after it had dried. This is what I got.


The same button tied inside


And here is the satin after drying. The shape held beautifully.     


with brown silk paint that ran along the grain of the fabric (rats)


With Halo Green Gold (jacquard) in the shade

and in the sun

and with some Seta-Color dark green.

This technique could be useful in doing a 3-D piece.

Wednesday, October 24, 2012

PS

In case you didn't know, I am having a 3rd anniversary giveaway (actually 8) on my blog

Sunday, October 21, 2012

My Try at 3-D Shibori--Quilter Beth


I finally had a chance to try this month’s technique. I didn’t have time to run out to get some marbles and cool polyester fabric, but I had some poly on hand from when we did a method where we actually “set fabrics on fire.” I used plastic buttons of varying sizes and tied them up in the polyester with crochet thread. Here is what it looked like when I had it tied up.
Once I got it all tied up, I plunked it into some BOILING water and kept it from floating by placing another pan on top.
After 30 minutes of boiling, I used tongs to remove the fabric from the boiling pot and placed it into a pan of ice water. I then placed it on a towel to dry. Here is my finished product.
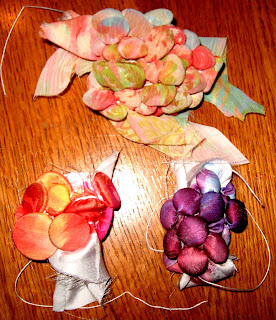
Before I got this posted, I had time to try some more experiments. Nienke and I had the same idea about using rocks and disperse-dyed fabric. This time, in addition to the buttons, I decided to try the process with rocks and those rounded glass pieces you put into a vase to secure the stem of a flower. Disperse dyeing was one of our previous projects here on the Fire blog, so I decided to use some of that fabric for this project. Here are the pieces before the process.


Fabrics tied and ready to boil.
Here I have untied the pieces after boiling, dunking into ice water, and drying.
I really like the texture achieved with this technique. I was looking at these pieces and trying to decide which shapes appeal to me the most. I think I'd have to choose the rocks; I like that all the shapes are not uniform. I’m thinking several pieces done like this might look really cool “caged” in my bias strips for a new piece in my series.

Oh and if you’d like to see how I have actually used some of the beautiful fabrics we have created on the Fire blog, check out my post here. In the piece I have shown, I have used hand-dyed flour-paste-resist fabric, sugar-syrup-resist fabric, and snow-dyed fabric in the piece.

Disperse dye and 3D shibori

After my first tries of commercial fabric, I wanted to create a polyester basepiece myself, so I made a nice piece with bubble-gum-colours (see my blog for more pictures).


This time, I collected some pebbles from our gardenpath, and tied them in as before:


I hesitated to proceed because I liked the way it is now, so delicate and subtle colours, and still a ´stonish´ look. But you are waiting for the next part so, let´s boil it:


Oops, what was I thinking... the transferdye cannot stand the heat and the not-tied fabric became sort salmon-orange all-over...


Now I understand why people like computergames. Just game-over and reset to one stage earlier ;-).
But I had to continue and unpack the pebbles. Luckily, part of the bubble-print was saved in the binding!


But the 3D effect is much less then expected. So, I had to conclude that this was not polyester... I guess it is what we call viscose. Not purely synthetic though the fiber is made artificially, the base material is cellulose, often used in linings.
If I iron it again, all is gone I guess, so I will never iron it ;-).
Will try again with polyester and pebbles before the end of October!

Sunday, October 14, 2012

3-D Polyester Scarf

I bought this dress at Goodwill because I loved the polka dot polyester sheer.

I cut the dress round and round to make a ribbon/scarf that was about 10 ft by 4 inches.  I used a heat tool  to cut the polyester so I would not have to worry about raw edges.  (Of course I have heat tools!  Check out the title of the blog!  LOL)

I then used by crazy ninja ...er...shibori binding skills and bound various sizes of buttons into the scarf.

I coiled, boiled, iced, then sliced the binding.  Here is the result.
And a couple pictures of close-ups of the texture.


Judith


Sunday, October 7, 2012

What happened when I tried

 These are what I wanted to use but I was afraid that the plunge from boiling water to ice water would shatter my glass eggs and rocks.
 So I opted for plastic buttons most well over 50 years old.
 This was the fabric I choose hoping it WAS polyester. I couldn't think of anything else it could be. This was organza from Joanns. Joann has tons of polyester. I even got satin polyester for the transperse dyeing.

 wrapped buttons and I thought why not wrap the excess too.


This is in the pot of boiling water but again I was afraid the fabric floating on top wouldn't get hot enough so I popped the steamer on top to hold the fabric under water.


Ice water
 one side  -  swish then
the other side. Left it in the ice water an hour (because I was working on two projects at once.
 draining on a towel.
 unwrapped
 close-up
All in all I love the result. Thanks Nienke for an excellent challenge.

Tuesday, October 2, 2012

A brief flash back to painting with thickened dye

I was browsing my blog list today and came across a couple of posts by Constance Rose on painting with thickened dye.  They are **MY** type of painting, meaning just color on fabric.  I thought you might enjoy checking them out if you have not already seen them.

Painting with Dye 1 and Painting with Dye 2

Judith

Monday, October 1, 2012

3D Shibori on Polyester


The first time I read about 3D Shibori on Polyester Fabric was in the Australian magazin Embellish, issue no 4 - 2010. The complicated title caught my attention but even more, the amazing pictures! Had to try it myself, so why not join me, during the month October as I will be the host for a new Fire-experiment?

First of all, I found an old, 100% polyester scarf, with a nice polka-dot, so I used my shibori binding skills to ty in marbles. With cotton crochet yarn, start to wrap making sure you wind over the beginning thread to secure it. After 3 or 4 windings, do not cut the thread but just go to the next point and repeat the process. It will be so much easier to undo later on:


Then we set it on fire ;-): boil the prepared fabric for 15 to 30 minutes. And if I say boil, I do mean BOIL, with bubbles. Reshaping polyester is permanent when it is heated!


Once boiled, the fabric is plunged into cold water to cool it down before undoing the shibori tie. Please make sure to do so, before you unwrap the marbles! The fabric does not have to be dry, but it should be cold.

And voila, the final result is a permanent 3D texture, which is so intriguing:


Next to marbles, you can also ty in coins or buttons, my second try:


 Oops, better not use coppercoins:


But the shadowplay is so nice in white!

Third try, a piece of leftover polyester fabric, nicely printed in soft colours:


I love this piece of sea anemone (please enlarge it to see it in full):


Polyester is hard to dye with procion MX, I know, but I had to try it, my fourth try, the greyish tone is the best I got:


I might be more successfull by using disperse dyes. Will try that next weekend. Autumn is coming in the Netherlands, making a nice scarf is a good reason to spend extra time in the studio! Don´t you urgently need a new scarf?